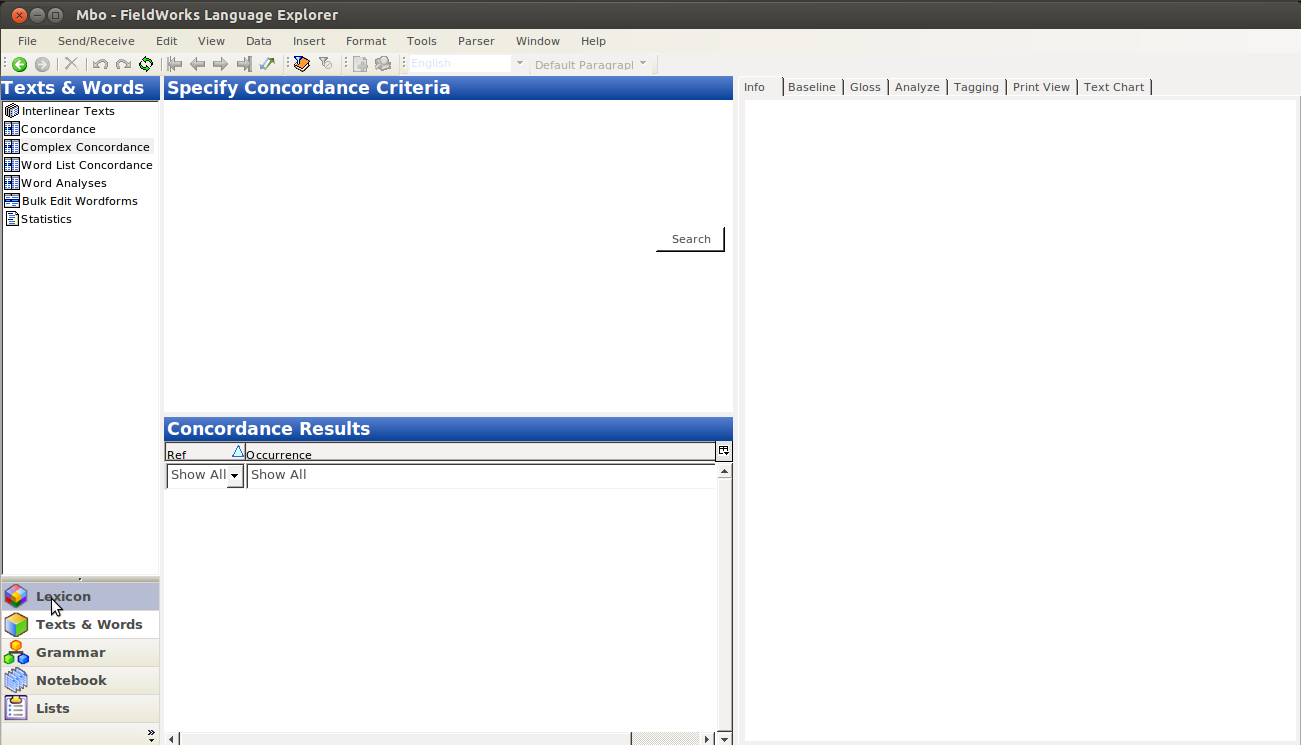
I blogged before (a decade ago!) about adding new tasks to WeSay, and just today was setting up someone, and realized I’d missed documenting something.
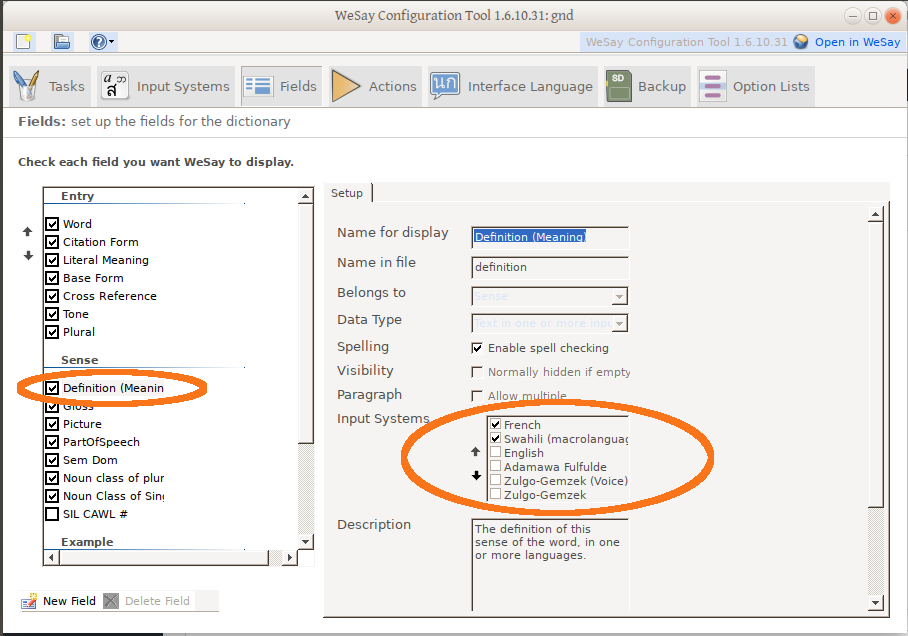
Typically we assume settings in <lift file base name>.WeSayConfig determine things, but not for the SIL Comparative African Wordlist (SILCAWL). That is, the ‘en’ value here doesn’t do anything:
In the config tool under the SIL-CALW wordlist Task, it says:
WeSay will use the top-most input system of the definition field to choose the prompting language (only English and French are available at this time).
This “top-most”, critically, is the topmost language in the settings for the definition field, here:
If you don’t have a language selected that is actually in your lift database (the wordlist you are trying to fill out), you will get this errorː
So to elicit in a language other then English or French, make sure that is in the lexeme-unit/form field in your lift database.
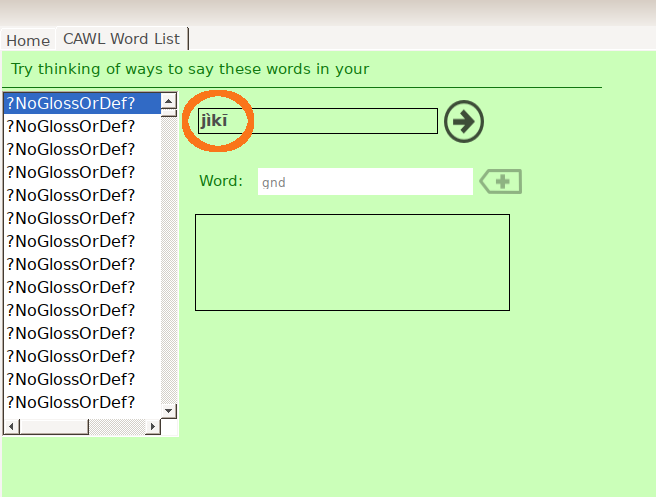
If you have other gloss languages (like Hausa) in your LIFT database, you can elicit from those, too —so long as a lexeme-unit/form language isn’t also selected in the definition input languages. But note that the interface isn’t as pretty (pay attention to the red circled area, not the long list of ?NoGlossOrDef? values…
I Think I finished a new feature today, complete with a settings page for the user to make it work.
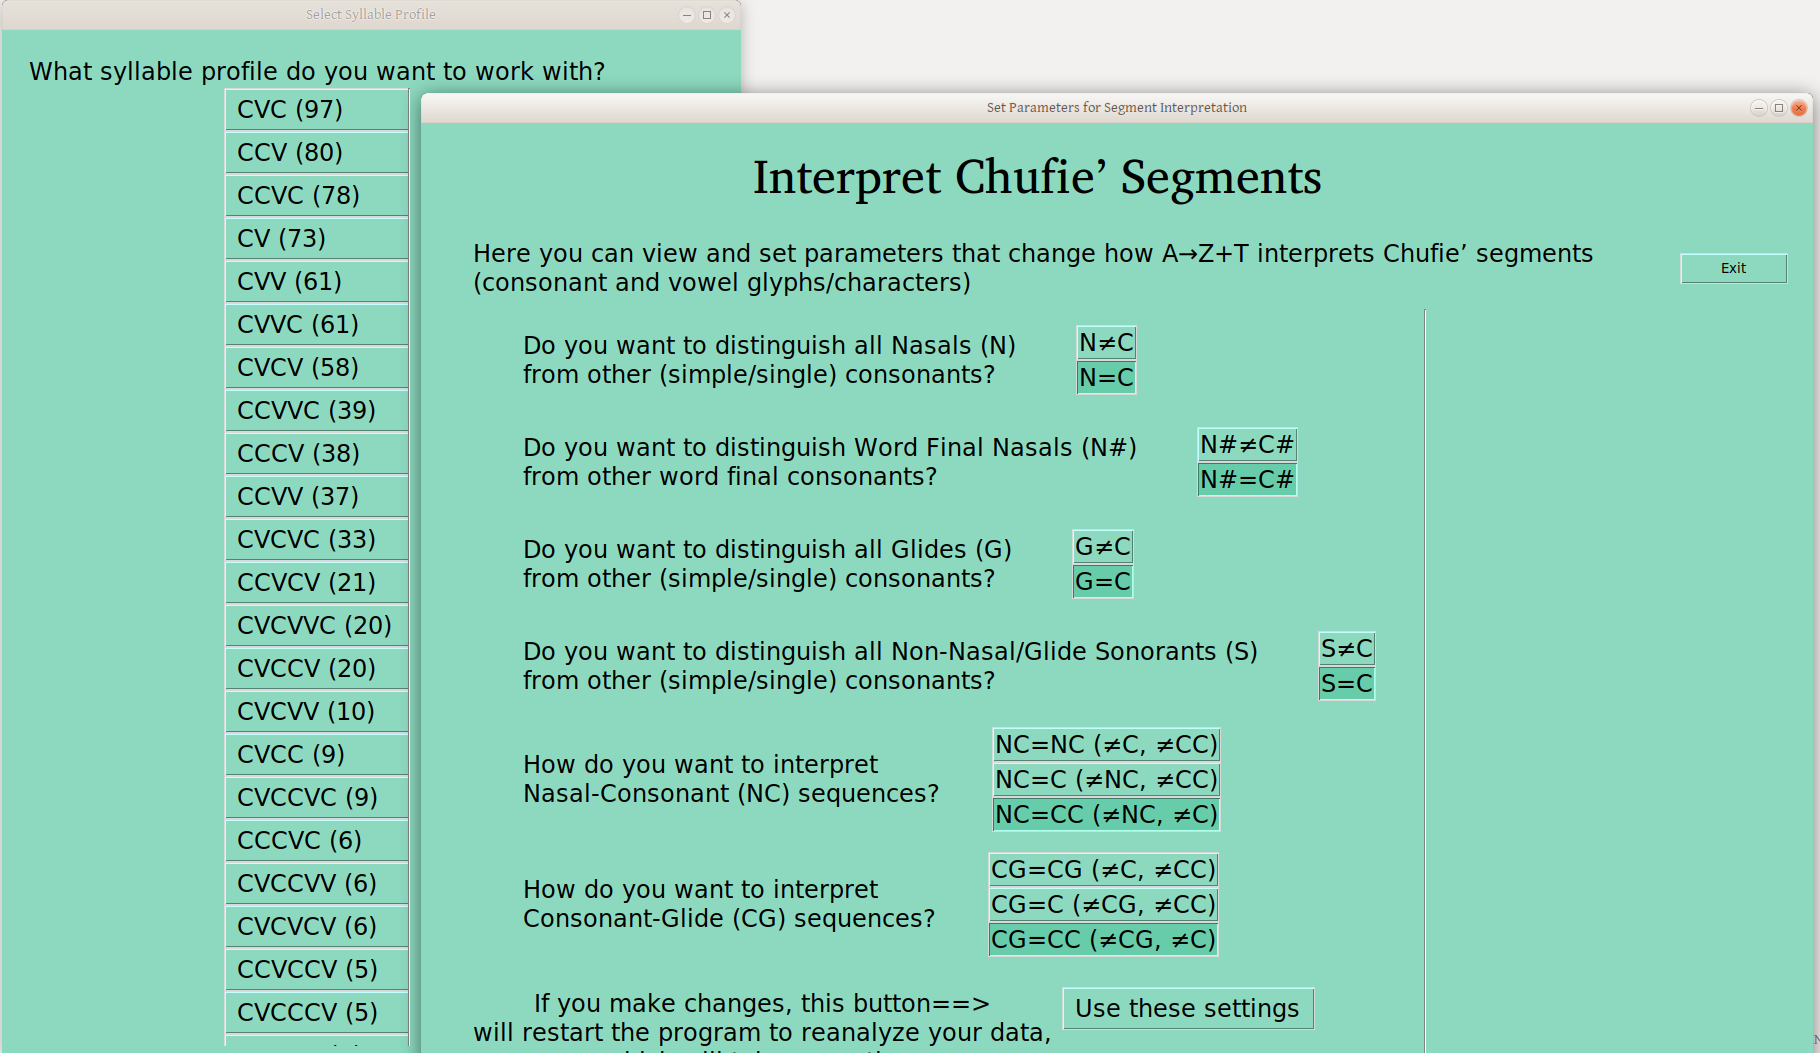
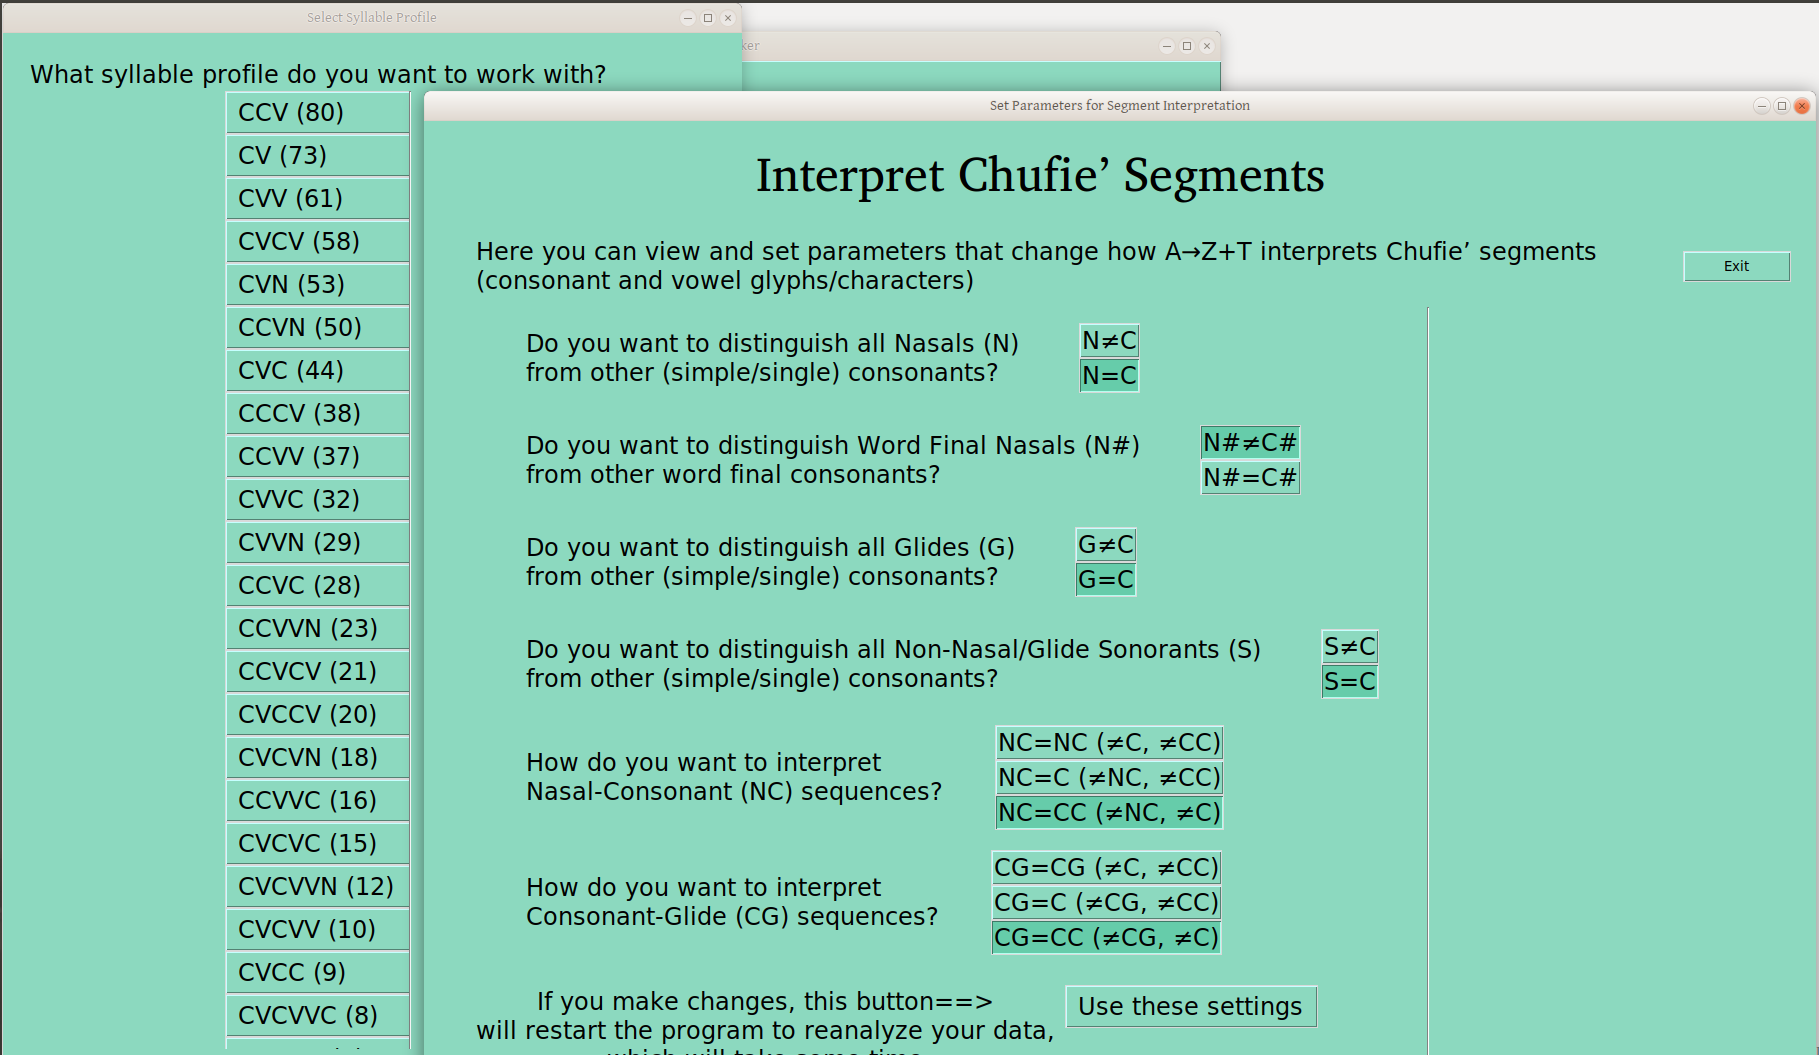
The question of segment interpretation has been an issue almost everywhere I’ve worked, and it is often a highly idiosyncratic (or language specific, as you like) thing. So I’ve set out four boolean settings (yes/no, True/False), which govern whether a given segment type is treated as a regular consonant, or separately from other C’s, in the syllable profile analysis:
N – Nasals, generally (or only word finally)
G – Glides/semivowels
S – Other sonorants (i.e., not the above)
In addition to this setting, there are also some segment combinations that could be treated separately:
NC – Nasal-Consonant sequences
CG – Consonant-Glide Sequences
That’s all for now, but the infrastructure is there, so if anyone REALLY needed something else, we could talk about it.
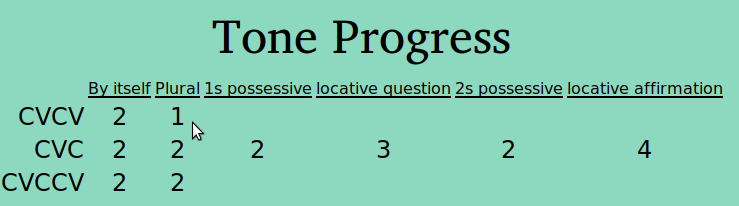
The following slides show the options for syllable profiles, after analysis given the settings as on the page (which shows current settings on open).
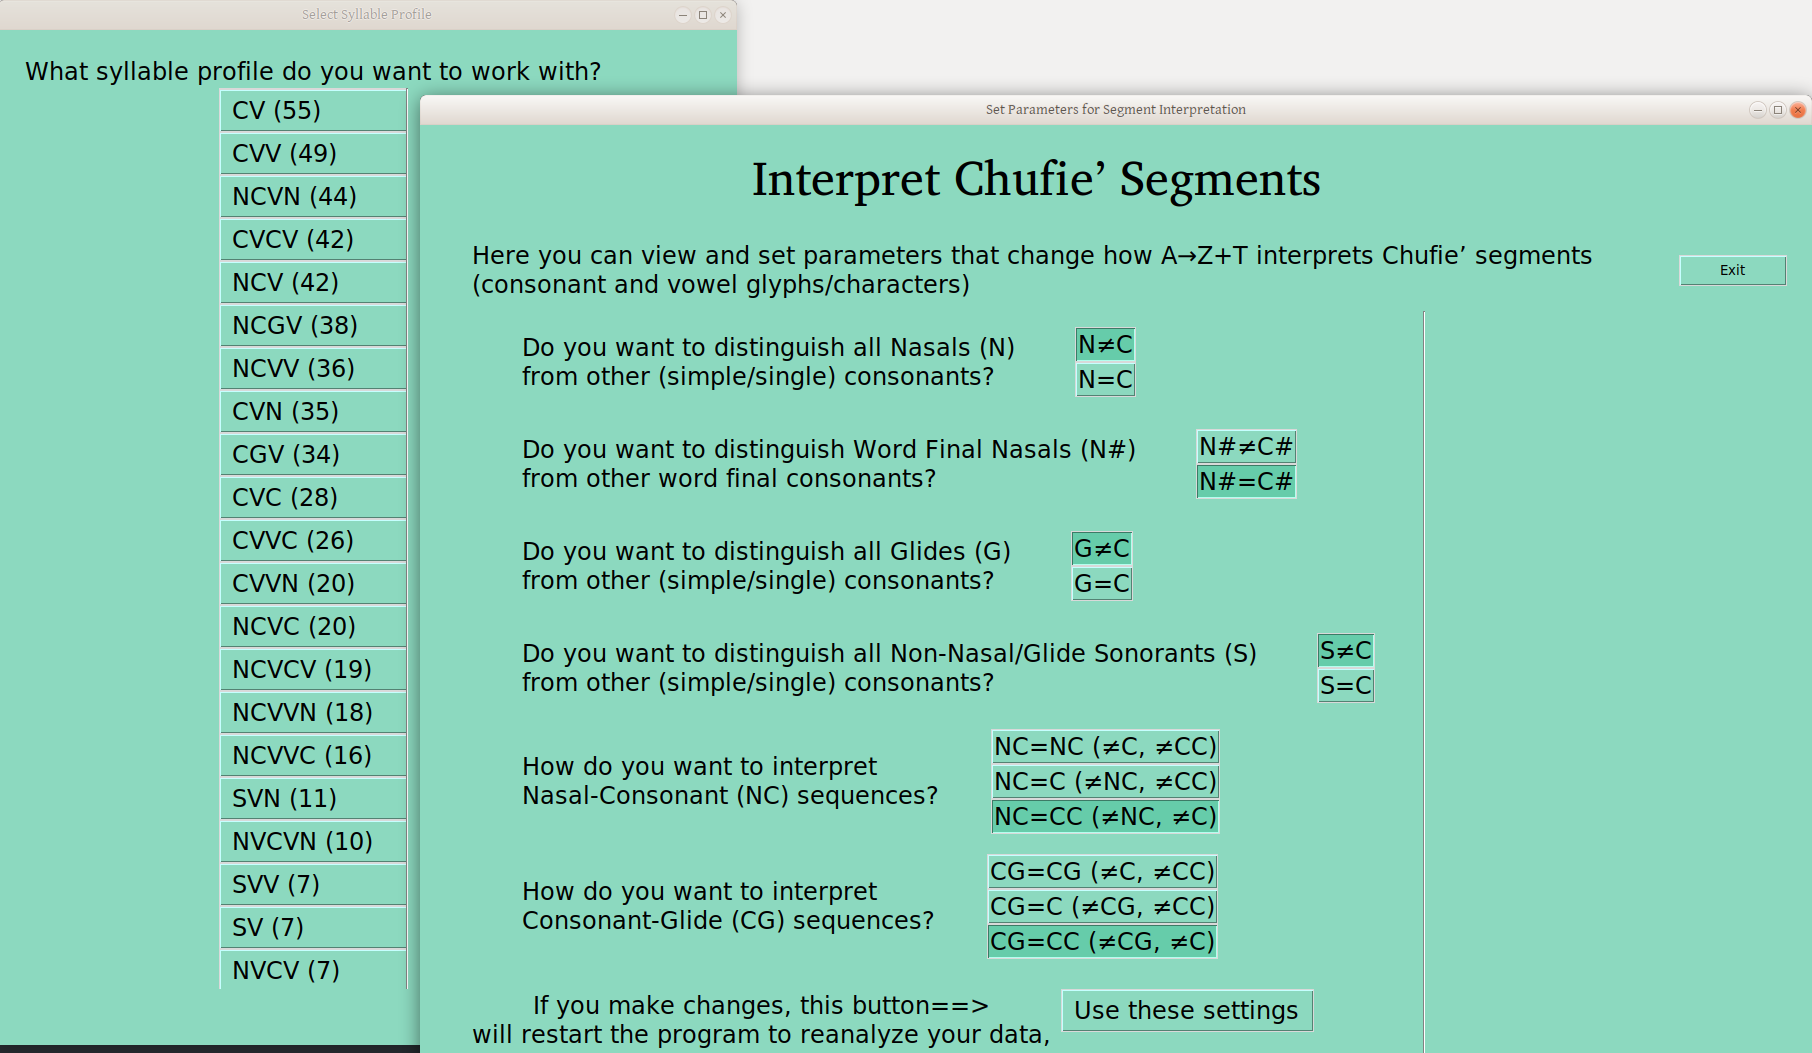
Default Operation
On first open, everything is a C, and no CC sequences are collapsed:
Note the number of each syllable profile, which are sorted with the largest on the top, and how quickly they taper off. I’ve always appreciated being able to do a quick syllable profile analysis, so this is nice. Good to know which are your more canonical forms (e.g., CVC and CCV here) and which are not (e.g., CCVCCV and CVCCCV here).
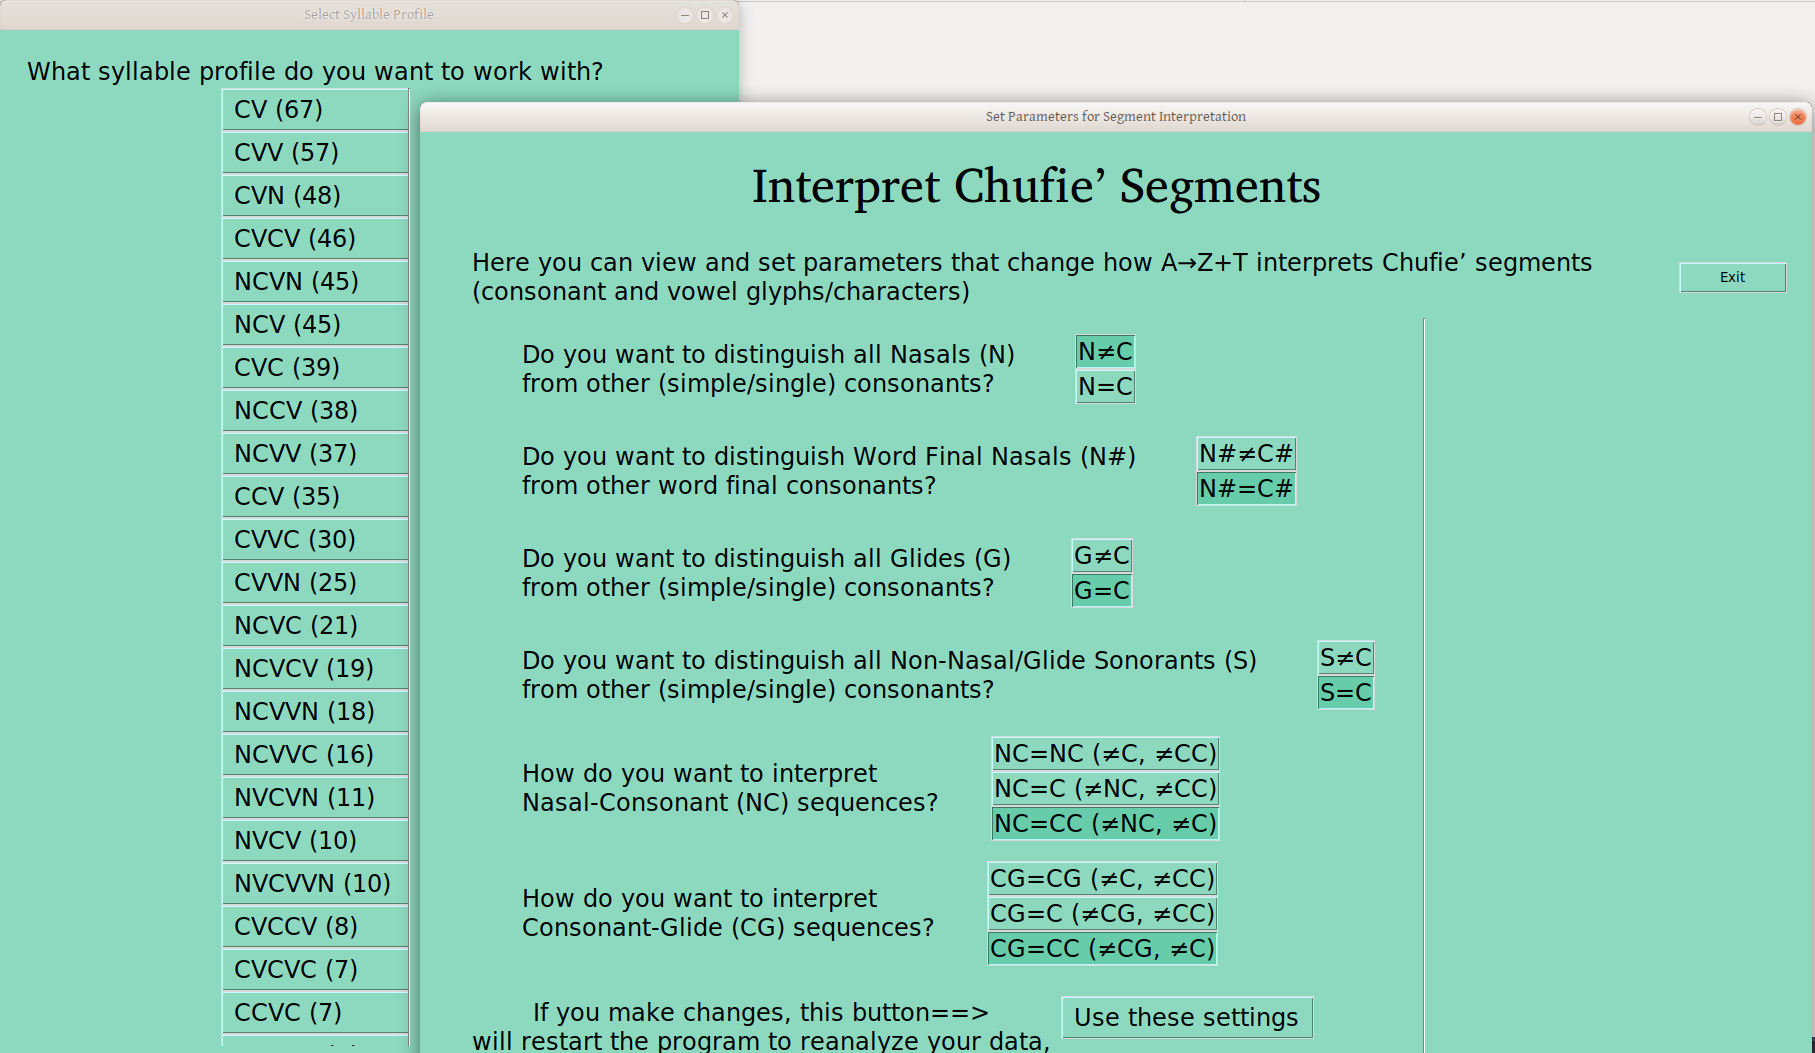
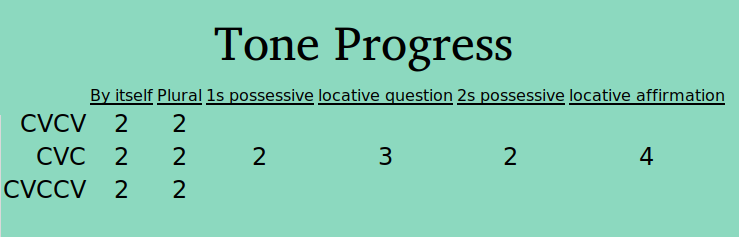
Distinguishing Segments by Type
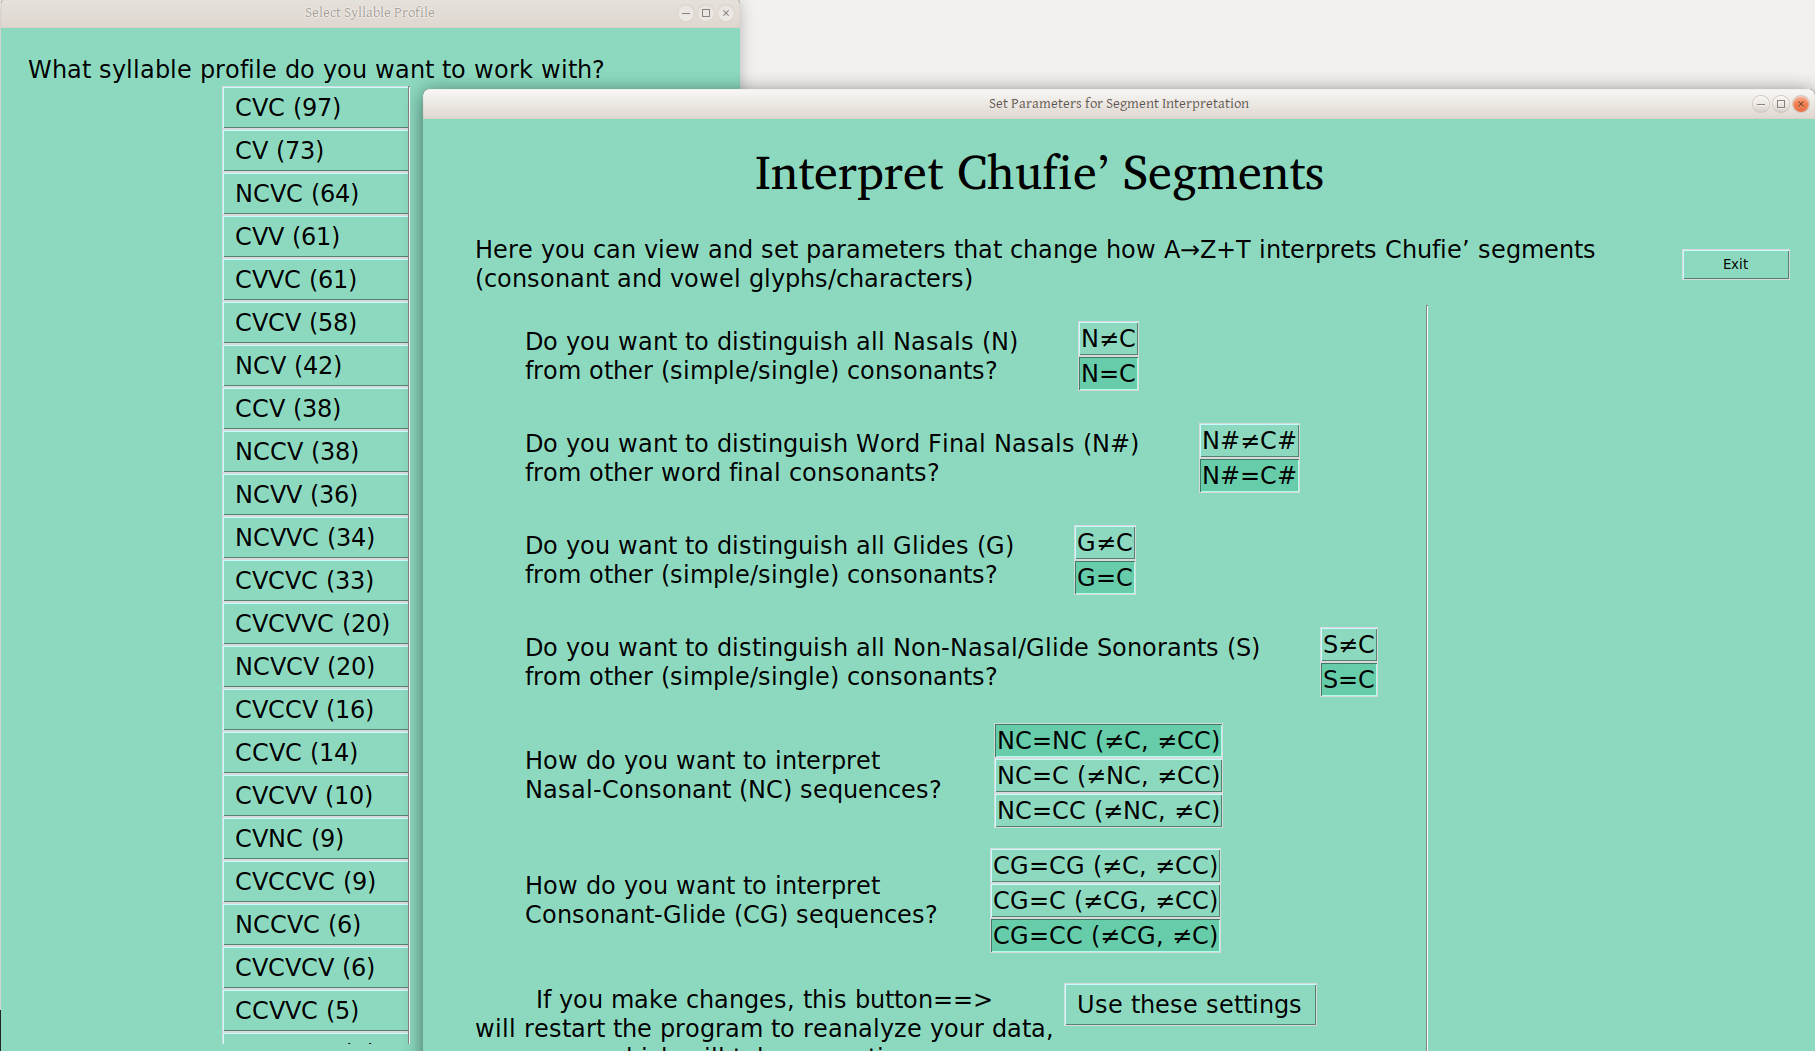
By toggling the various settings (then hitting “Use these settings”, after noting the warning that this will trigger a data reanalysis), you can get other analyses. For instance, if you set N≠C, then you get the following (All nasals are distinct from other consonants, wherever they appear):
Or, you can just distinguish nasals only word finally:
In case it isn’t obvious, there is a clear practical trade off to these selections. That is, the more distinctions you make, the smaller your groups become, from max 97 in this case, to 80 or 67, as the number of distinctions increase. So one is typically advised to use the distinctions important in the language (as soon as those are known!), and keep everything else together —hence the number of distinctions I’m offering.
And of course, you can distinguish both glides and nasals at the same time:
And even sonorants, too:
Distinguishing Sequences of Segment Types
The other kind of setting on this page has to do with sequences of particular segment types. That is, should NC be interpreted as such, the same as other CC sequences, or as a single C (all of which I’ve heard people want)? One advantage of this setting is that one can get NC sequences marked as such, without otherwise distinguishing nasals (as in the first two settings):
One can do the same for CG, resulting also in NCG sequences in syllable profiles:
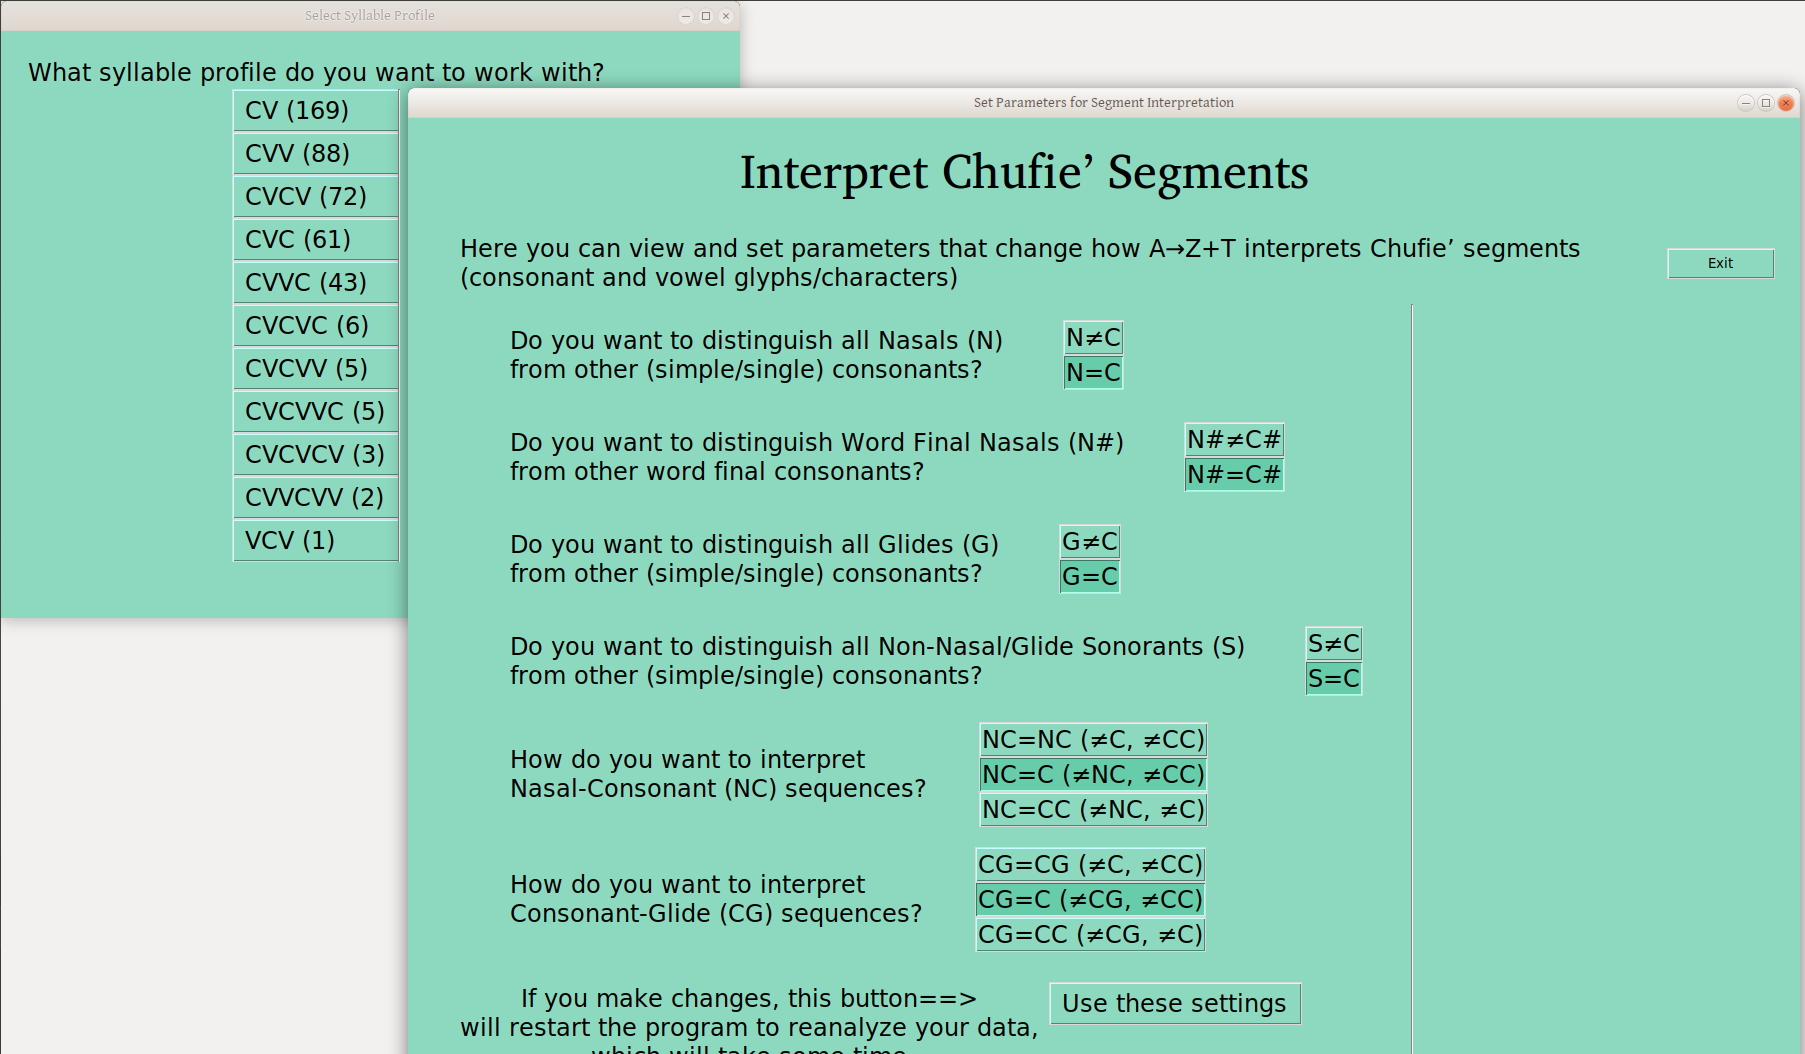
For these two settings, one can leave the default CC interpretation, or specify NC or CG as above, but one can also set either (or both) to just C, so these sequences lump together with other C’s in the profiles (I assume when appropriate for the language!), as here:
Note that this lumping greatly increases your group sizes, and reduces your number of groups, which can help a lot in the analysis —though again you want to be sure that this is appropriate. If you don’t know why it would or wouldn’t be, it probably isn’t.
Summary
Anyway, now as you go to sort words by surface tone pattern in various contexts, you can group words with certain segment types together or apart, as appropriate for the language, and work with the appropriate groups as you sort for tone. This will be available in version 0.5 of A→Z+T.
When I wrote earlier, I realized I probably was sending out a firehose of information. I really was just trying to get some feedback on the UI, but I realize a lot of people (based on responses) would have appreciated a bit more context on what we’re doing. So I’ll try to lay out things a bit more peacemeal here, and hopefully in future blog posts.
One thing that I’ve thought from the beginning is that the participatory methods I learned depend heavily on being able to fix things. We assume mistakes will be made, so we build into the method ways to check and fix things.
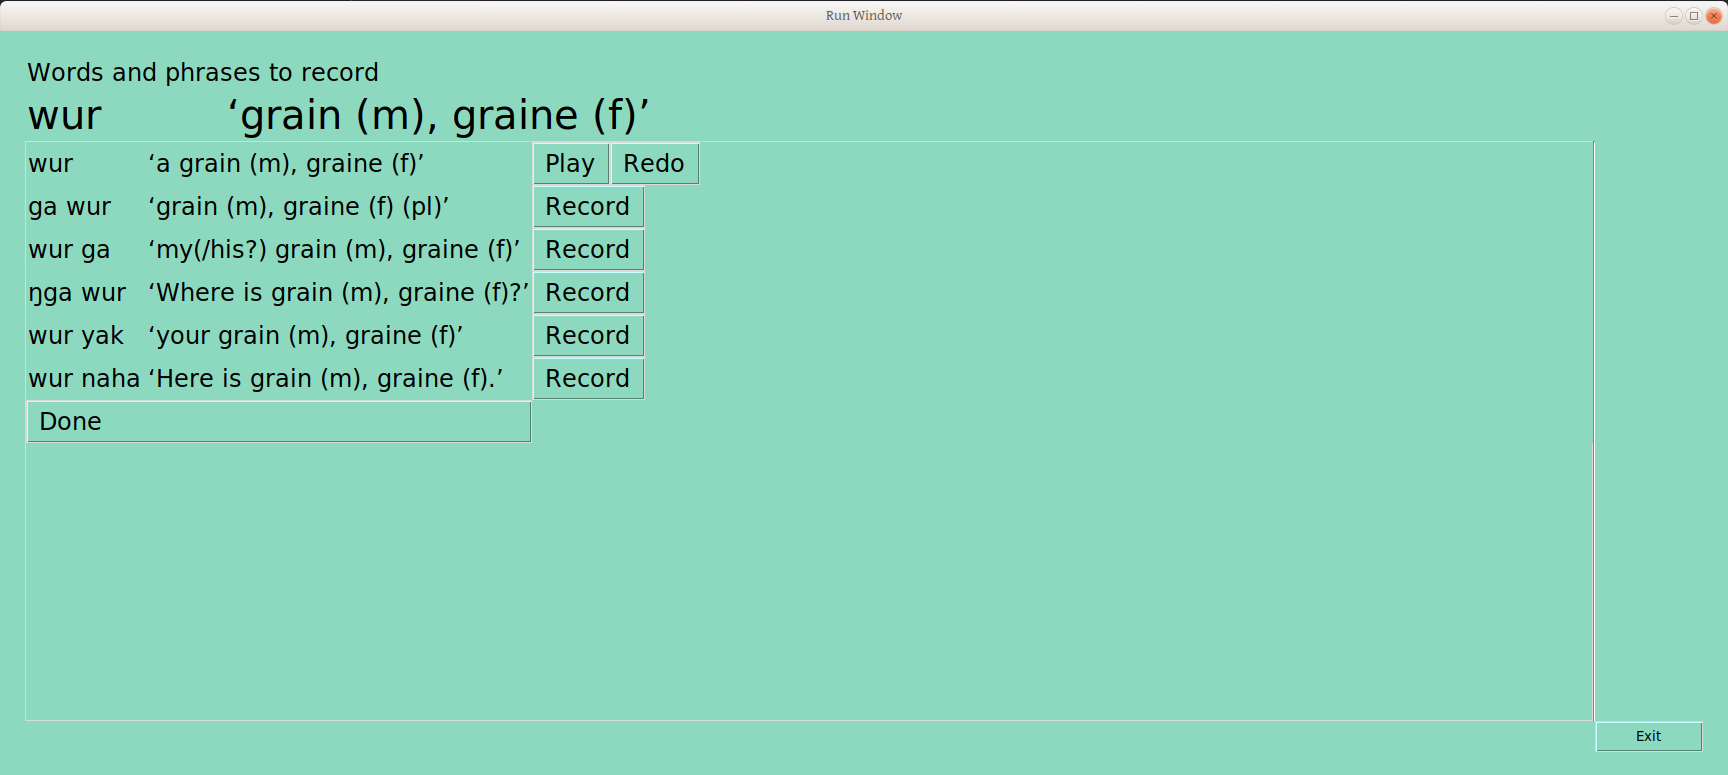
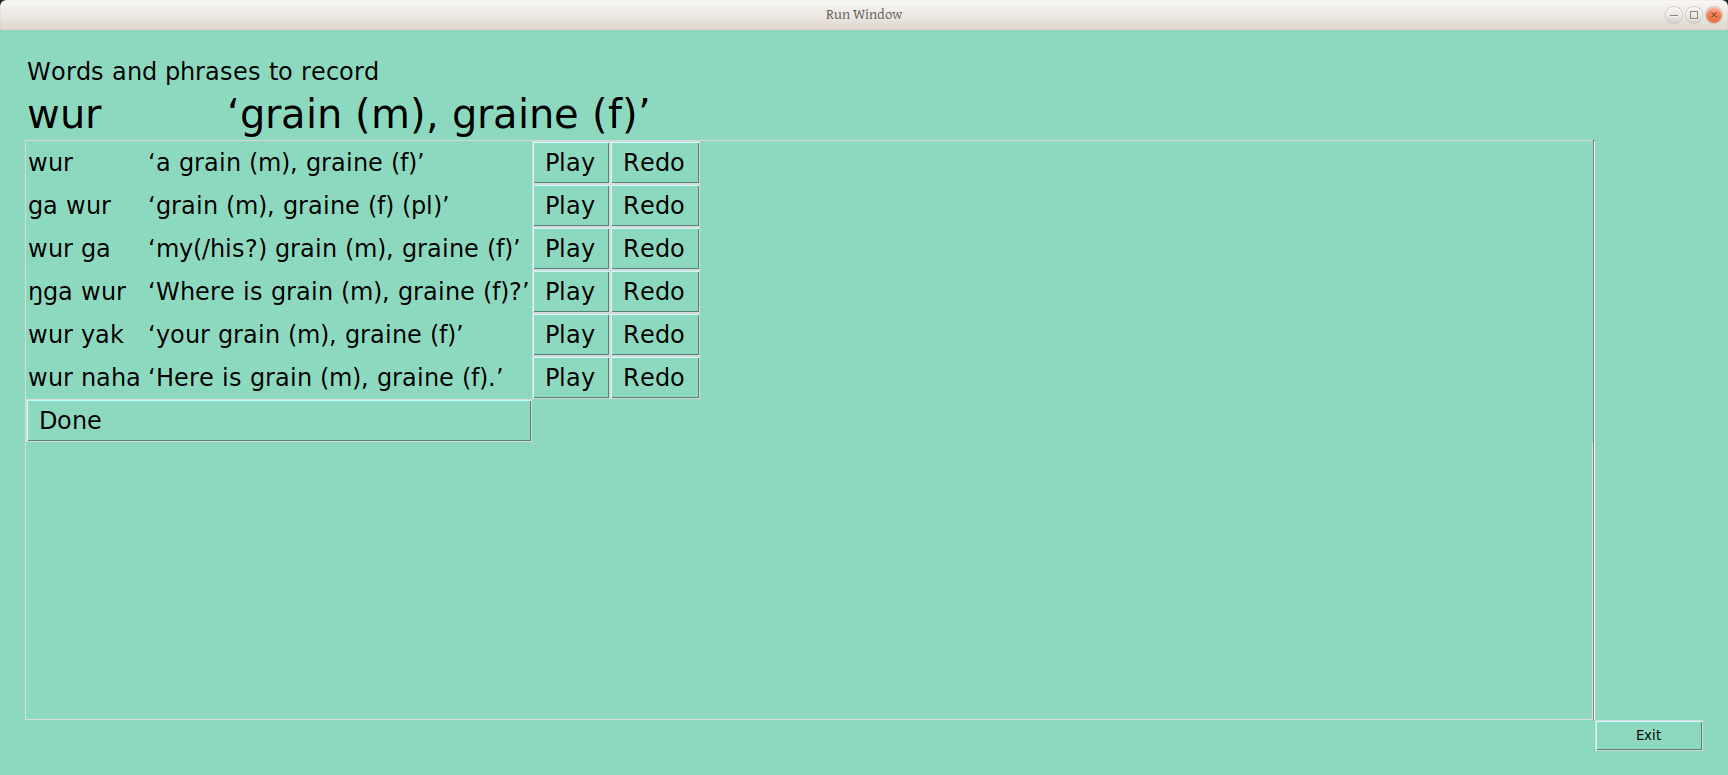
For recording, there is a simple three button method for taking the recording of a framed word with a Click-Speak-Release work flow, like in WeSay and FLEx. On release of the record button, a number of things happen:
Under the hood:
The recording is written to file with a (long!) meaningful filename, including syllable profile, part of speach, guid and gloss. This enables better searching of a pile of files, with whatever operating system tools you have for doing that.
The filename is added to the LIFT file in the appropriate place for an audio writing system (as used in FLEx and WeSay), so it is immediately available in any tool that reads LIFT.
Visible changes:
The record button disappears, and is replaced by play and redo buttons. This allows the user to immediately hear what was just recorded, and approve it before going on. Or, to click redo, and do another take. In beta testing, there were lots of reasons do to this, including noise in the room, weirdness of sound cards starting and stopping recording, and users getting used to how to click and speak in syncrony, without excessive delays, while getting the whole utterance.
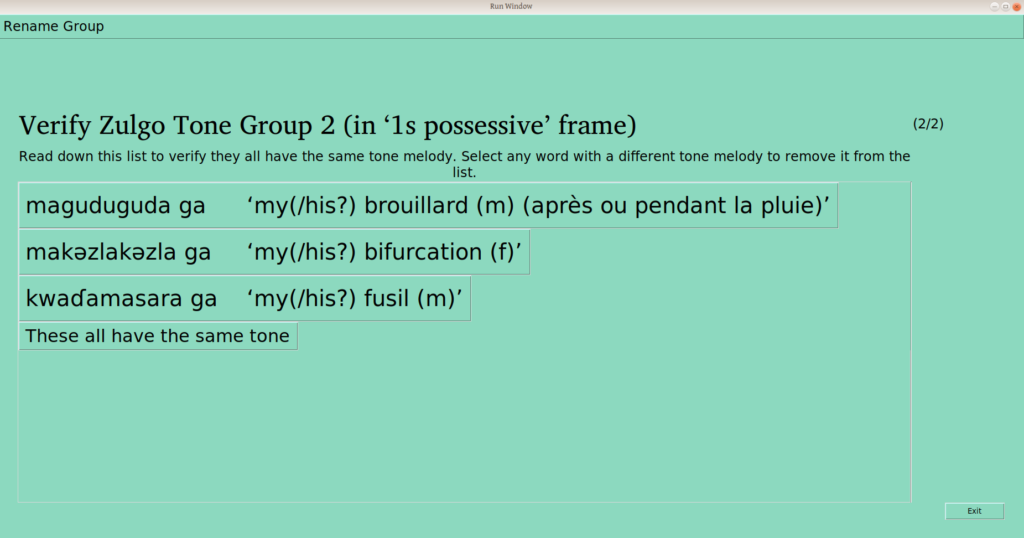
So since before writing this, one questions I’ve gotten a number of times is why tone groups are just called 1, 2, and 3, etc. This was somewhat intentional, as I think it is healthy (both for the computer tool, and for the linguist) to remain agnostic of the value of sortings, until “same/different” piles are established. But while I stand by that statement at least initially, I recognize that most people are ultimately going to want to give even surface groupings some kind of descriptive names, and it would be nice for this tool to handle that.
So I decided to give myself a gift and implement this feature, and this is what I came up with:
The verify surface tone group page now has a “rename group” menu in the upper left, which when clicked on, provides the following very simple entry window:
I’ve given my position on how these labels should go, but you can of course call it ‘H’, ‘High’, or ‘Rocky Mountain High’, as you like. Analytically, though, I hope you get that giving any label at this point that implies an underlying form value would be inappropriate, as we are sorting on surface form here.
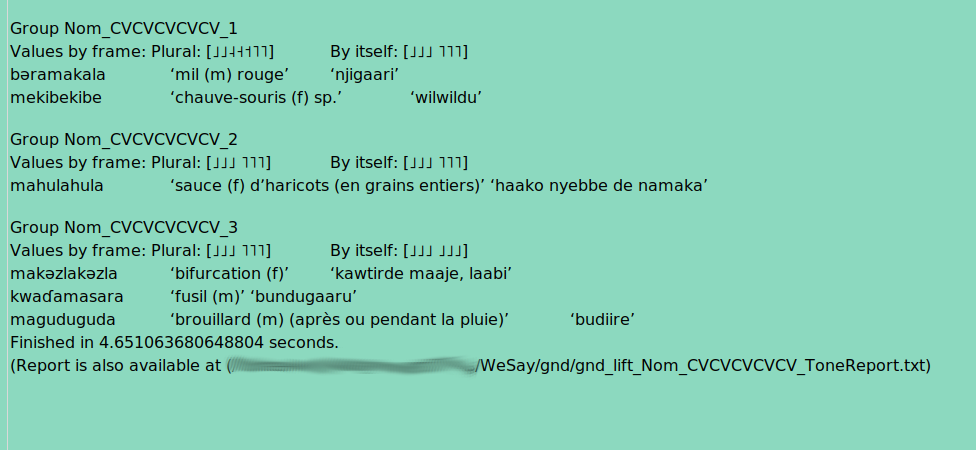
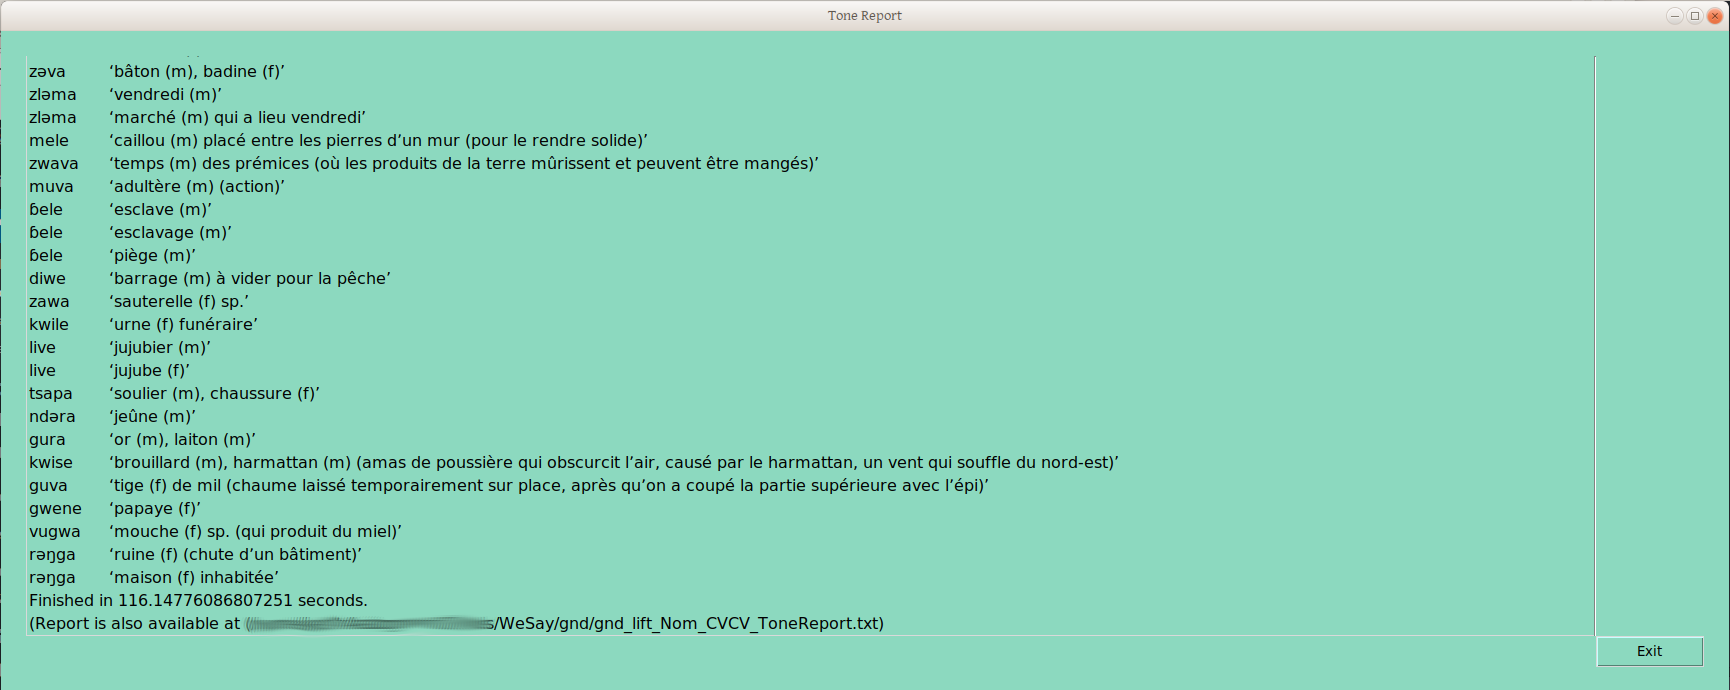
This name is then picked up in the tone report, providing more interesting results:
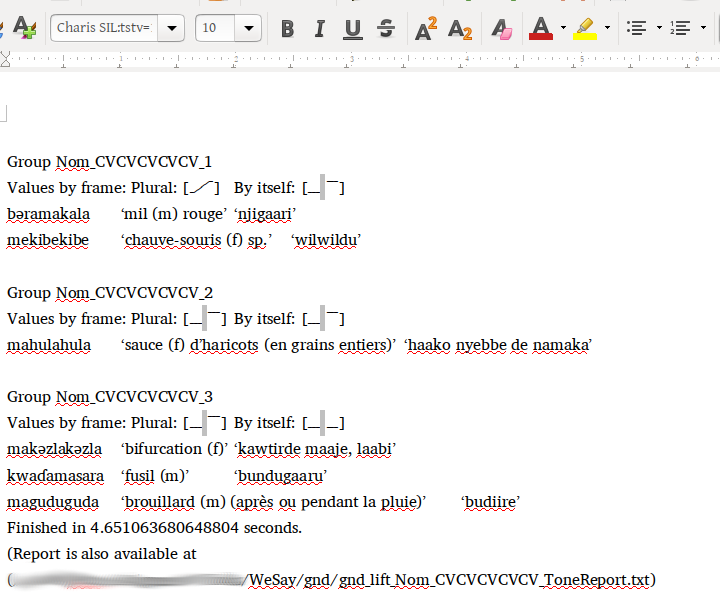
In fortunately, I haven’t figured out how to display fonts with graphite features (yet, anyone?), but fortunately these are just standard unicode points, so the text file output can be given a nicer font specification when viewed in LibreOffice, as usual:
And of course, wherever else you import this text, will be able to handle graphite font features, right? :-)
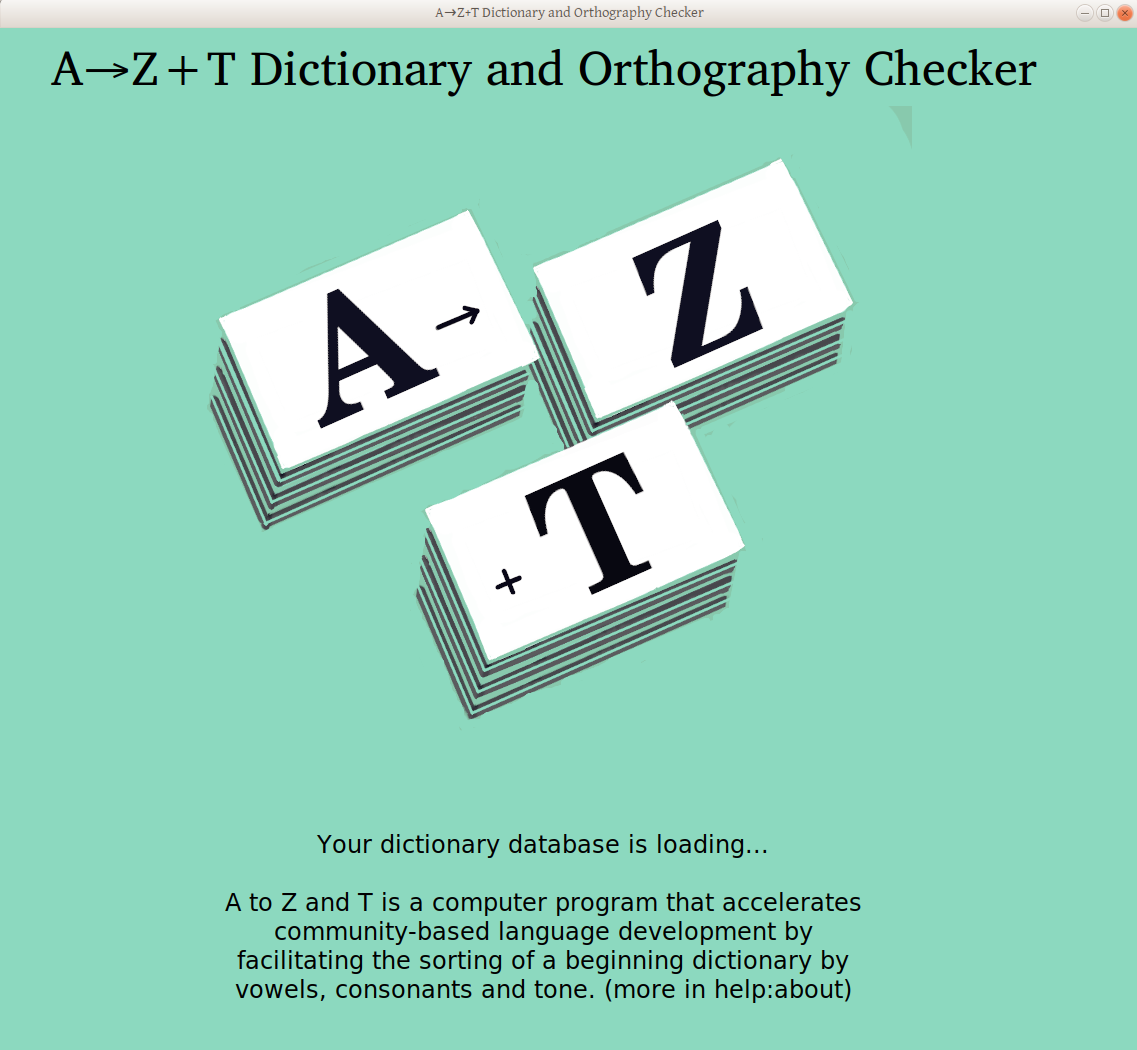
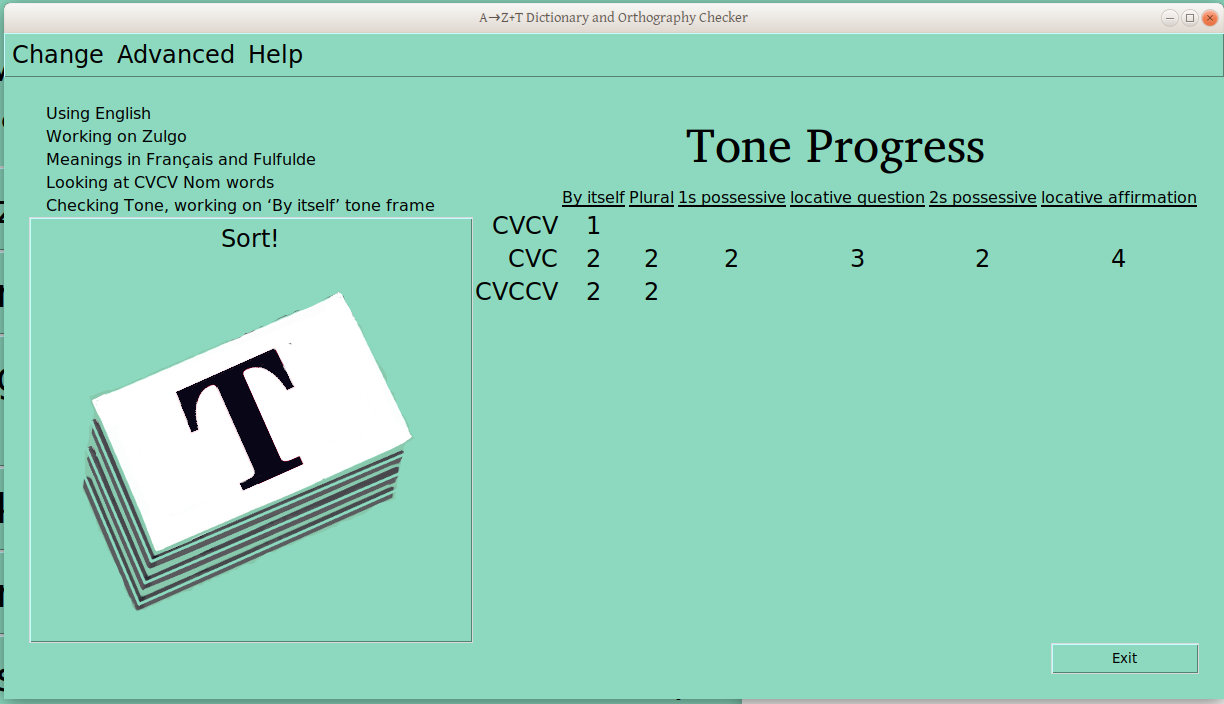
I’ve written before (here and here —yes, not quite a decade ago!) about the need for a tool to collect data for my work in sound system analysis (phonology). This year, I decided to stop waiting for someone else to do this for me. So learned Python and Tkinter, and I now have a draft tool, that I’m going to try out in a live work environment next week. Here is a screenshot of the splash screen:
The database it refers to is a Lexical Interchange FormaT (LIFT) database, which allows collaboration with those using other tools that can read LIFT (e.g., FLEx, WeSay, and LexiquePro), as well as archiving online (e.g. at languagedepot.org). Once it loads (1.5 sec, unless it takes 3 minutes to reanalyze syllable profiles), you get the following status field:
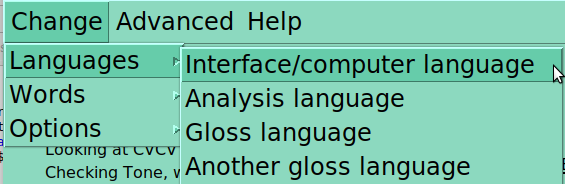
Menus
This window has a number of menus, which are intentionally hidden a bit, as the user shouldn’t have to use them much/at all. One can change which language is used for the program (Currently English and French, other translations welcome!), which is being analyzed, and one or two gloss languages (these last options depend on what is actually in the database):
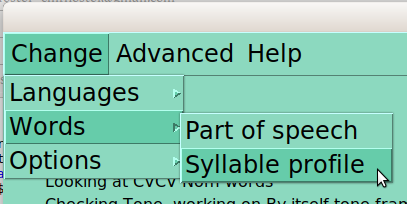
One can also change the words being looked at in a given moment. The primary search parameters are part of speech (indicated in the dictionary database) and syllable profile (analyzed by this program).
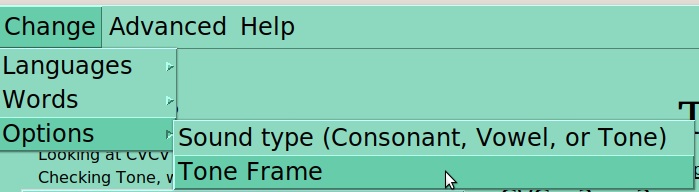
Once the group of words to be studied is selected (based on part of speech and syllable profile), The third section of the basic menu lists options relevant to that group:
Many of these options are only meaningful when another is selected. For instance, “sound type” must be selected for ‘Tone’, before you can select which tone frame you want to use. Similarly, if you are looking at CVC nouns, you won’t see V2 or V1=V2 as options!
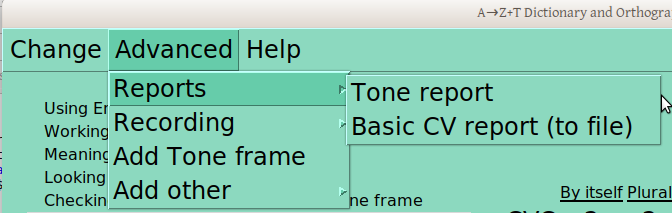
The basic function of presenting and recording card sorting judgements can be done on the basis of this first menu alone. But other functions require a bit more work, either running reports or changing something most people shouldn’t. So in the Advanced menu, you can ask for a tone report (more on that later), or a basic report of CVs (not really doing much right now).
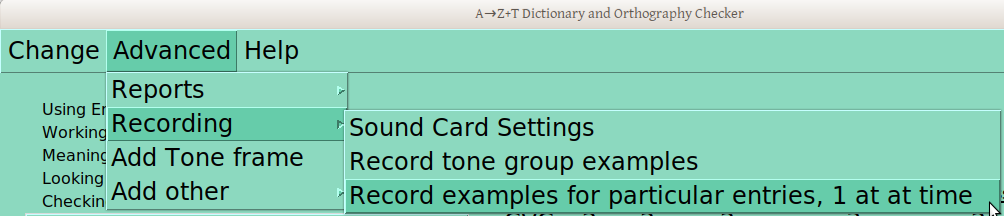
You can also record, with one window to let you test your system, another pulls automatically from draft underlying tone groups (more later!), and the third allows you to specify words by dictionary ID in a separate file, if you want to record a specific set of words that aren’t otherwise being picked up:
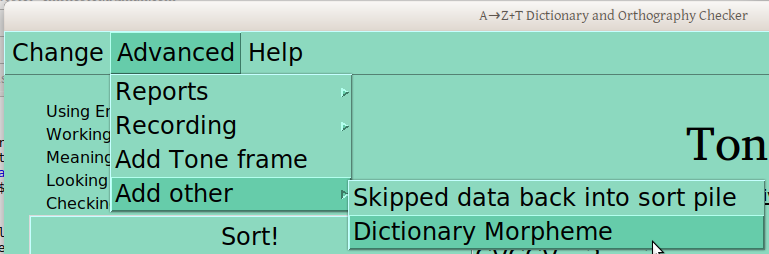
This Advanced menu also gives you access to the window where you can define a new tone frame. And another lets you add stuff, like a word you find wasn’t in your database but should be, or a group of words you skipped (more on that later).
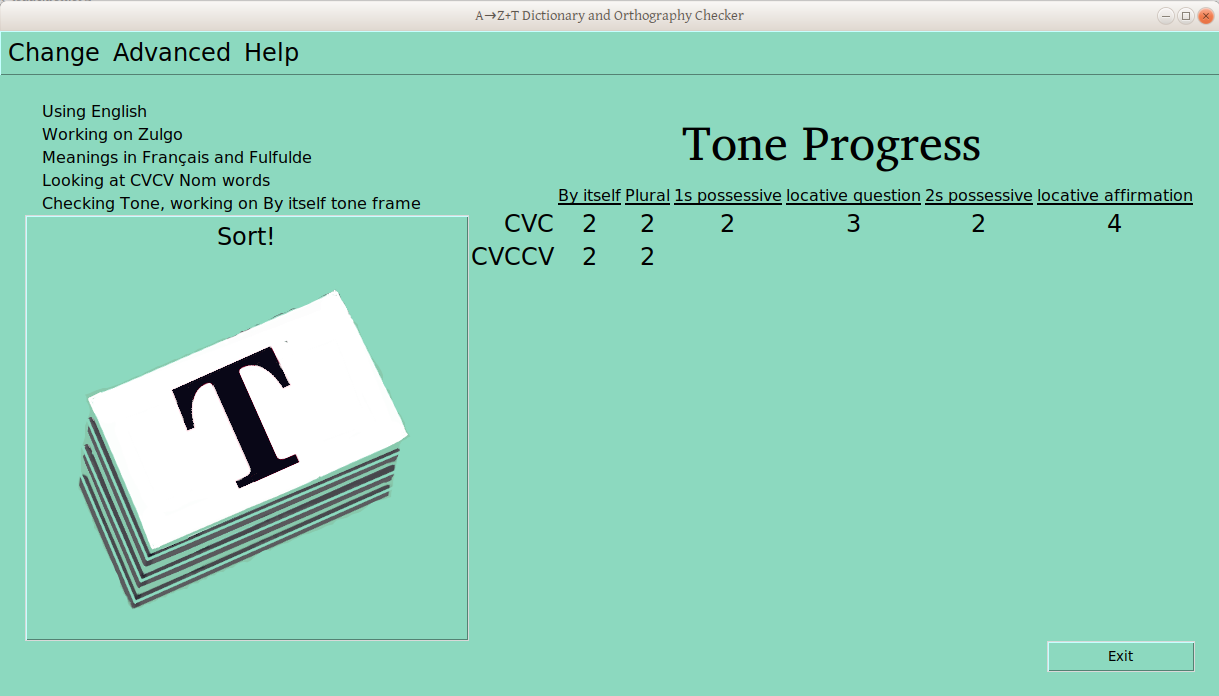
Status indicators
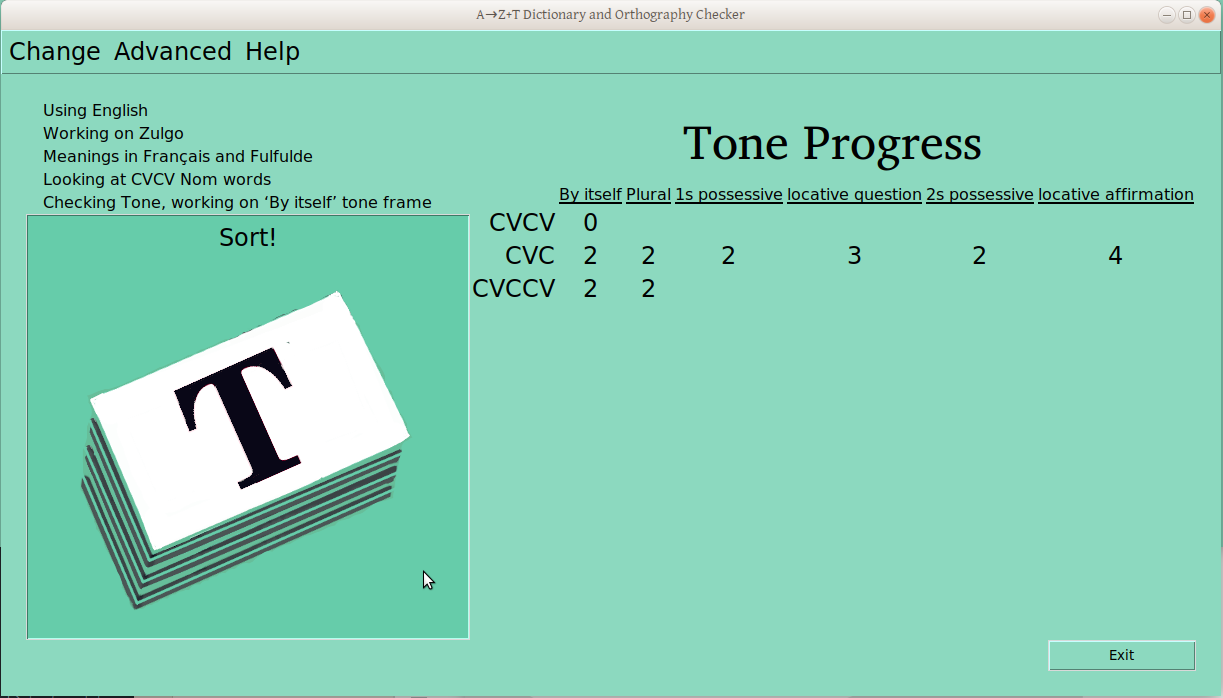
As you make whatever changes you like through these menus and the windows the provide, the current status is reflected in the screen, as below:
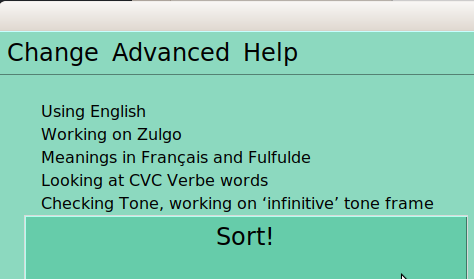
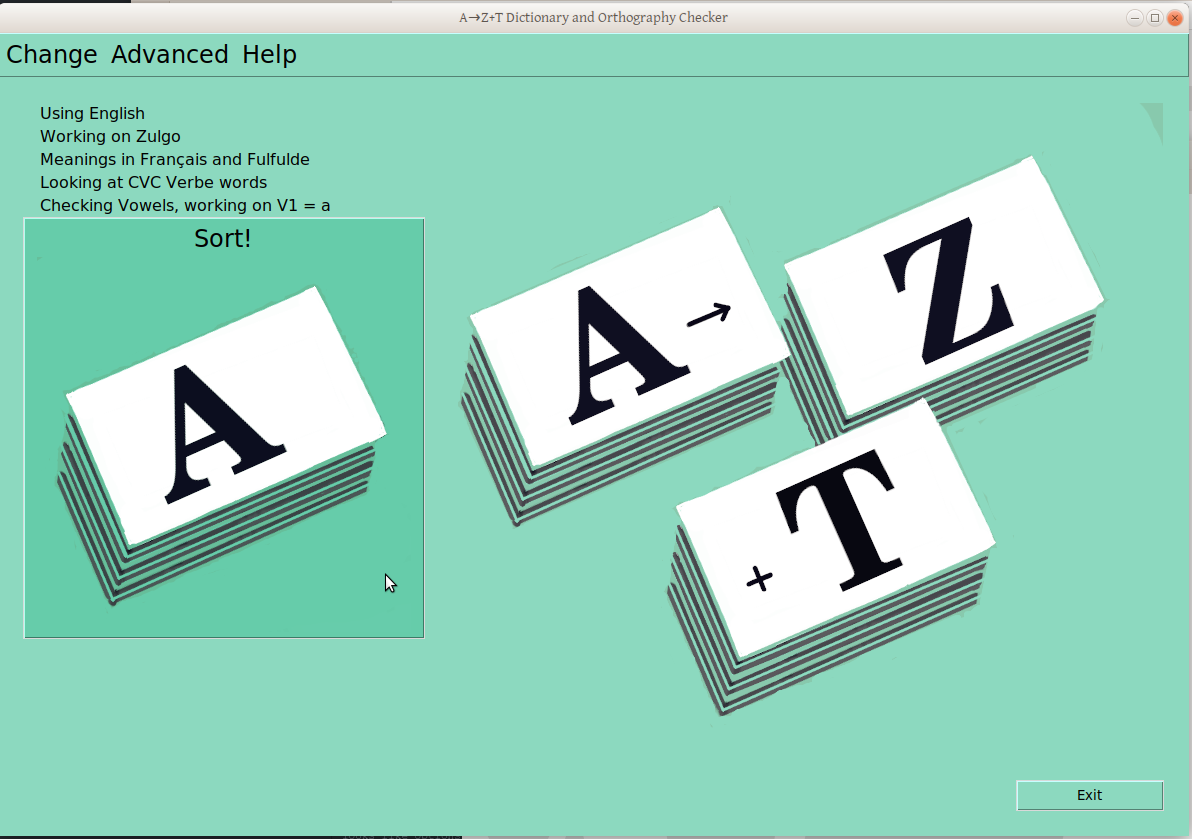
This is now looking at CVC Verbs (not CVCV Nouns, as above, and we’re now looking at the infinitive frame (not the nominal “By Itself” frame).
If your preference is for Vowels (no accounting for taste; it happens), you’ll also get an “A” card on the big “Sort!” button, just to be clear we’re working on Vowels now:
But the Vowel sorting is not so advanced as the tone one at this point; it mainly lets you look at lists of data under different filters:
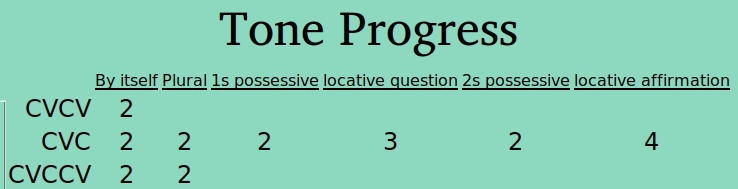
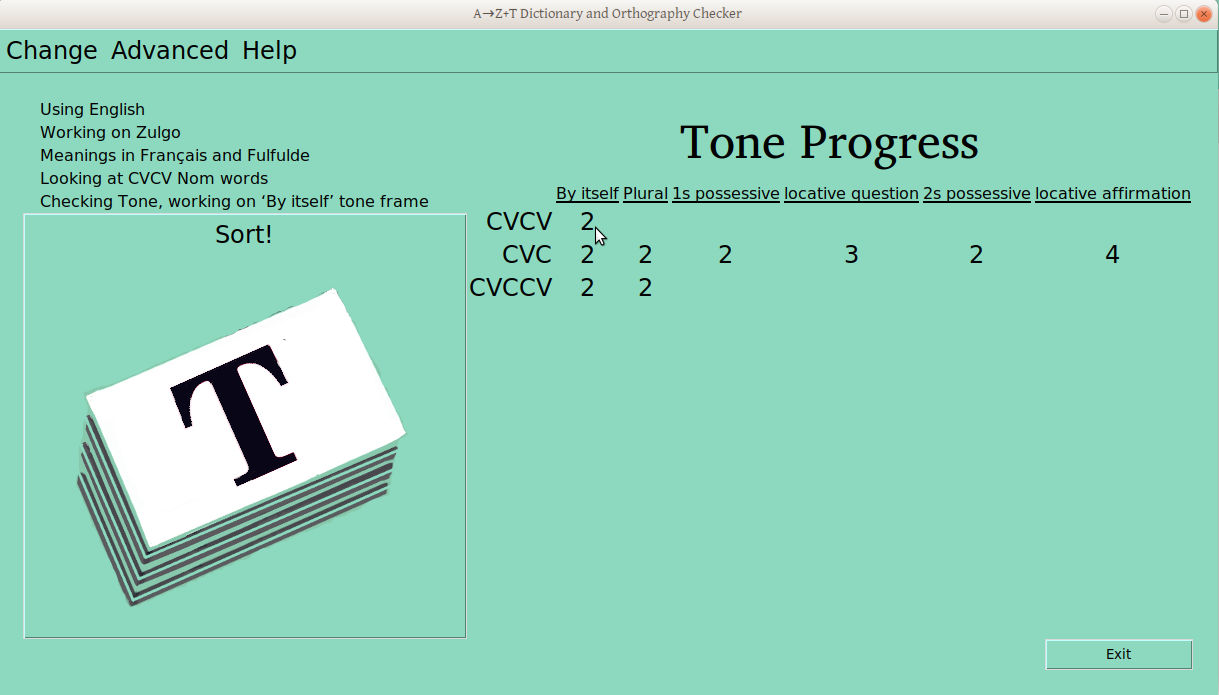
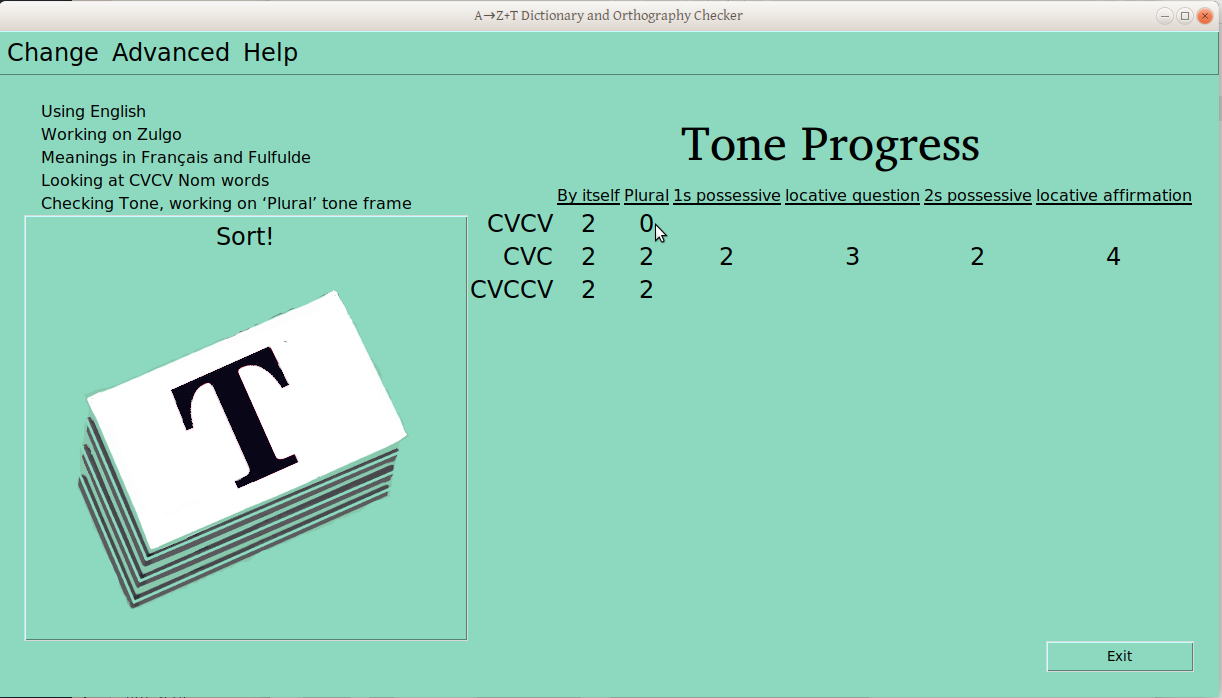
Once the verification process has started for a ps-profile combination (e.g., CVCV Nouns), the number of verified groups is displayed in the progress table:
No verified groups for CVCV nouns in “By Itself” frame
Sorting Data
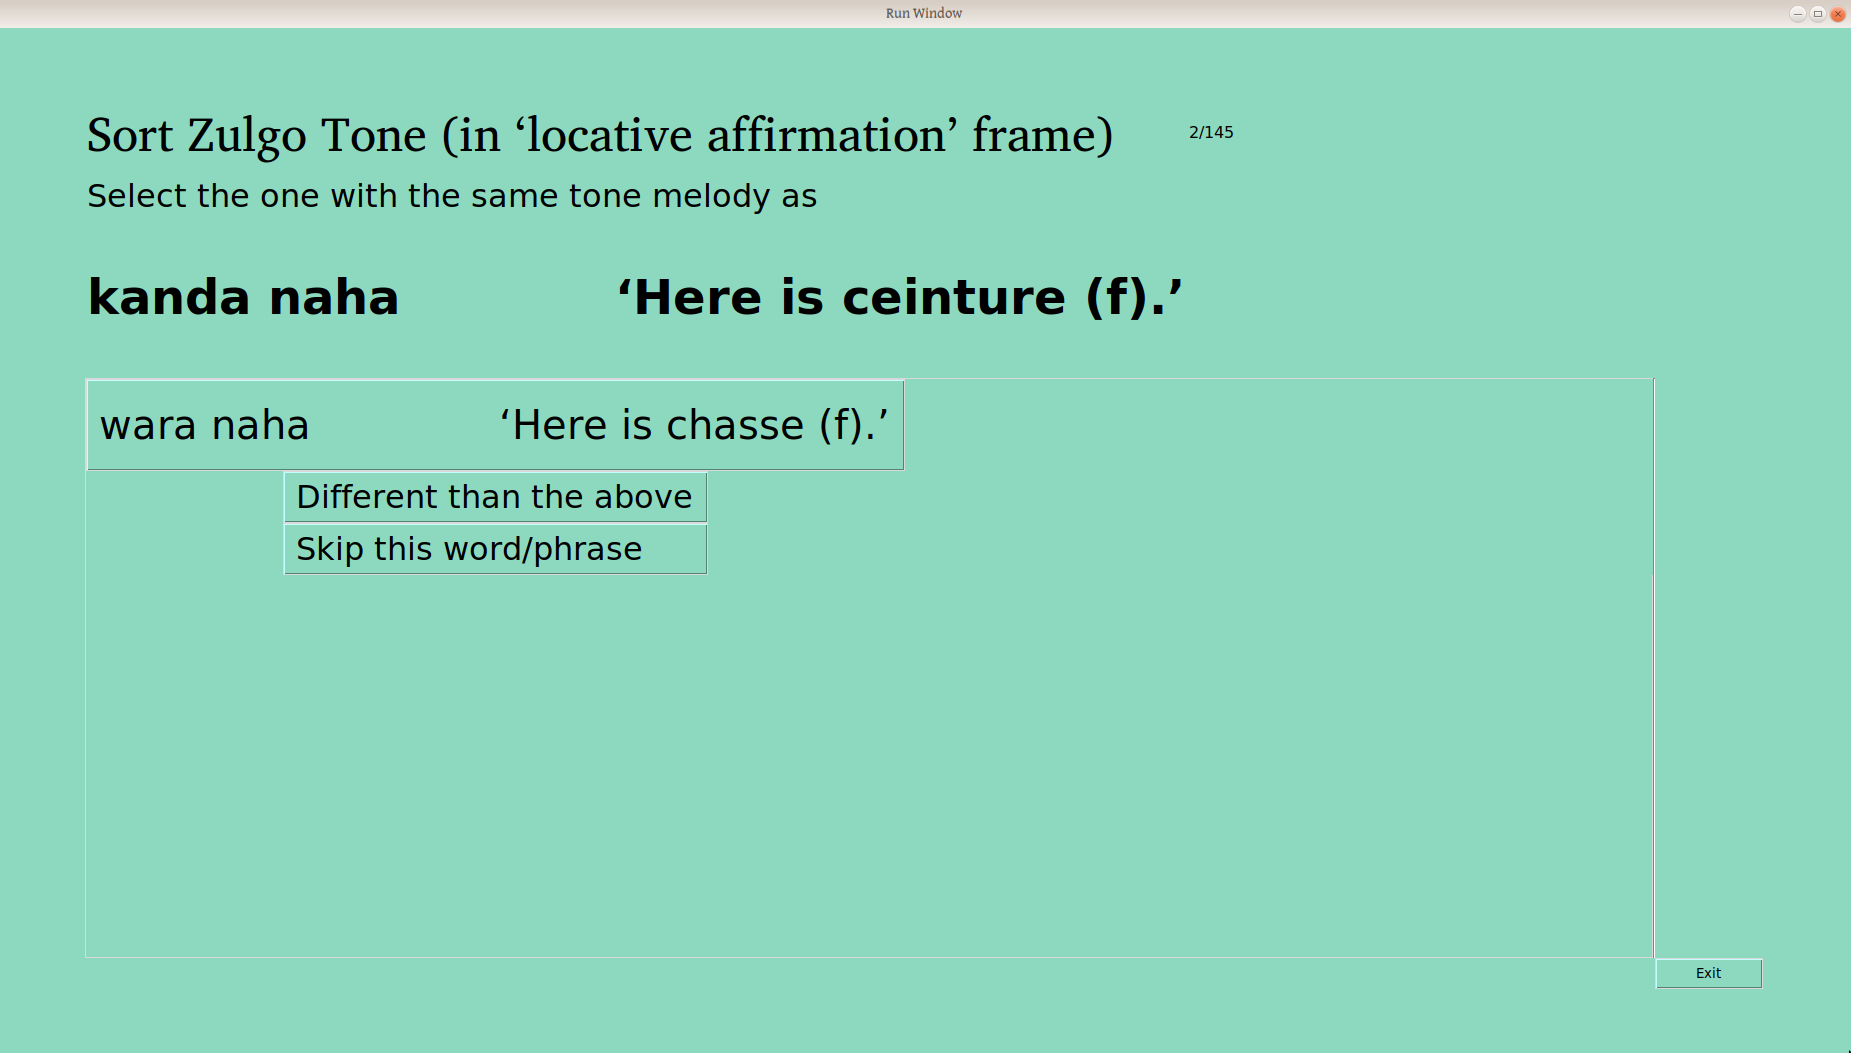
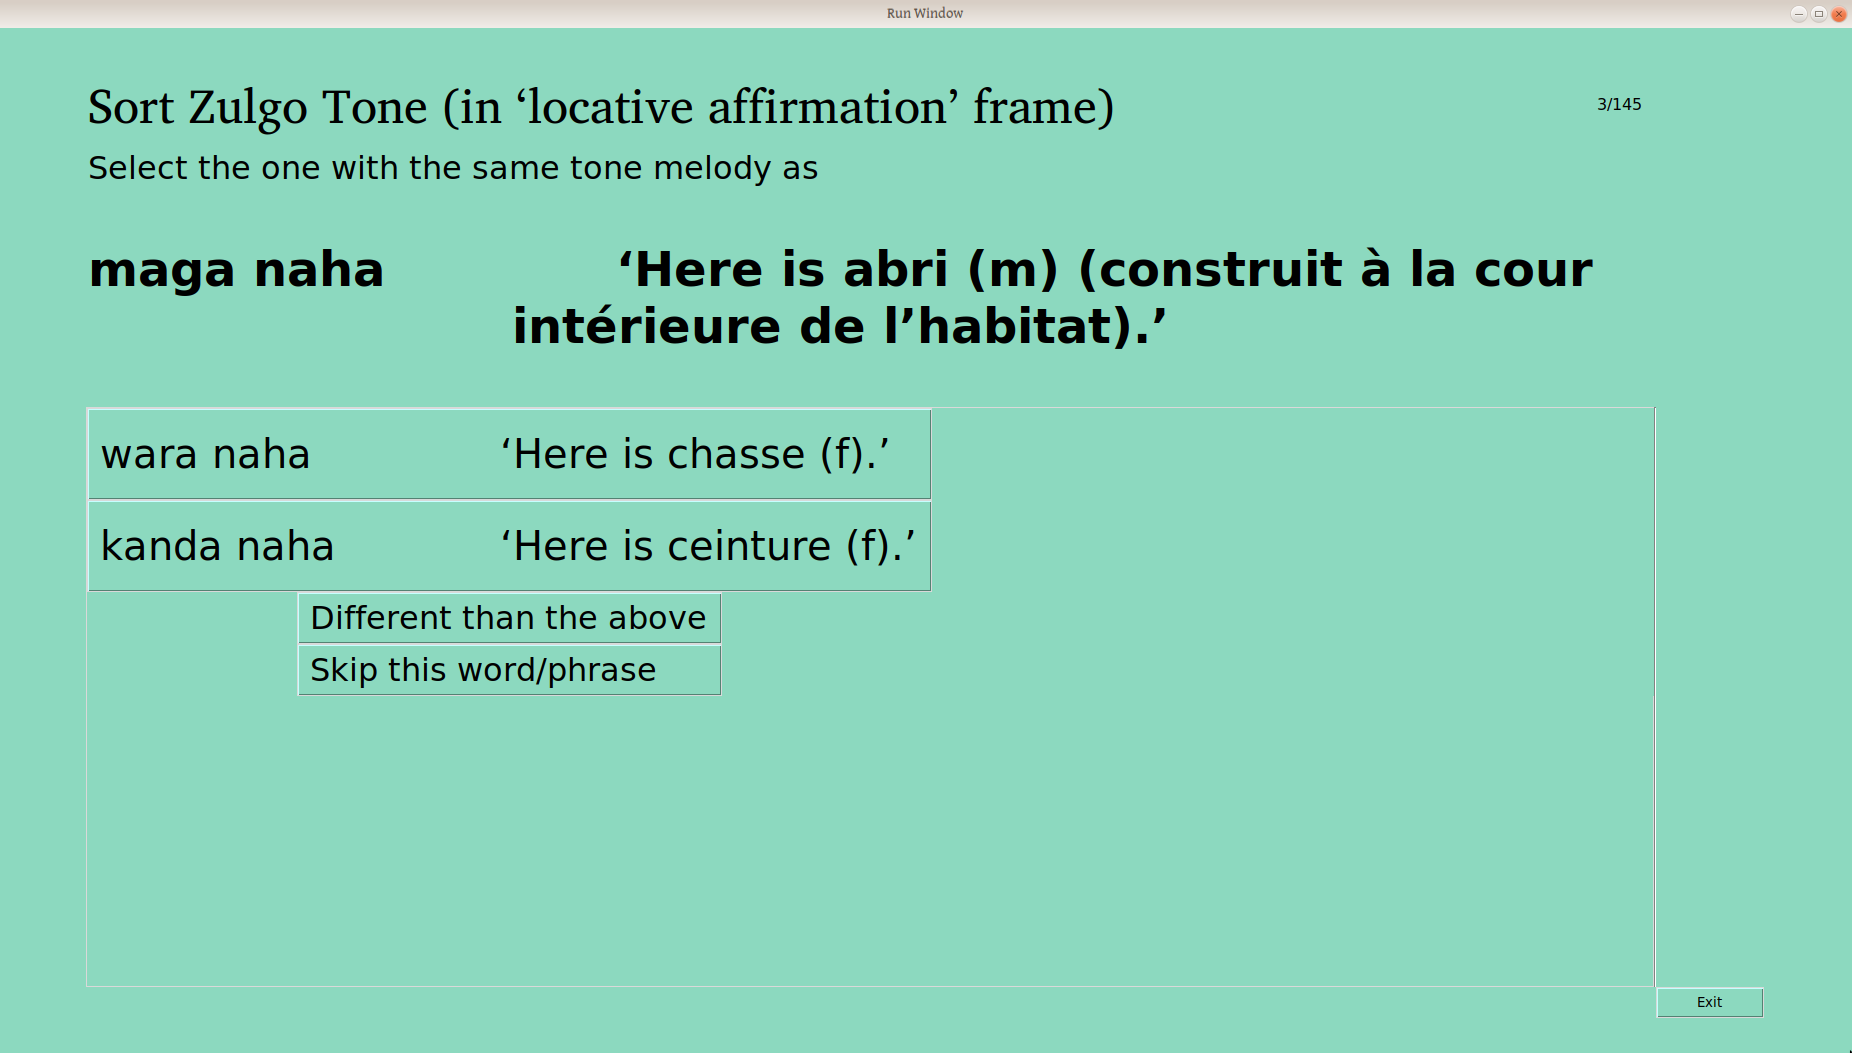
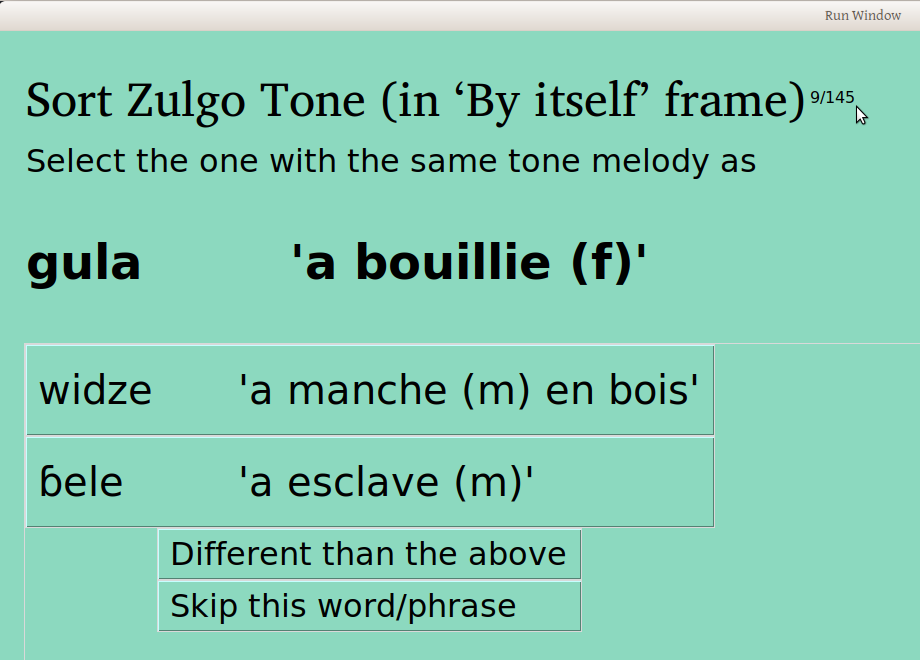
When the user clicks “Sort!”, the appropriate searching and filtering is done, to provide the following screen to sort those words, one at a time:
The first framed word (here wara naha, “Here is chasse” —yes, a bad combo of an English glossed frame and a French glossed word, but you wouldn’t do that, would you?) is sorted automatically into the first group, and the user is asked if the second word is the same.
The user is also given the option “Different than the above”, as well as “Skip” —there are some word/frame combinations that just don’t work, either because of the meaning, or the syntax, or particular taboos, or whatever. Excluding one word (or a couple) isn’t the end of the world, as we’re looking to understand the system here. Words that are skipped can always be sorted again later.
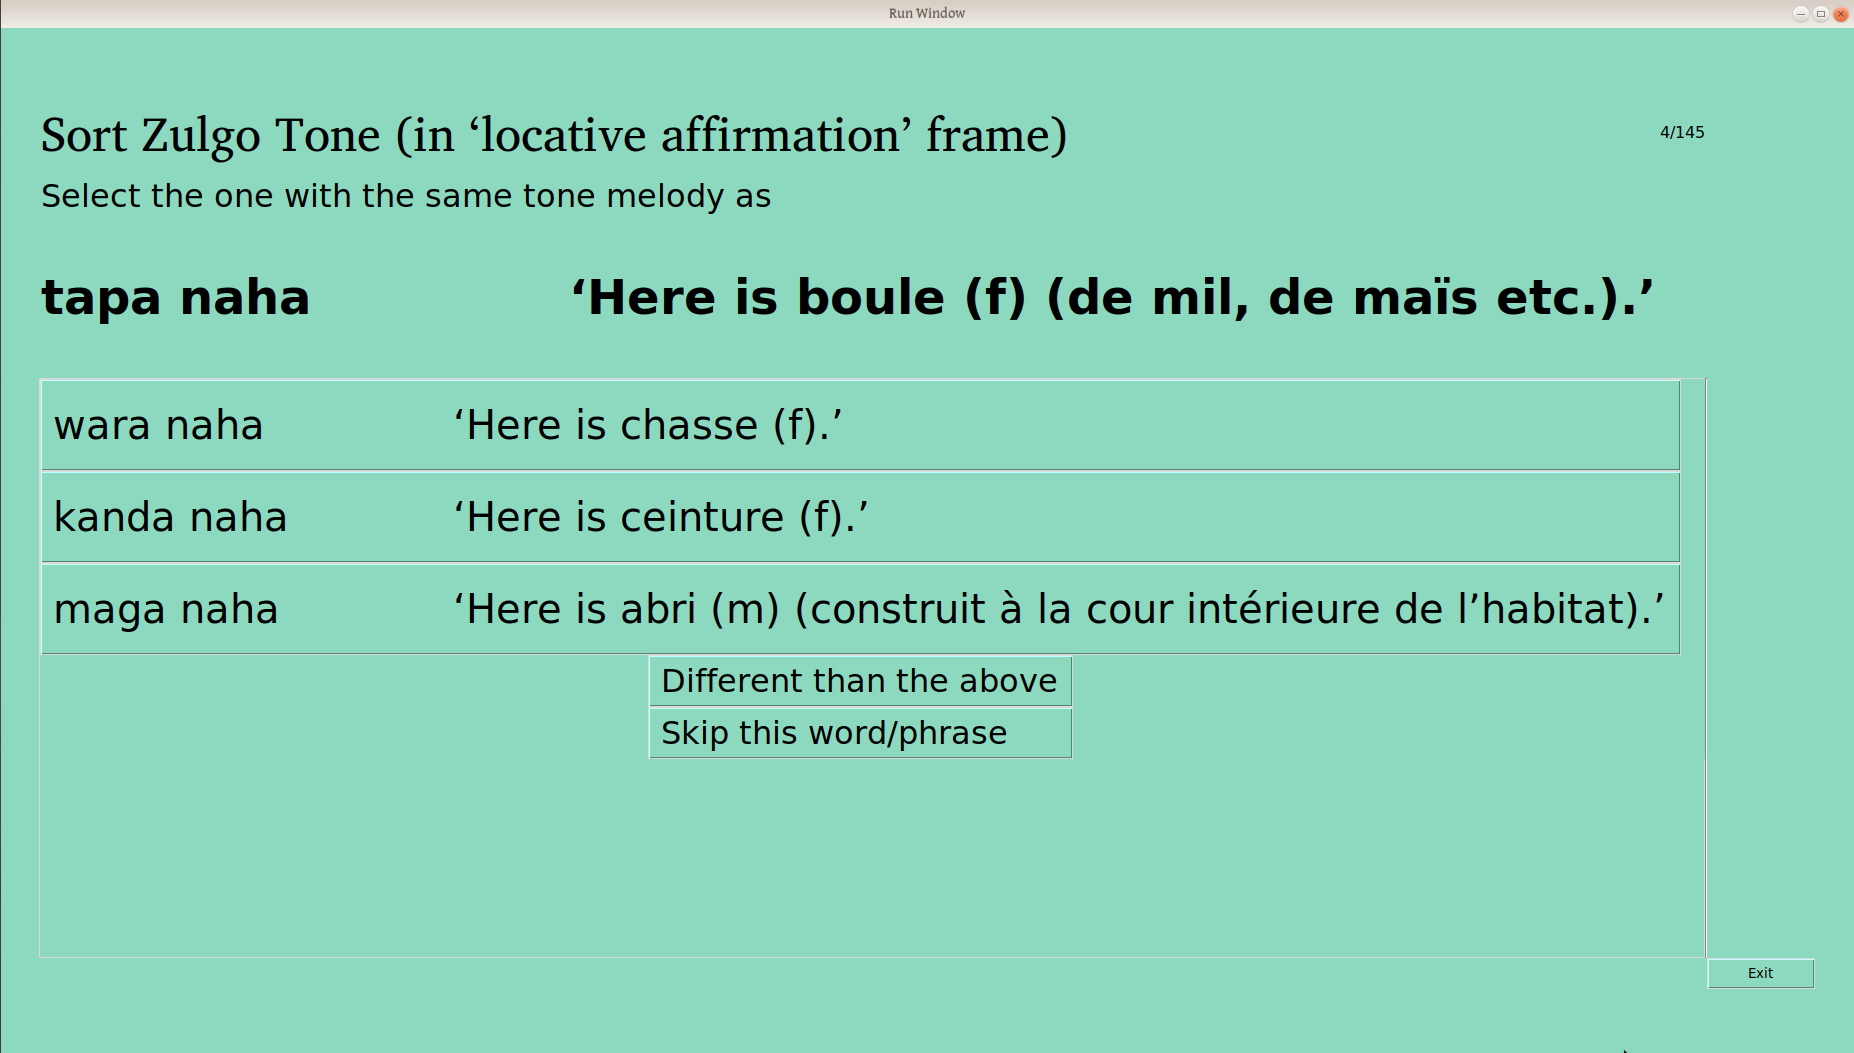
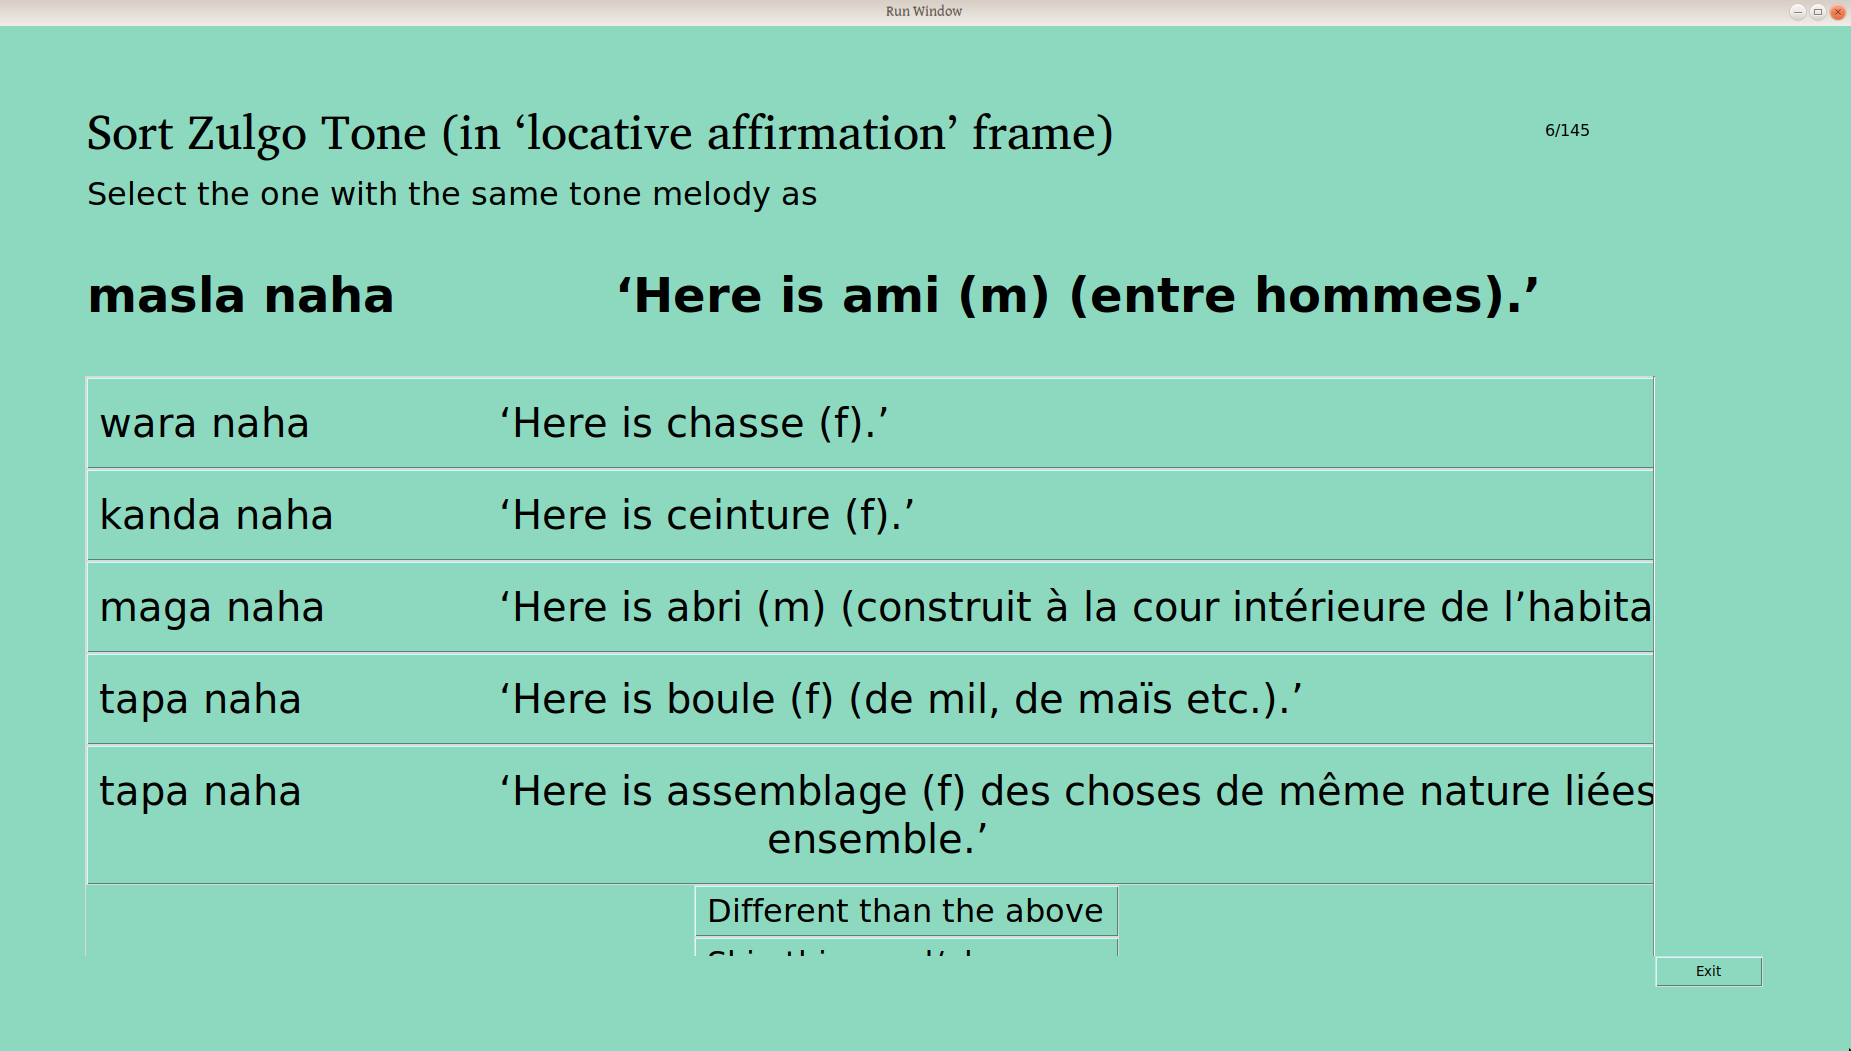
If the user selects “Different than the above”, that word becomes another button to select a second group, for the third word:
If that word is also different, the program gives a third group from which to select when sorting the fourth word:
Up to as many as are needed:
Once all the words have been sorted into groups, each group is verified, to make sure that it contains just one tone melody. Once the user verifies a group, the main window updates:
One verified group for CVCV nouns in “By Itself” frame
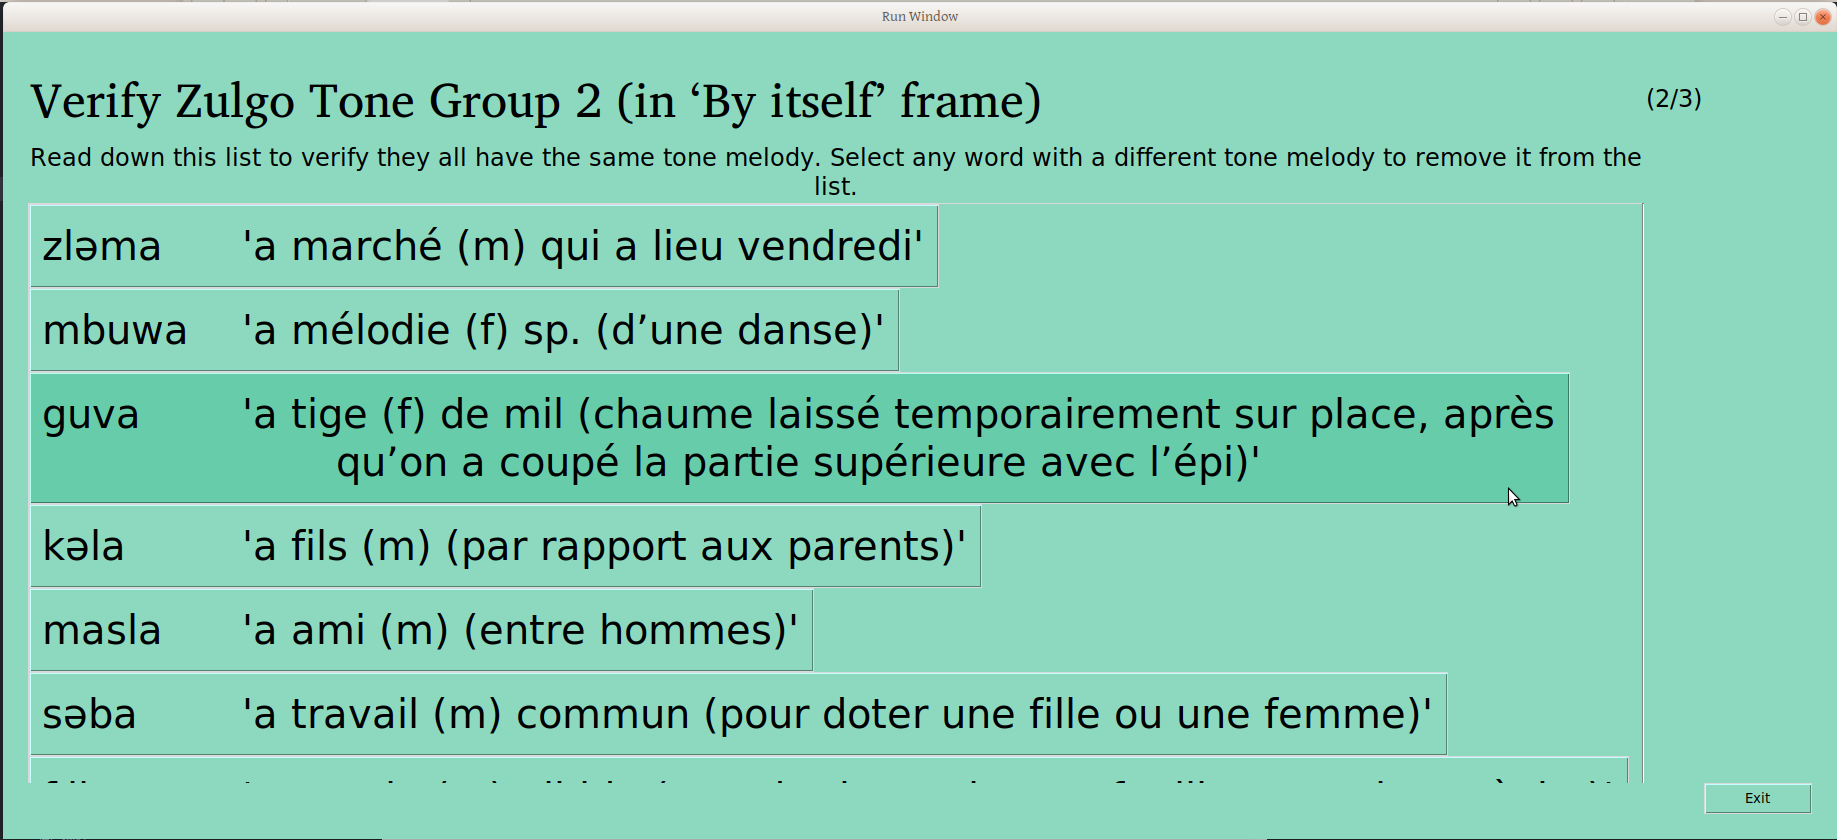
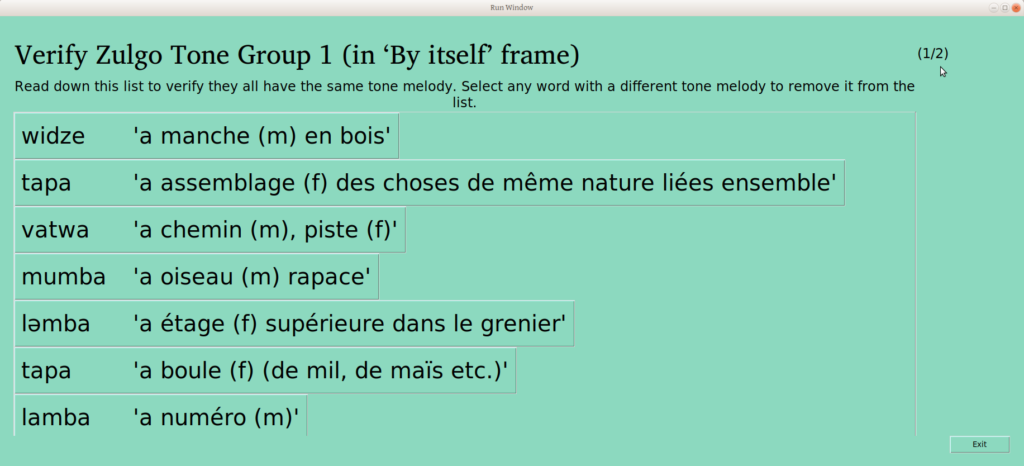
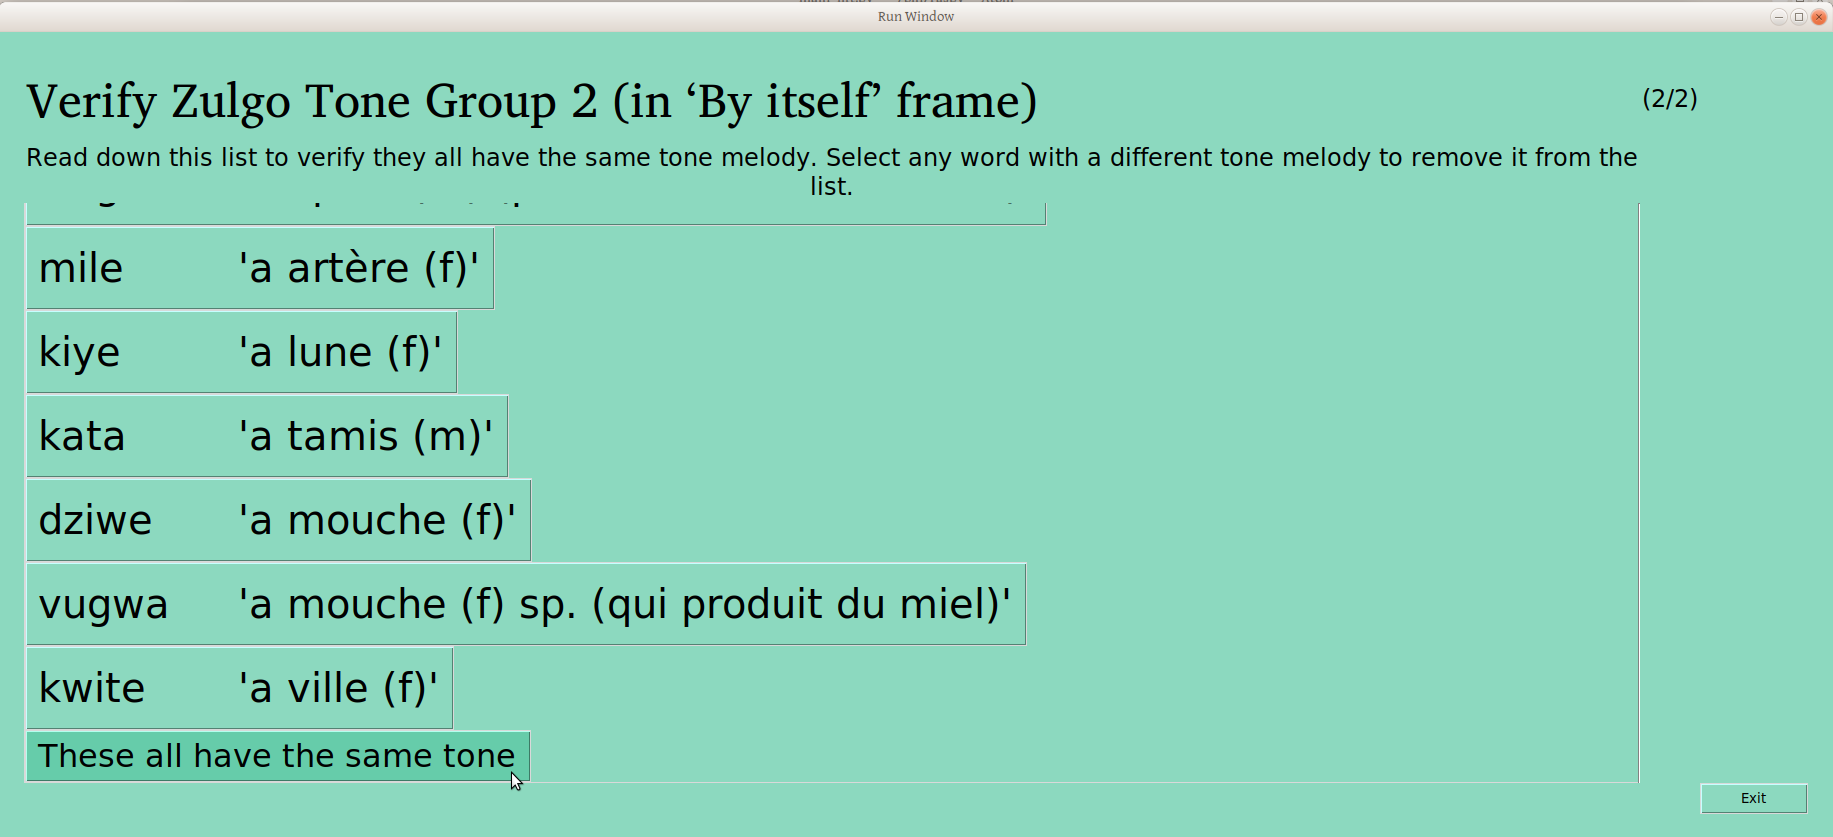
Once the piles are sorted and confirmed to be different, the user is presented with a list of words like this:
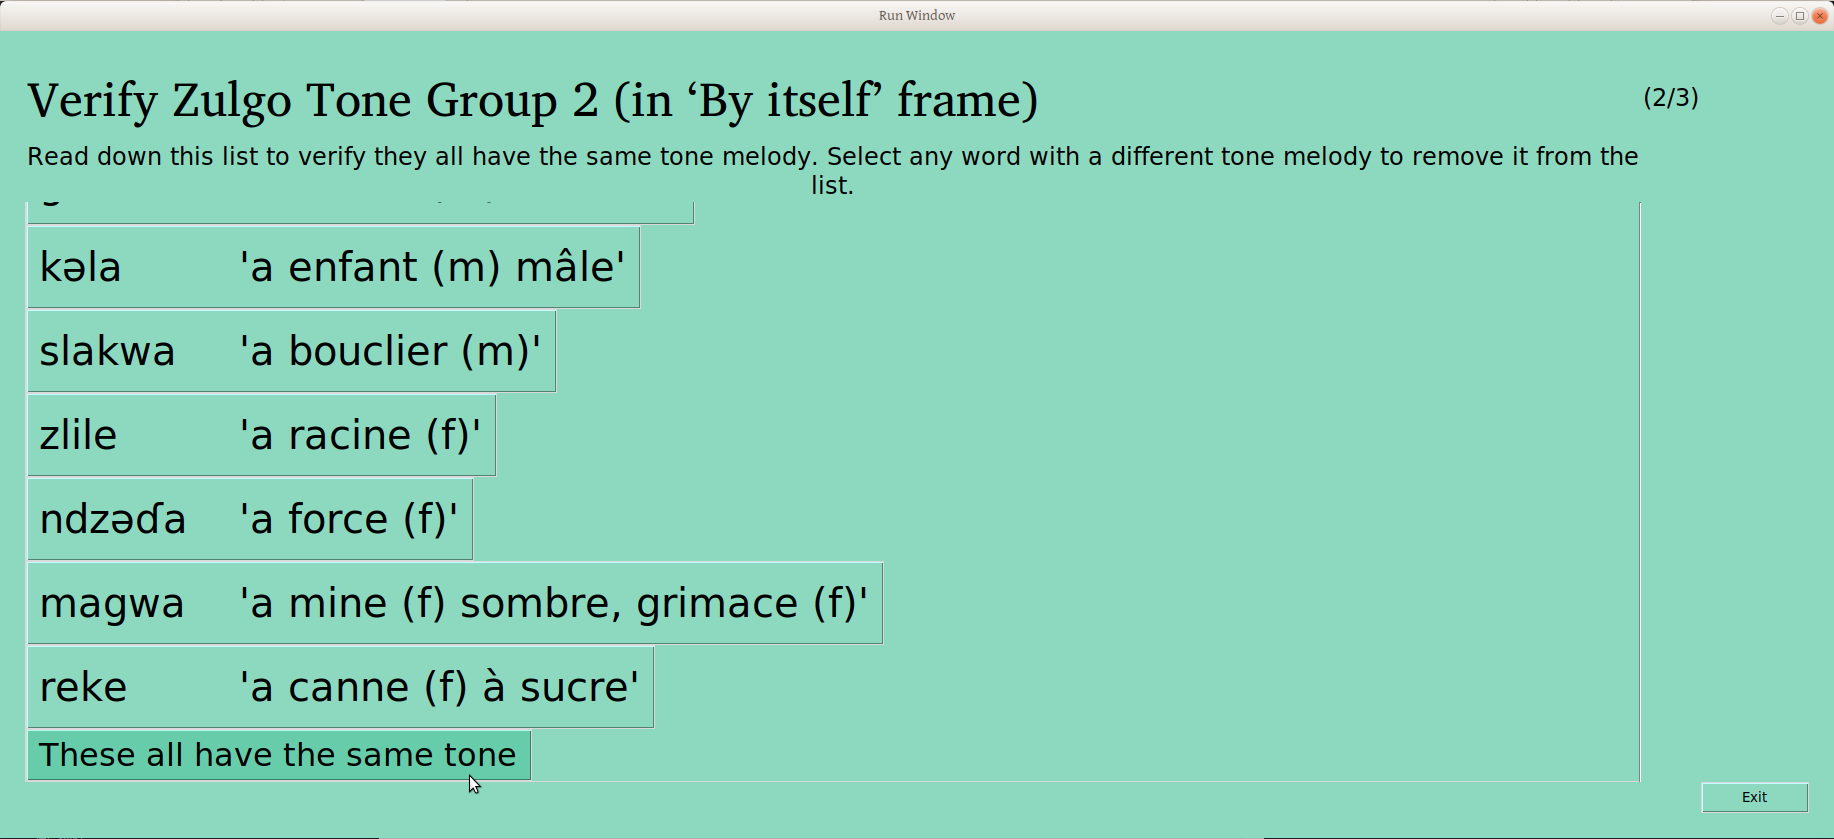
The user can scroll through the whole list, clicking on any words that don’t belong to remove them. The button on the bottom of the page gives the user the opportunity to confirm that the remaining words are the same (People who care about this kind of detail may note that progress is indicated in the upper right –this is the second of three groups being verified):
Once that last button is clicked, the group is considered verified, and this is reflected on the status page:
Second CVCV noun “By Itself” group verified
And so on for a third and more groups, for as many as the user sorted the data into:
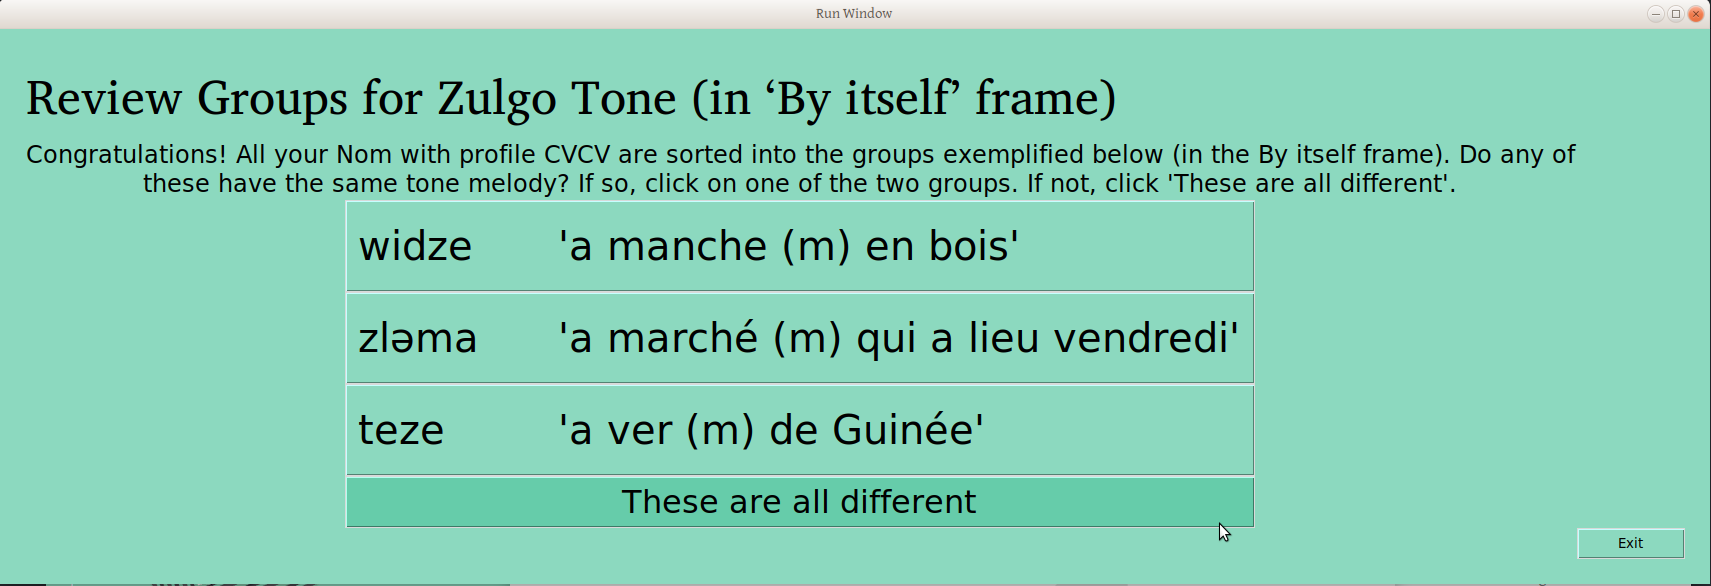
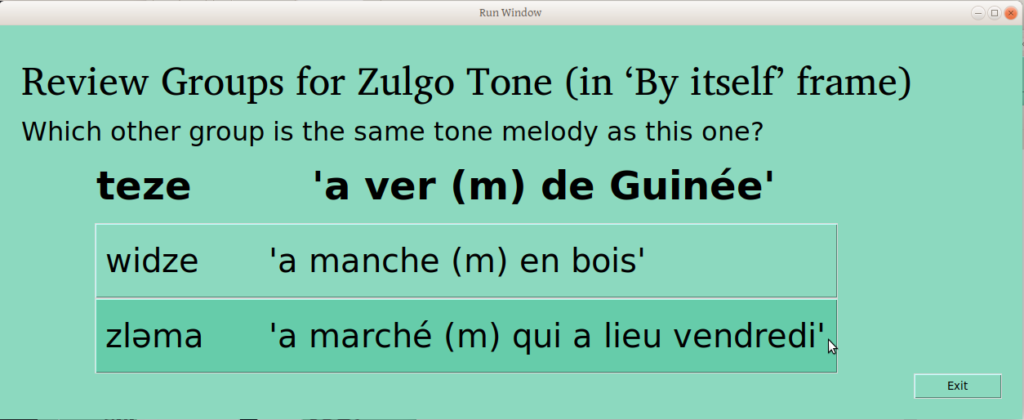
But as anyone who has run a participatory workshop can tell you, these processes are not particularly linear. Rather, there is often the need to circle back and repeat a process. So for instance, the fact that these three groups are each just one tone pattern does not mean that they are each different from each other. So we present the user this screen:
This allows the user to confirm that “these are all different”, or to say that two or more should be joined (something we would expect if there were lots of groups!). If the user selects one of the groups, the following window is presented; the first selected group is now presented as a given, and the user is asked which other group is the same.
Note that all of these windows have “Exit” buttons, in case the user arrives on a page by accident. Most changes are written to file as soon as a process is finished (e.g., joining groups), so this whole process should be fairly amenable to a non-linear and interrupted work flow.
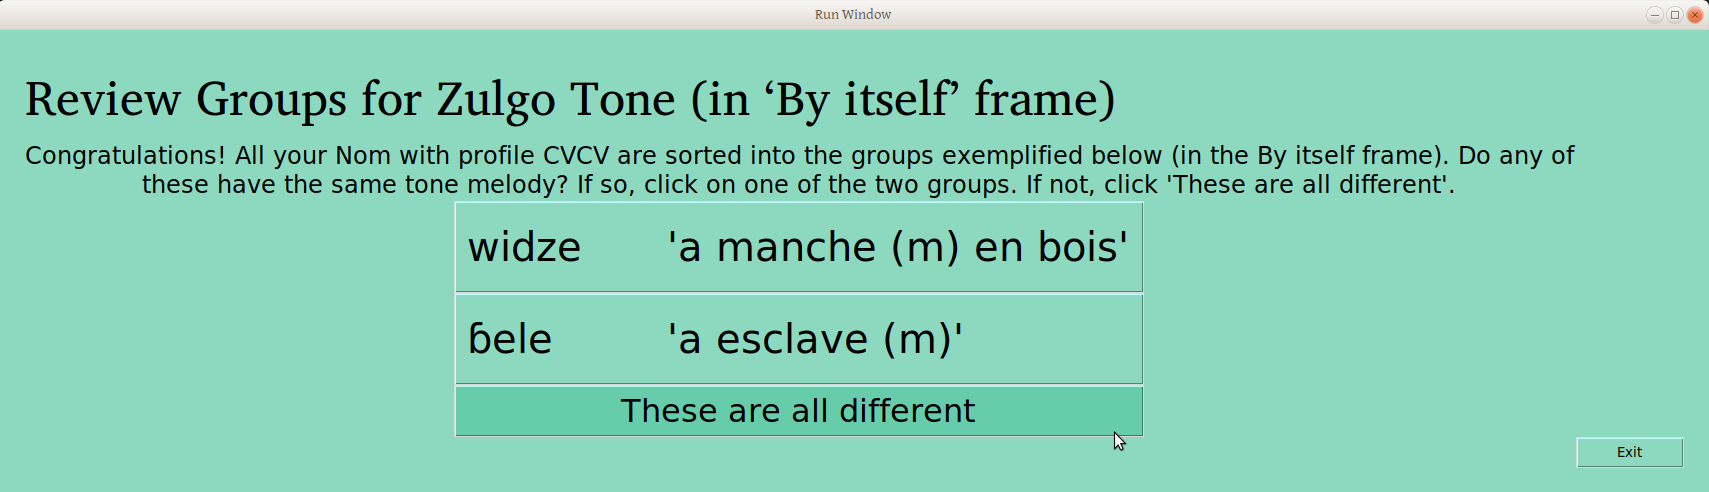
If groups are joined (as above), the user is again presented the choice to join any of the remaining groups. If you made one too many groups, who is to say there isn’t another one (or two!) excessive divisions in your groupings
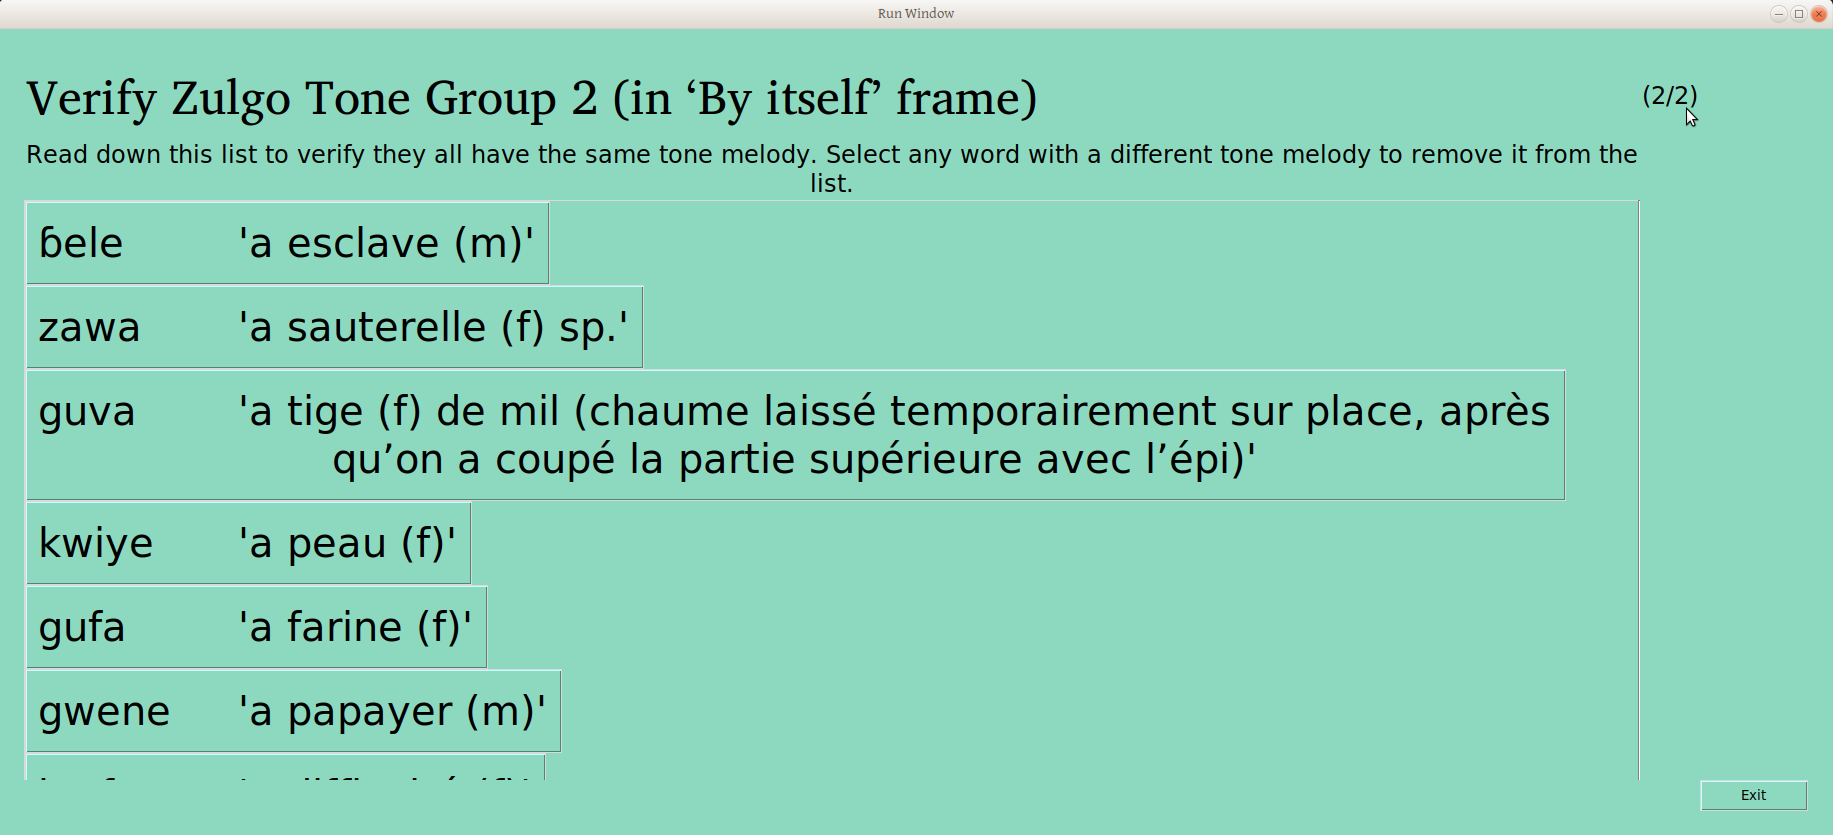
Back to the cyclical nature of this process, if groups are joined, that means the joined group is no longer verified! So we verify it again (this time as one of two groups).
The user is again offered the chance to remove from this group any words or phrases (depending on the frame) which do not belong (anyone want to sing the Sesame Street song?). Any words that are removed from this group in this process are then sorted again:
In the sorting process, if any words are added to the group, it is marked as unverified, and sent to the user to verify again:
If the cards that were pulled earlier are resorted into multiple groups, each is verified again:
So just like in a physical card sorting workshop, word/phrase groupings are sorted, verified, and joined until everyone is happy that each pile is just one thing, and no two piles are the same.
Only in this case, the computer is tracking all of this, so when you’re done, you’re done —no writing down on each card which group it was in, then forgetting to commit that to your database months later.
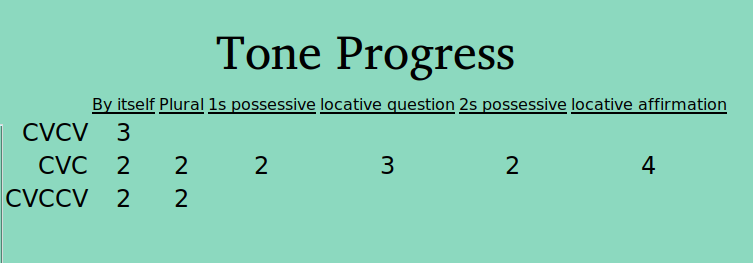
And this progress is visible in the main window:
The Tone Report
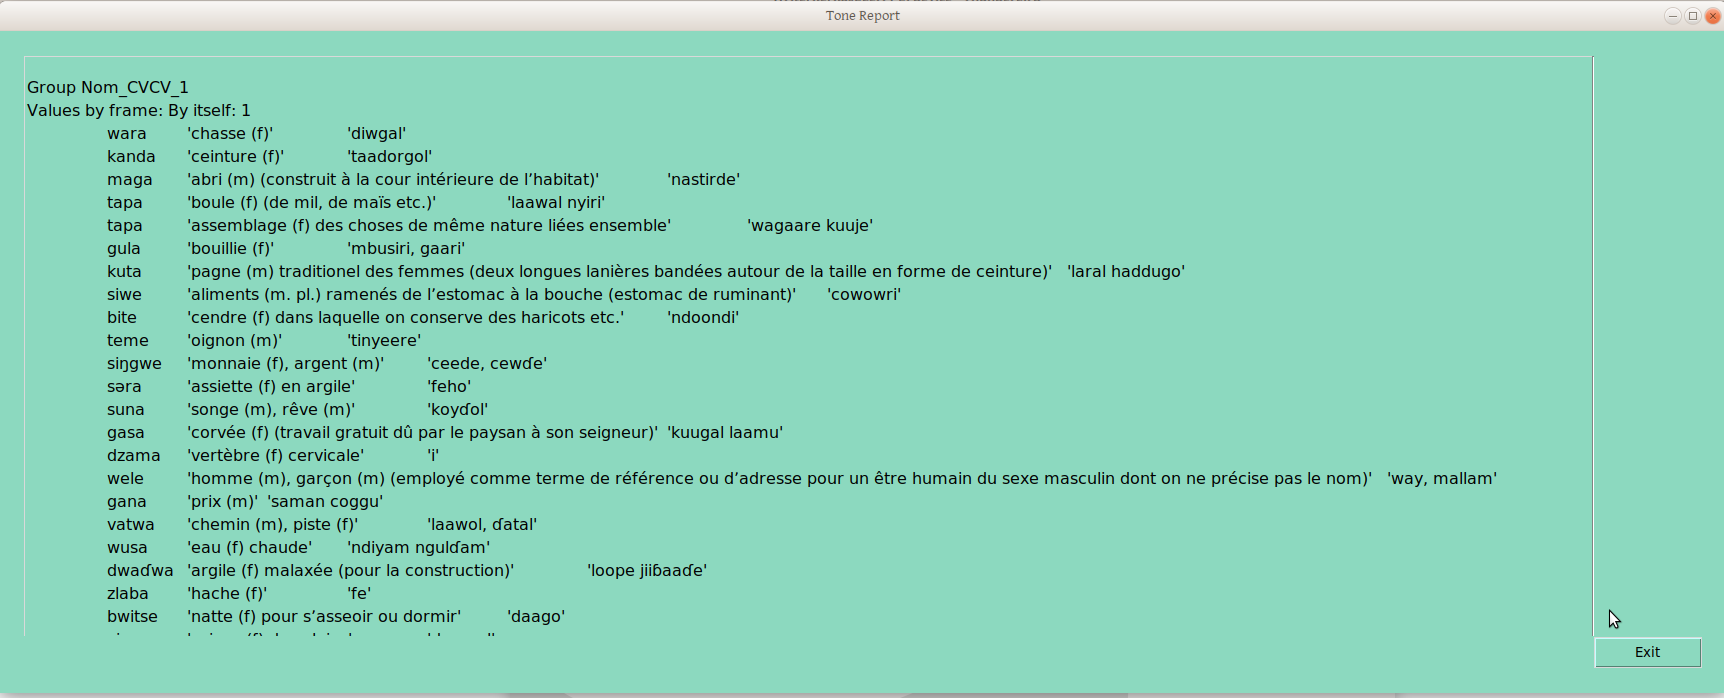
Now, the above is exciting enough for me, given the number of times I’ve run into people that seem to feel that sorting by part of speech and syllable profile, then rigorously controlling and documenting surface forms, is just too much work. But it doesn’t stop there; many of us want to do something with this data, like make a report. So the Tone report option produces a report which groups words (within the ps-profile we’re studying at the moment!) according to their groupings in each tone frame:
group 1group 2
This is the same thing human linguists do, just on a computer — so it is done faster, and the resulting draft underlying forms are put into the database in that time. But perhaps you’re thinking you could find and sort 145 CVCV Nouns into tone groups based on a single frame, and mark which was which in FLEx, in under 100 seconds, too. And I admit that sorting by one frame just isn’t that impressive —and not what we tonologists do. We sort by how words split up across a number of frames, until new frames no longer produce new groups. So we look at another tone frame (recall the window where you can define these yourself?):
When you verify a group in that frame:
Then in another:
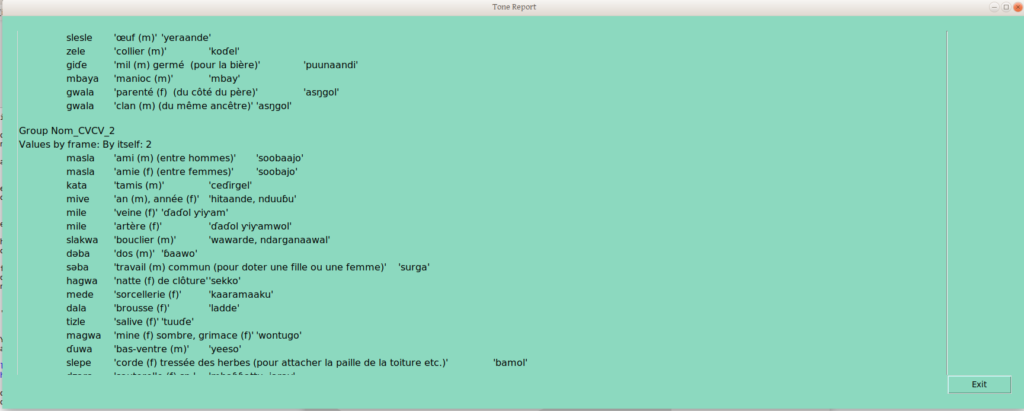
Once that second frame has a couple groups verified, the tone report becomes a little more interesting:
The group provisionally labelled “Nom_CVCV_11” (yes, there are too many groups, as a result of my highly random decisions on group placements) is defined by the combination of group 1 in the “By Itself” frame, and group 1 in the “Plural” frame.
Group Nom_CVCV_12 differs in the “By Itself” grouping, though not in the “Plural” grouping —in this way we handle neutralizing contexts: any word grouping that is distinguished from another group in any frame gets its own (draft underlying tone) group.
Yes, there are of course groupings which don’t indicate underlying forms, such as if one group differed from another by the presence and absence of depressor consonants.
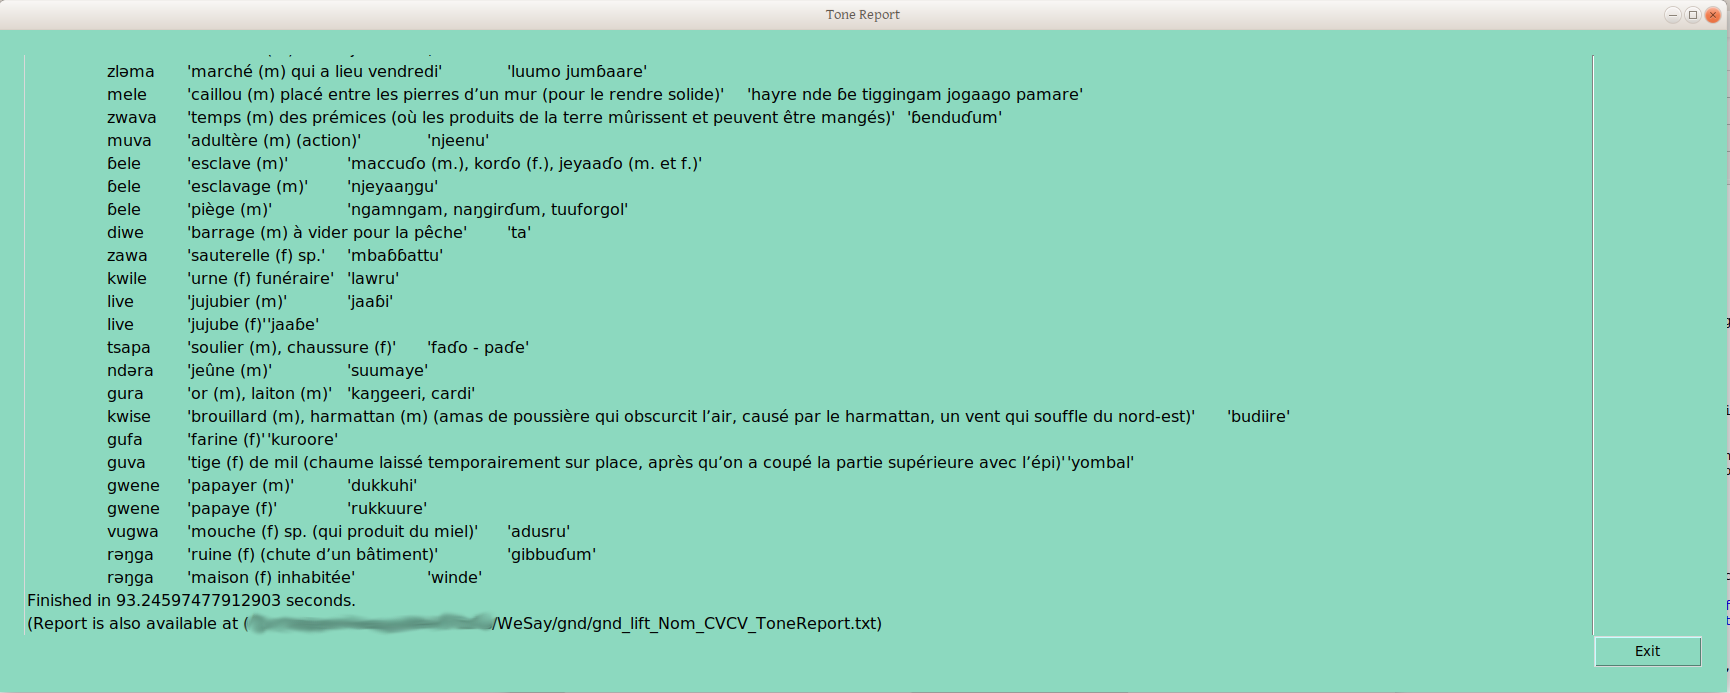
But still, I’m impressed that we can sort 145 CVCV nouns by two different frame groupings, in less than 120 seconds (32 CVC Nouns sort across six tone frames in about 45 seconds). These groupings (e.g., Nom_CVCV_12) are immediately written to LIFT, so could be available in FLEx, to sort on. Because this report costs almost no time (unlike physically sorting cards), this report can be done after each of a number of different sortings, and the progression of group splits can be monitored in more or less real time.
One caveat I would mention. Assuming the words are found in more or less the same order, their names should be more or less stable, unless a new frame creates a real split. But there is no reason that it should be so —neither I nor A→Z+T make any claim that these groupings are anything more than draft underlying form groupings, including the shape of those underlying forms. That is, words marked Nom_CVCV_12 may ultimately be called H, Low, mid, or something else — that is for the analyst to figure out (Yay! more time analyzing, less time collecting, organizing, and archiving data!).
One perhaps less obvious extension of this caveat is that Nom_CVCV_1 has no implicit relationship with Nom_CVC_1, apart from that each was grouped first when their syllable profile was analyzed. So the linguist still needs to figure out which CV draft underlying tone melody groupings correspond to which CVC, CVCV, etc draft underlying tone melody grouping —but why would we wan to cut out the most fun part?
Recording
For many people, participatory card sorting is just uninteresting work —either because they question its scientific value, or because of its notoriety for data to not survive the workshop. How many times have you finished a workshop with hours of recordings, wondering when you would have the time to cut, label, organize and archive them? But what if you could make recordings in a way that immediately cropped, tagged, and made them available in your lexical database?
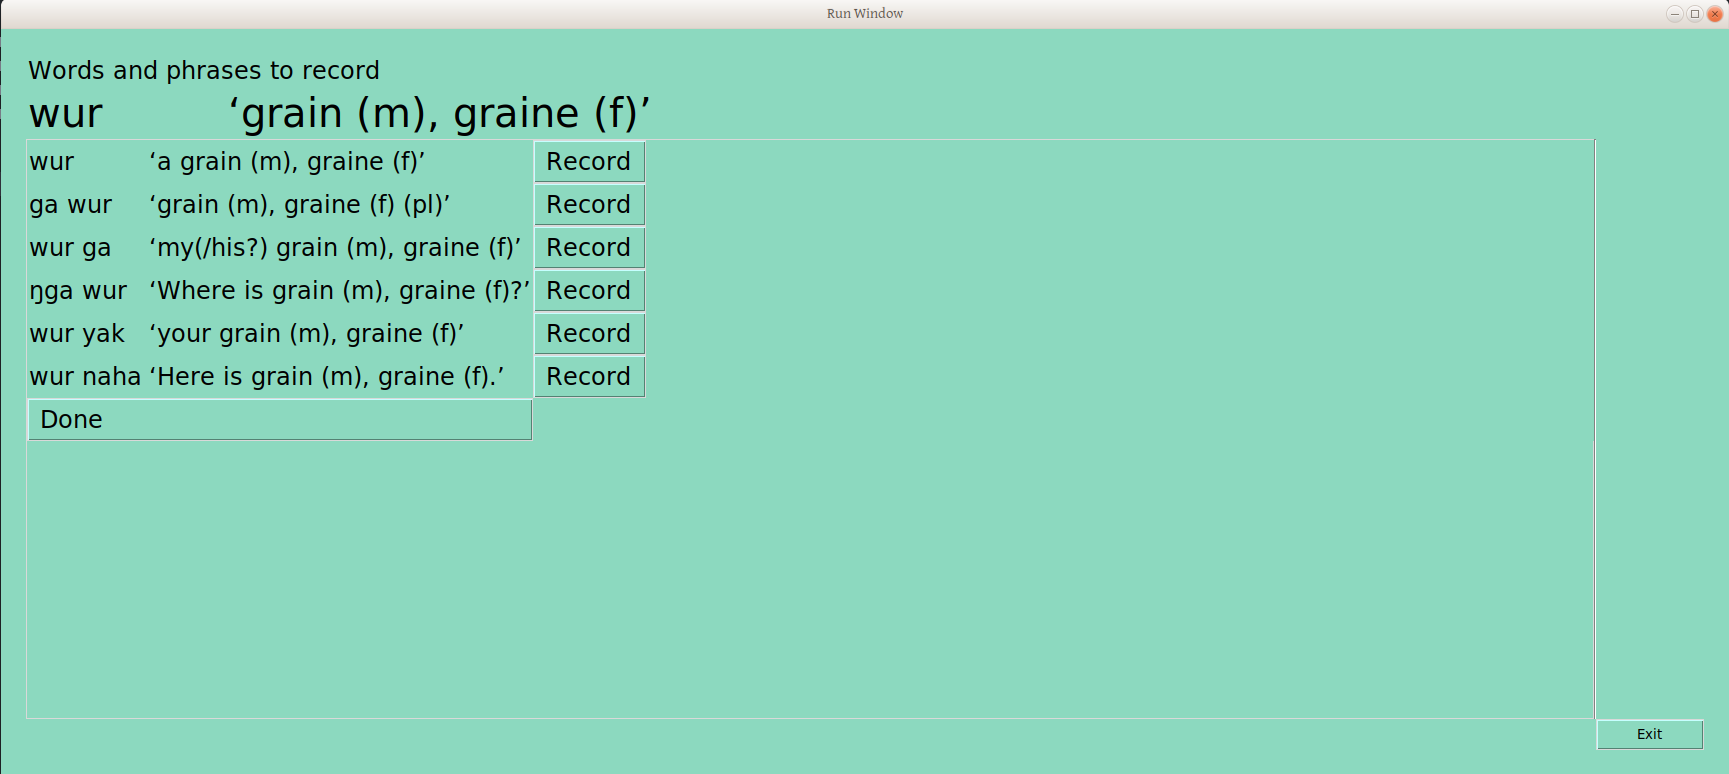
This tool provides a function which goes through the most recent tone report groupings (we’ll be doing that often, right?), and pulls (currently five) examples from each, and presents them one at a time on a page like this:
Below the bold title with word form and gloss are six rows with that word in each of the frames where it has been sorted: the word form is framed, as well as the gloss, so the user can see the entire context of what has been sorted (this info is taken from the LIFT file, where we put it earlier for safekeeping). Next to each line is a record button. The user presses down on the button, talks, and lifts up on the button, resulting in a sound file recording, storing in the repository’s “audio” folder, and a line in the LIFT example field telling us what that file is named (which is something like Nom_CVC_75438977-7cd0-49ac-8cae-ffb88cc606a1_ga_wur_grain_(m),graine(f)(pl).wav, for those interested). And the user now has a play button, to hear back what was recorded, and a redo button, in case it should be done again (chickens, anyone?)
The user can go down the page, until all are done:
Once the user selects “Done,” an example word from the next grouping is presented. Once each group has one word, the user is given a second word from each group. This was designed to allow even a minimal amount of recording to most likely include each of the draft underlying tone groups.
Conclusion
This has been a brief overview of the user interface of A→Z+T, the dictionary and orthography checker. I have not discussed the inner workings of the tool, apart from the logic relative to the user, but may do that at a later date.
Please let me know (in the comments or by Email) if there is anything about the user interface (e.g., placement, fonts/sizes, wording) that you think might hinder the user experience. I hope to finish translations into French early next week, so I hope to finalize at least this version of text for now soon.
I recently finished a series of presentations, each of which required me to prepare notes and a handout and/or slides. I figured out a workflow that made things a bit more streamlined than I’d been doing it, so I thought it worth documenting here.
Why do it
First of all, I’m sold on the use of XML standards, like XLingPaper, an XML standard for writing linguistic documents. One of the main reasons is because it just makes sense, if you’re re-purposing a document, to not start it from scratch each time (Simons and Black 2009 and Black 2009). For instance, the three presentations I gave last month were all on the same language, and a bit of the content was common to all, even if the focus (and audience) was radically different for each. So rather than starting each from scratch, I modified one presentation to make the next, and used copy and paste liberally. I think most of us would do this, because it just makes economical sense. But what about applying the same principle across notes, slides, and a handout, for the same presentation?
Each of my presentations required me to have notes to speak from, which were related to the slides I used, and the handout (for the academic talks). Why should I make three different documents in three different programs, when I can accomplish all three in one? Especially if I can use the same source document for all three, so I don’t have to update three separate documents when I need to make a change?
How to do it: Content Types
I accomplished this by writing my presentation in XLingPaper, through the XMLMind XML Editor (XXE), the recommended editor for XLingPaper. The basic mechanism to organize the different outputs was Content Control, which is described here in the XLingPaper documentation. Rather than repeat that information here, I’ll just describe how I used the system.
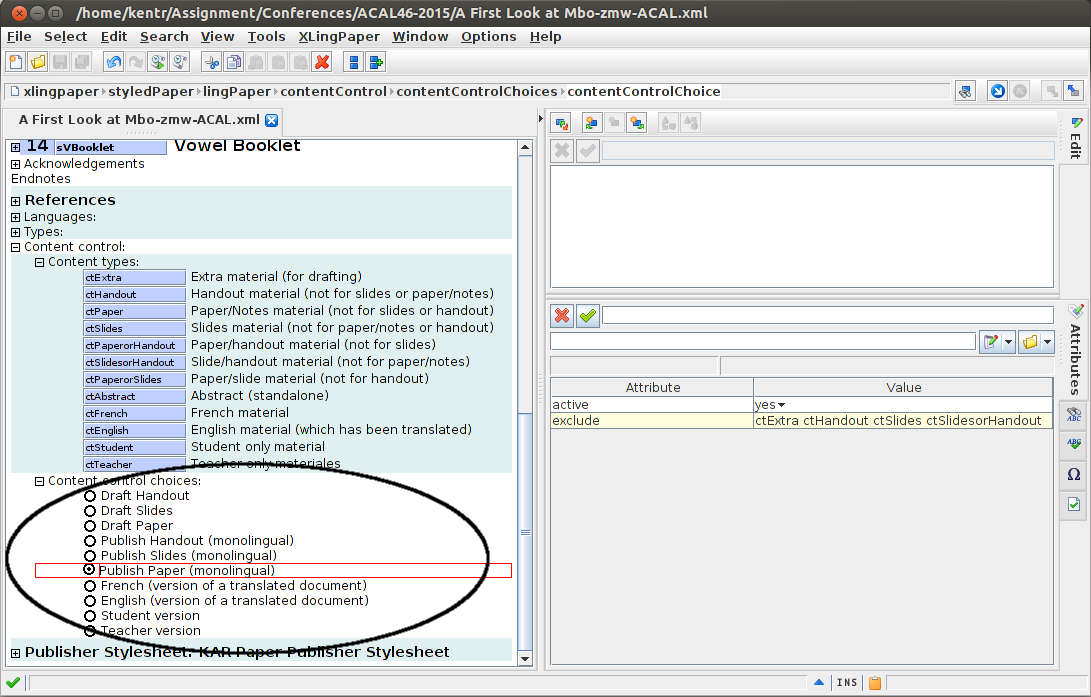
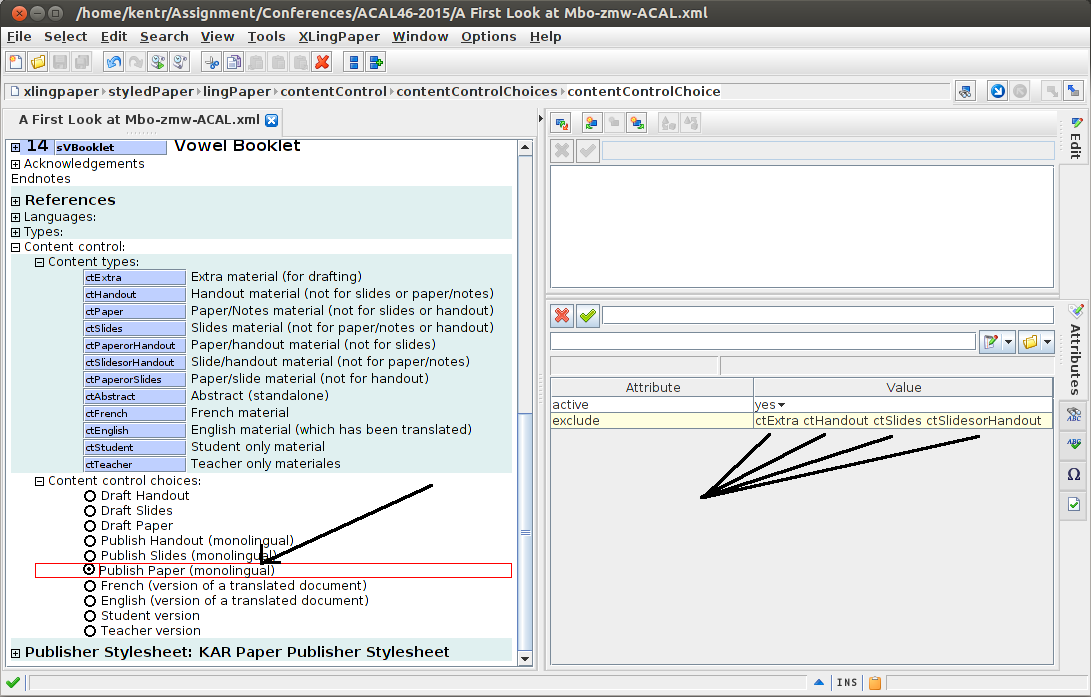
The circled section of this screenshot shows my content types (under content control, after the back matter):
You can see that I have a content type for each of handouts, slides, and paper/notes, as well as one for each combination of the two (and a few others). This allows me to quickly mark a portion of the paper as belonging to just one of the three products, or else to two of them, but not the third (like if I want something in the handout and my notes, but not on a slide, or else in my notes and the slides, but not on a handout). Once this is set up, as I’m editing my paper, I can mark a paragraph, list, section, etc. as belonging to the appropriate output, and know it will only show there. So if I have a full table of data to put in the handout, but I don’t want all that data in a slide, I can make two different copies of that table, and label the one for the handout and paper, and the other for the slides. As I make any updates to the table, I can easily cut and paste between them, since they’re adjacent in the source document. I haven’t so far had much trouble keeping track of which copy goes for which product (this may be a bit of an issue, since it isn’t obvious in the UI), but one could easily put a comment (which would be highlighted in the UI, but not show in any output) in one or both copies to remind yourself which is which.
How to do it: Content Control Choices
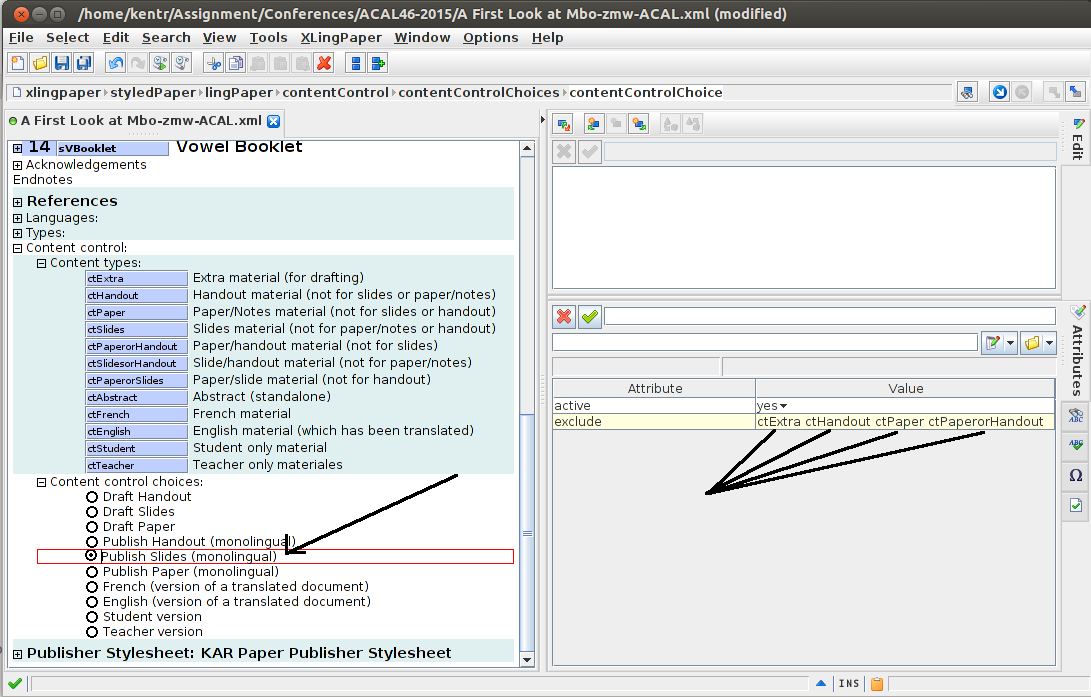
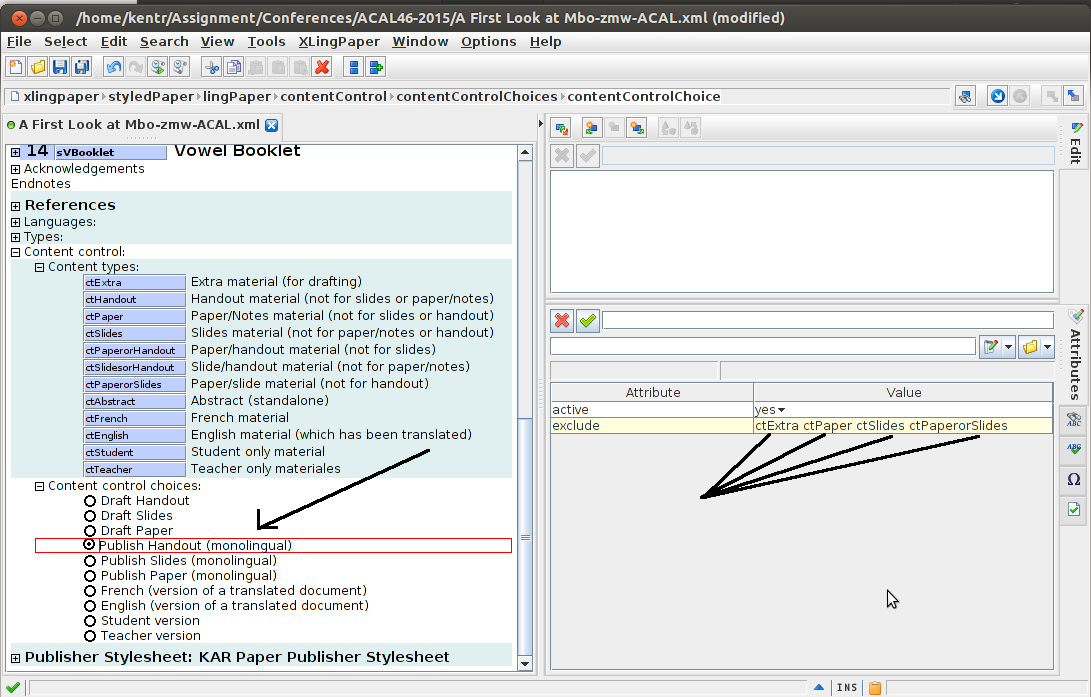
Once I have my content (at least provisionally) set up as belonging to one output or another (or not marked, if I want it in all outputs), it makes sense to test it out by selecting an output, here:
I’ve set up these content control choices to give me quick access to what I want showing in each of slides, handout, and paper, etc. For this selection, you see the following exclusions:
That is, when “publish paper (monolingual)” is selected, it excludes pieces of the document labeled as extra, handout, slides, or SlidesorHandout:
Alternatively, when Publish Slides (Monolingual) is selected, it excludes pieces of the document labeled as extra, handout, paper, or PaperorHandout:
And finally, when Publish Handout (Monolingual) is selected, it excludes pieces of the document labeled as extra, paper, slides, or PaperorSlides:
To be clear, this is just the way I’ve set up my documents, for my own convenience. I decided initially to have a ctExtra type, though I don’t really use it much. Additionally, I haven’t done many bilingual or student/teacher versioned documents since I started using content control (though there were some times when it would have been handy). Other categories may be relevant for you, both for tagging sections of your document, and for selecting them in content control choices.
Setting up a template
Regarding this setup, I wouldn’t want to organize all this for each paper I wrote, which is why I’ve made these options a part of my modular paper template. So just like I have the same (longer and longer) references section referenced in each paper, I now have the same content options available in each paper (which costs me nothing if I don’t use them…). But this was a bit tricky to set up, since we want the options to be universal across documents, but not the selection itself. So as you can see in the above screenshots, the Content Control section has a white background, since it is part of the document (since I want my content control choice to impact a particular document), but the content types node has a colored background, as it is in a referenced document (since I want a change to that section to impact all documents). This does mean that if I develop new content control choices, I would need to copy them into old documents where I wanted to use them, but I think that’s a worthwhile (and small) cost. You might see this as an unprincipled decision (and maybe it is); you’re more than welcome to organize your docs in a way that makes sense to you.
Outputting slides
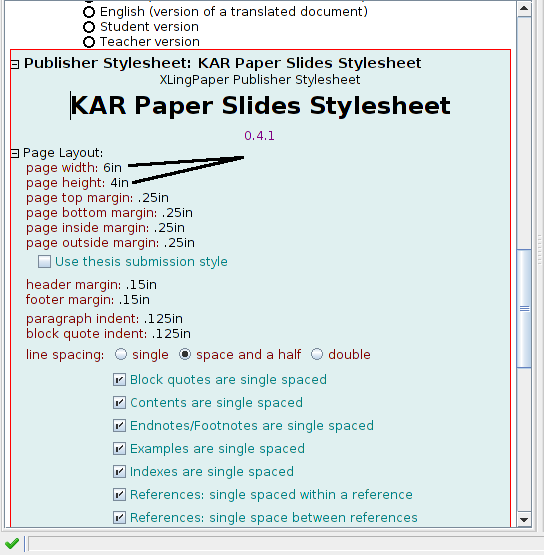
One last point about this setup deals with the output formatting. My notes and the handout are both output to US letter, but you can set whatever you need in your stylesheet (e.g. A4), and assuming its the same, you can use the same stylesheet for both. But what about slides? I’ve tried showing letter-sized PDF’s in a slideshow before, and it is ugly. So what I did this time was set up a new stylesheet, that gives me 4″x6″ pages:
You may find a better solution for your material, but the important part is to get the aspect ratio right (assuming you know what your projector’s aspect ratio is). Additionally, I found this size to work nicely in terms of getting only so much information on a slide. If you did 8×12, you’d have much more information on each page, which you probably don’t want for your slides — or maybe you do. In any case, there will probably be some fiddling to find the right mix of size and aspect to get the right content on your slides. I also found that if my images were smaller in my paper, they came out just right on the slides, but that if I had full page width images, they would spill over the edge of the slides — again figure out what works for you; I could see using two different images with different sizes and content types, but I just made them smaller and used the same images for each.
Setting Stylesheets
One final bit of trouble is the fact that there is no method (currently) for associating a stylesheet with a content type. That is, if you set XXE to output a handout, but you have the slides stylesheet applied, you’ll get really big words on weirdly shaped paper for your handout PDF. Alternatively, if you set it to output to slides, but don’t have the slides stylesheet attached, you’ll get your slides material in a letter sized PDF. So that’s just something to watch out for. But the good thing is that once you set up your source document, making changes like which output to make, and which stylesheet to apply, are rather simple.
Conclusion
Over all, I was very happy with this application of the XLingPaper XML specification, in that it reduced duplication of my work, kept multiple versions of a single document in one place, and reduced my overhead in terms of the number of files I was managing, while producing each of the three files I needed to do each of my presentations. Just another reminder of why I’m editing my documents in XML (Black 2009).
Last month I taught the FLEx II course at CoLang, held at UTA. It was very interesting trying to teach to about 45 students, coming for a great variety of backgrounds, but I think we all learned something. There was one thing that I taught, which I thought deserved further write-up, so I’ll do that here.
The problem is not immediately obvious, unless you spend lots of time thinking about how FLEx does what it does, in particular how writing systems work. But when you want to copy data from a field that is encoded in a particular writing system, into a field that is encoded in another writing system, you can’t just bulk copy and get results you might expect. The reason is that the data itself is tagged for which writing system it is in, and not just the field. So you can, theoretically, have Spanish data in a field that is supposed to have English. But this is actually a strength, as it allows you to tag one word or sentence in its correct language, even if it is surrounded by another language, all within the same field (like if you write a note in English, but include in the note words in another language). All data is tracked by writing system, and you don’t loose that information when you copy from one field to another.
So, the task we were working on, which you may need to do some day, was copying data from one writing sytem, to use as a base for another. For instance, if you have data in a practical working orthography, and you want to also have an IPA field, you may notice (as I hope is true) that much of your orthography transfers directly over to the IPA. And for those things that don’t, there should be regular changes (like substituting [ɸ] for ‘ph’). This task is just begging to be done through bulk editing. Why type all that over again, just to change a few phonemes here and there? Why not make most of the systematic changes systematically? But we can’t just copy a practical orthography field into an IPA field, since the data would still be encoded as the practical orthography, even if the field should contain IPA data. So here’s what you should do.
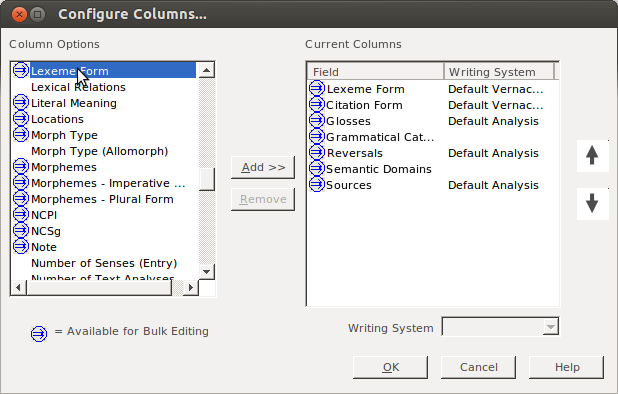
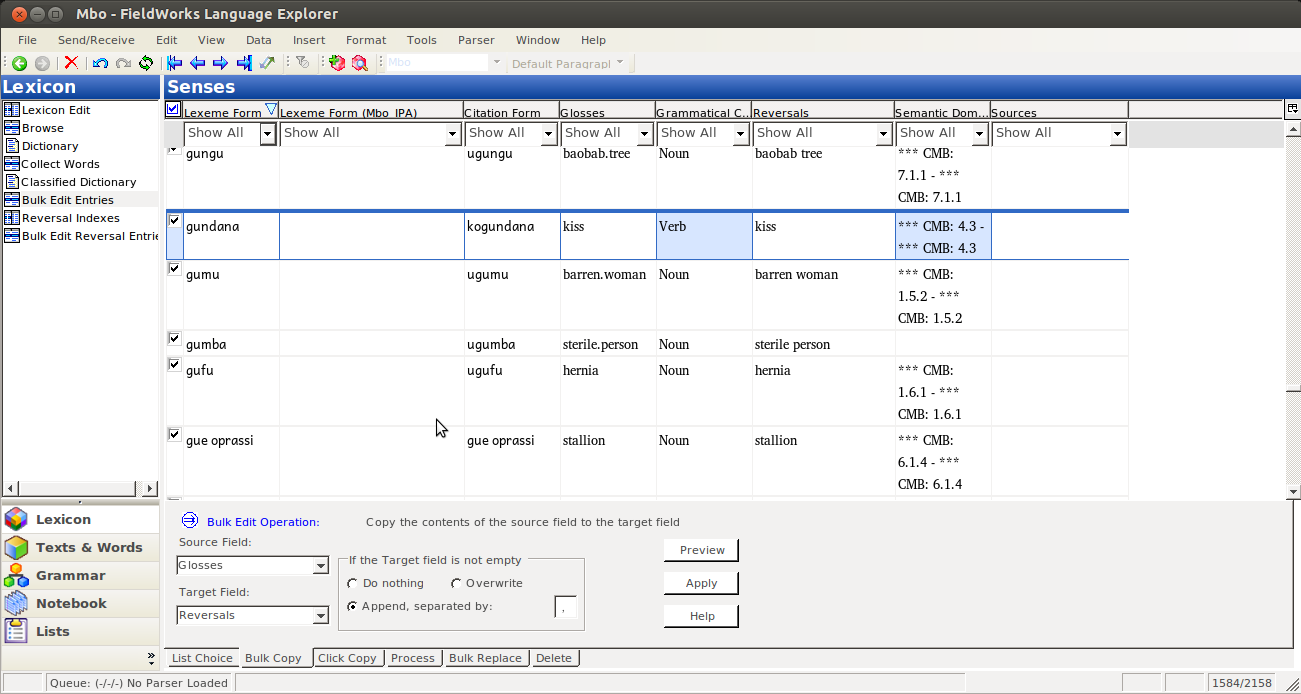
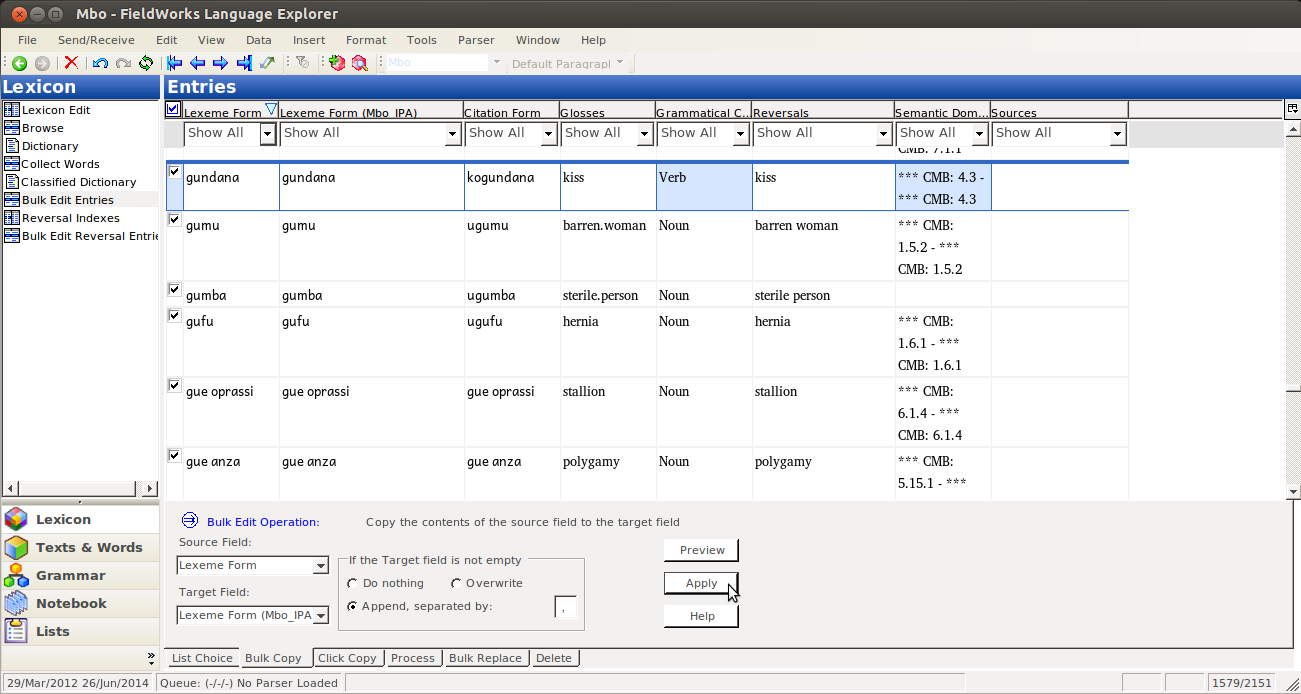
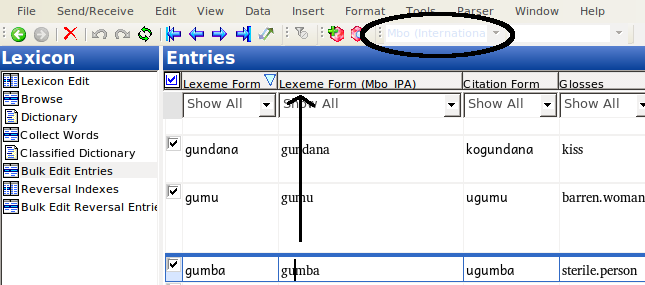
First off, I assume you have your two writing systems set up; I’m using Mbo and the IPA variant in these screenshots:
Go to the Lexicon pane:
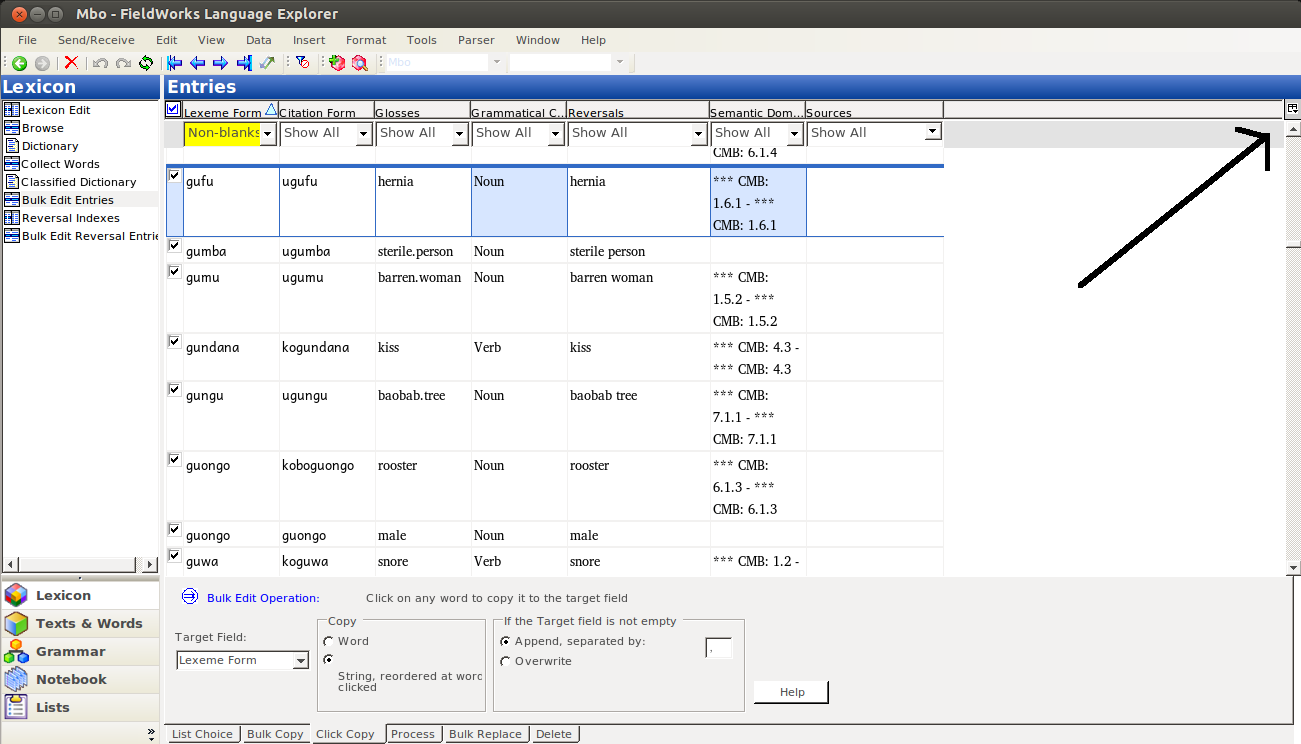
Then Select Bulk Edit Entries:
To be able to operate on both fields, you need to make them both visible. Click on the “Configure which columns to display” button:
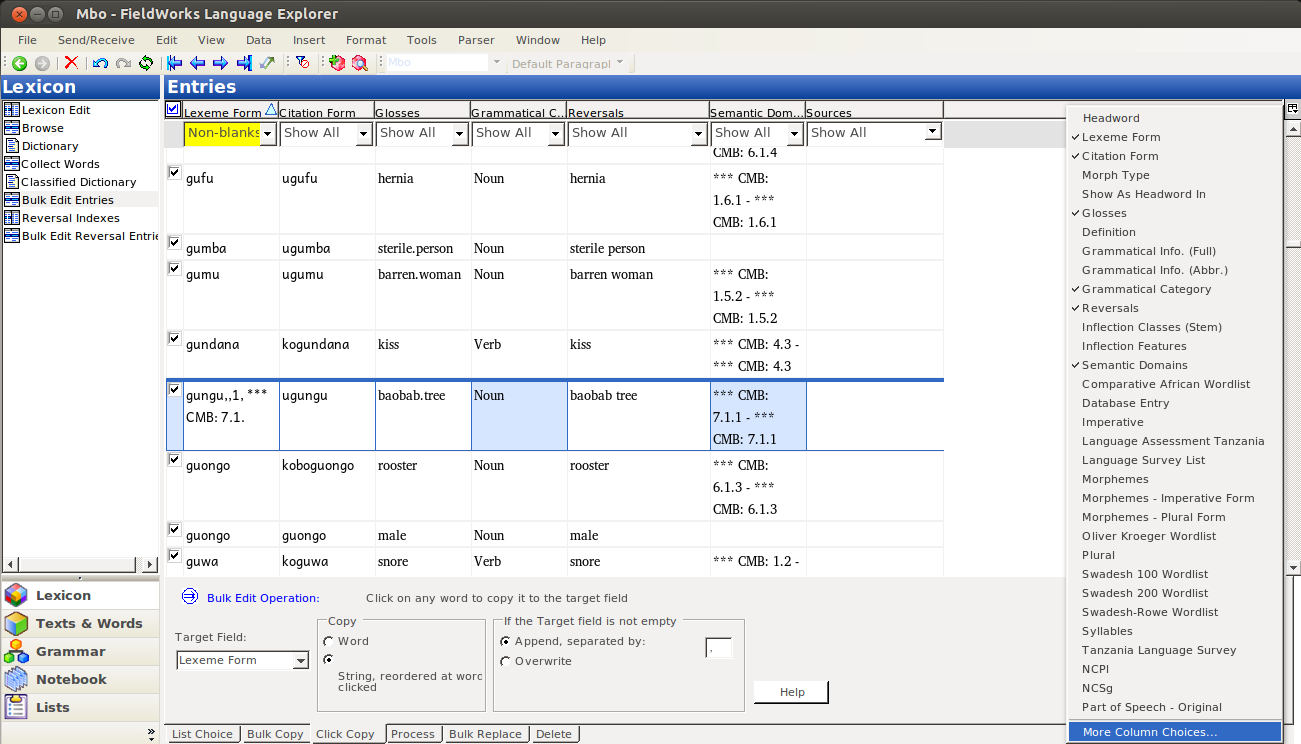
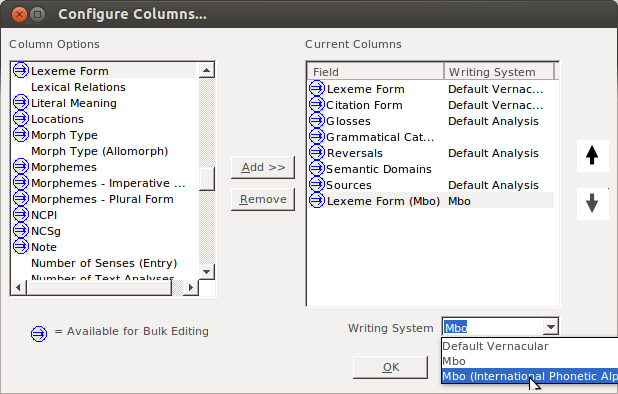
Then click on More Column Choices (unless your IPA field is in the list, in which case you just select it):
In the dialog that comes up, you selct the Lexeme form field (or whatever field you’re copying to). Yes, it is already on the right; we want to display the Lexeme form field twice, once in each of two writing systems:
Click Add:
Initially you will probably have the same writing system for each of the two fields:
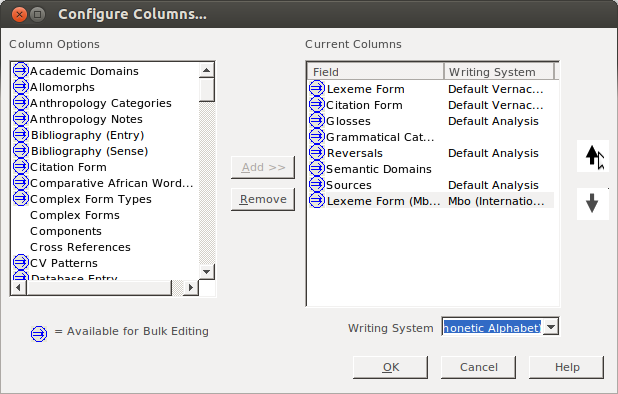
change one to the IPA variant:
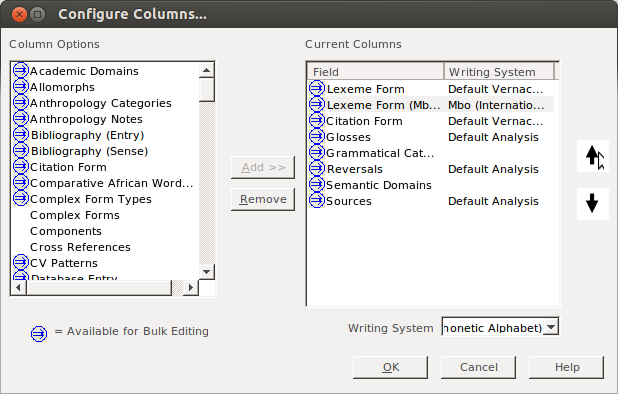
then I like to move that second field up, so it will display next to the other one. While the field is selected, click on the up arrow:
Then keep clicking until it is in place:
Now that you have everything situated, click on OK:
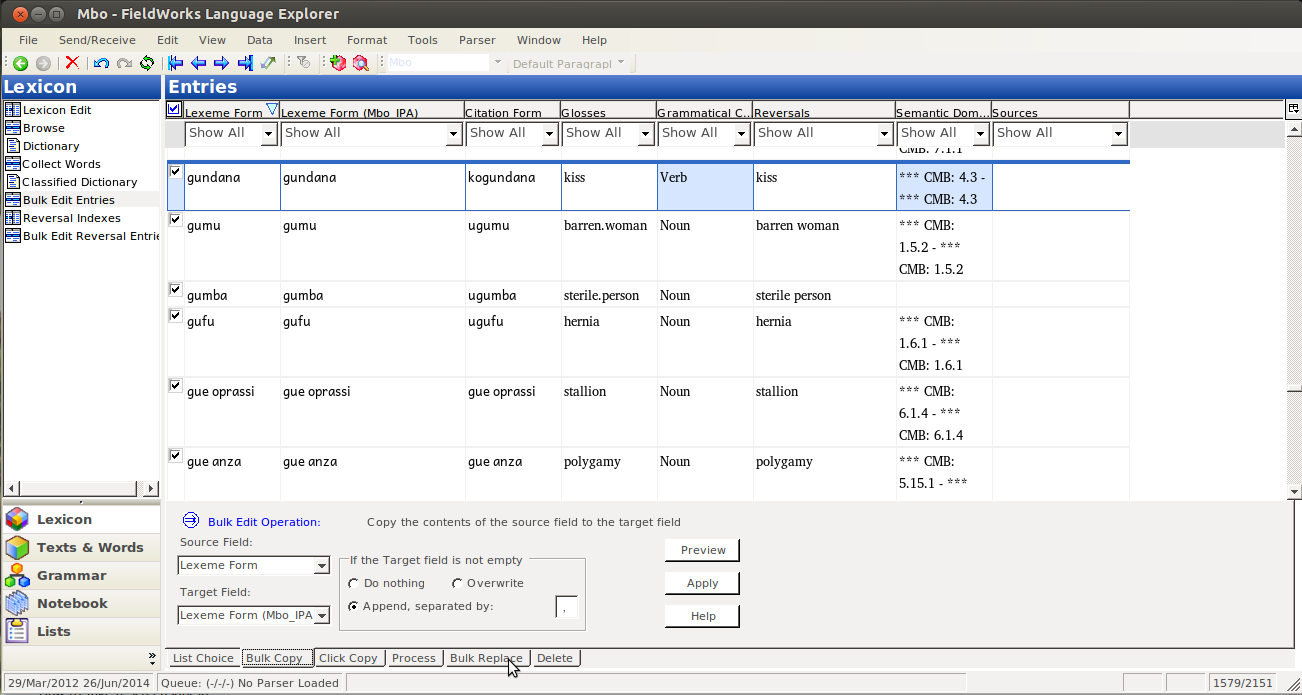
That should take you back to the bulk edit pane, where you should see your IPA field. Assuming you’re just starting to work in this field, it should be empty:
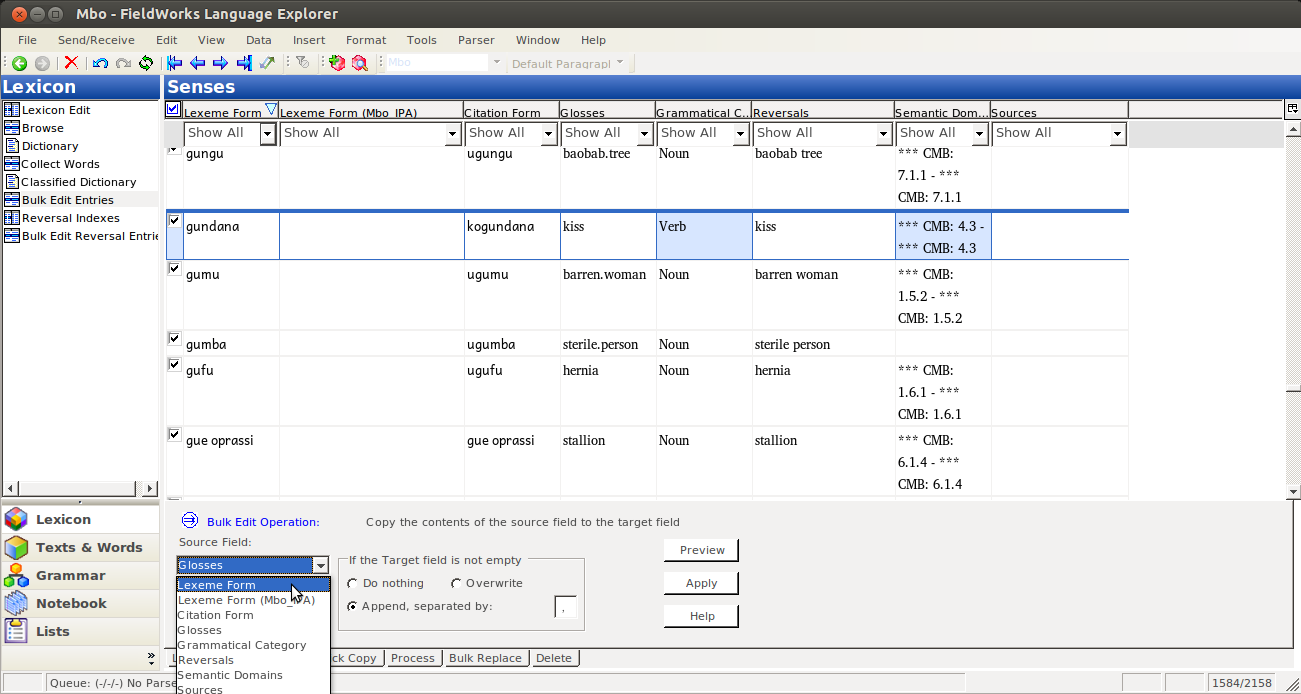
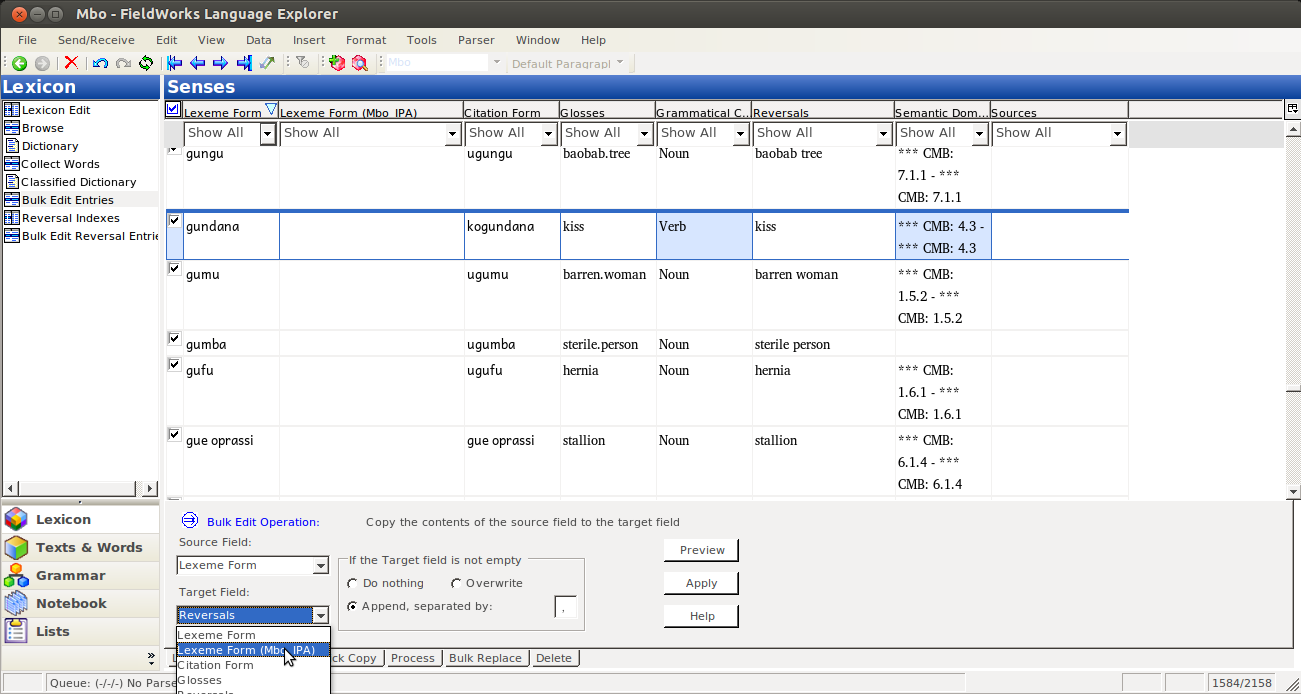
Then you Bulk edit, like normal, by selecting the Source Field (the one with data in it):
and the Target Field:
As always, you want to preview your bulk edit, to make sure it’s doing what you expect:
And you should see blue arrows going from nothing to data, which matches the field next to it:
If you don’t like what you see, just click clear, and fix whatever was wrong. But if you like it, click Apply:
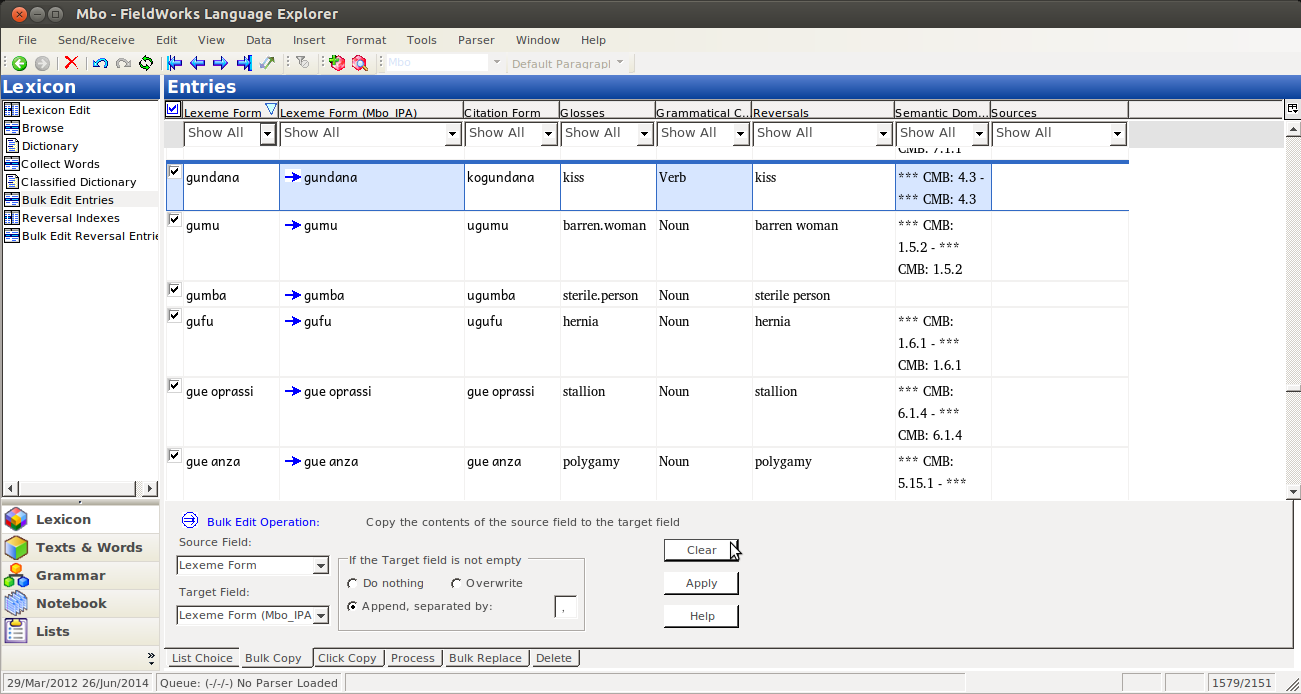
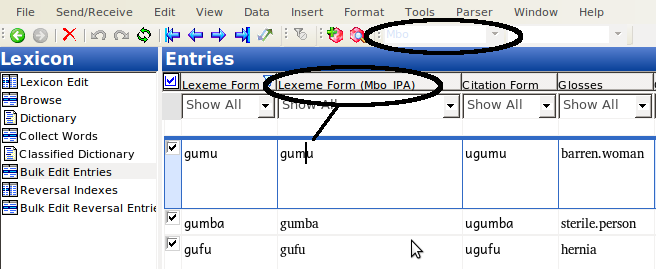
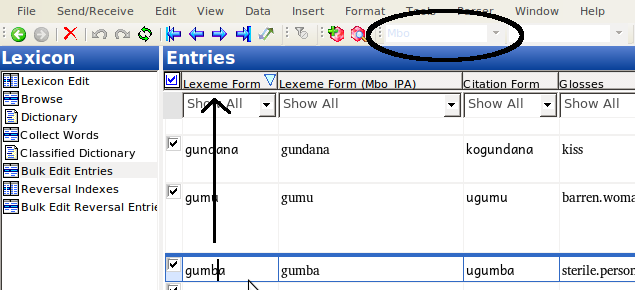
And then you’ll have both fields filled with the same data (and no more blue arrows):
But if you select data in the IPA field, the indicator above will show that the data is NOT in IPA, but still in the other writing system:
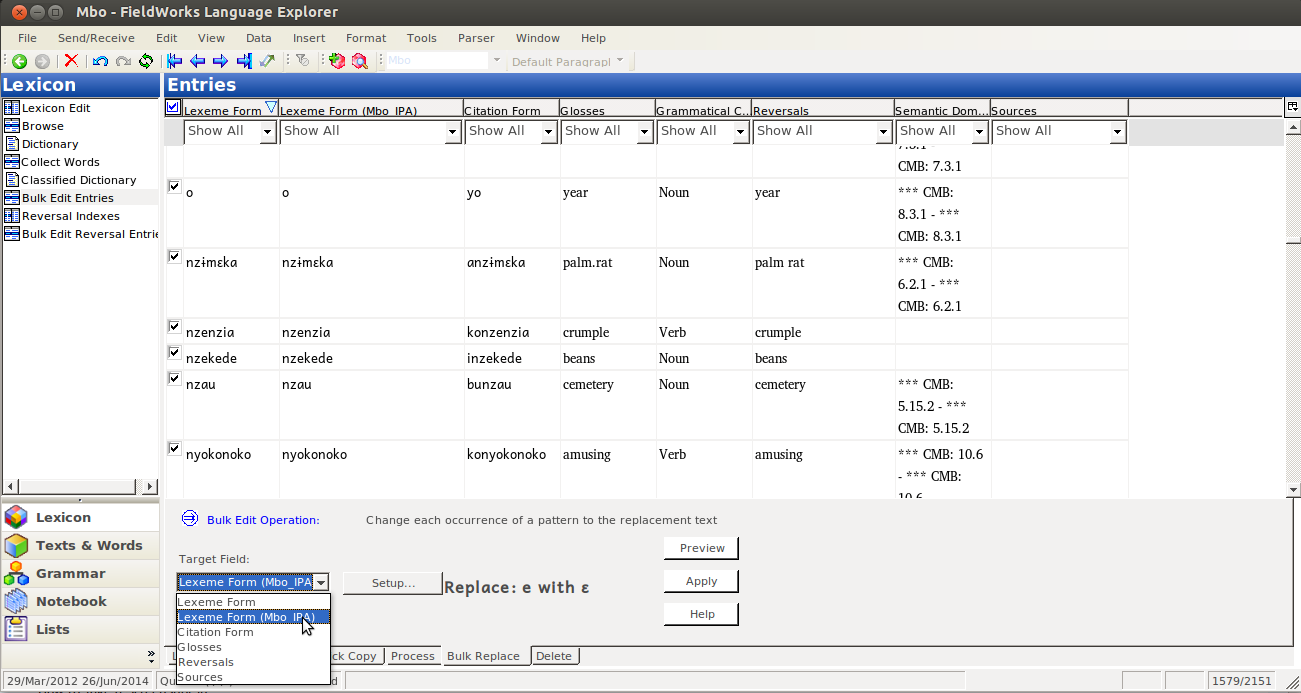
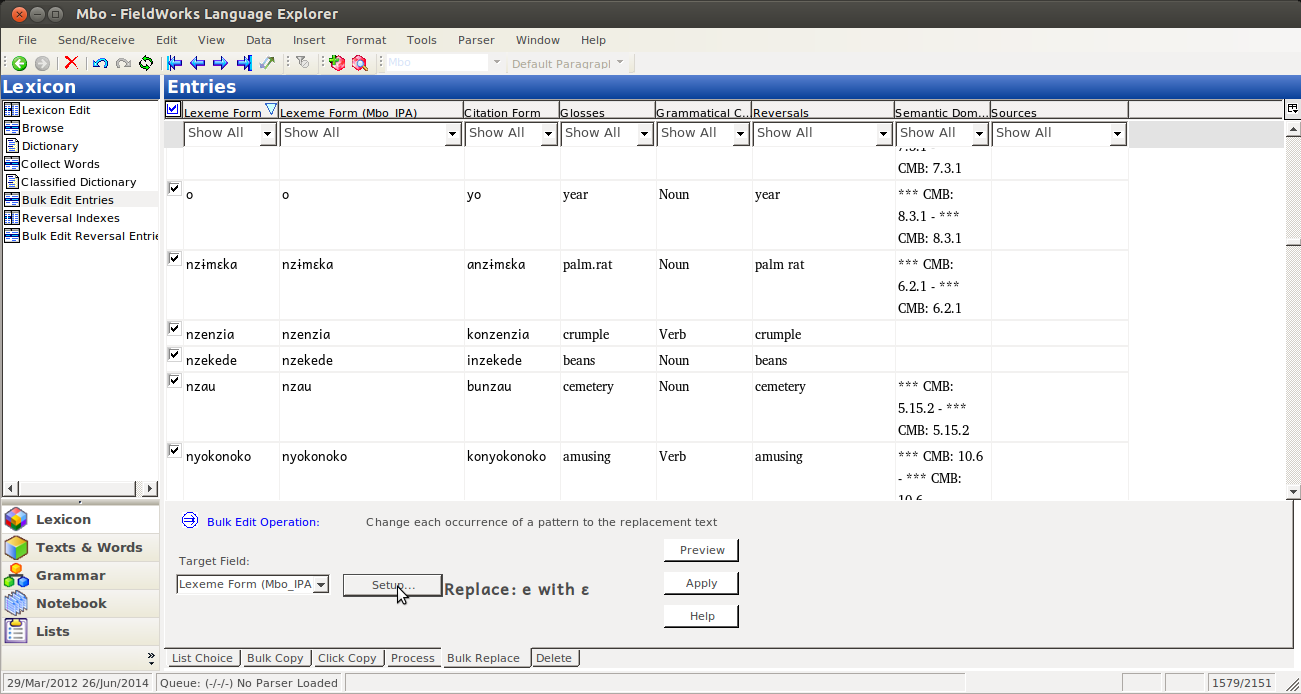
So this is the problem we need to fix. To do this, we’re going to Bulk Replace:
Select the target field (Just the one we want to change writing systems on, the IPA on in this case):
Then click on Setup…:
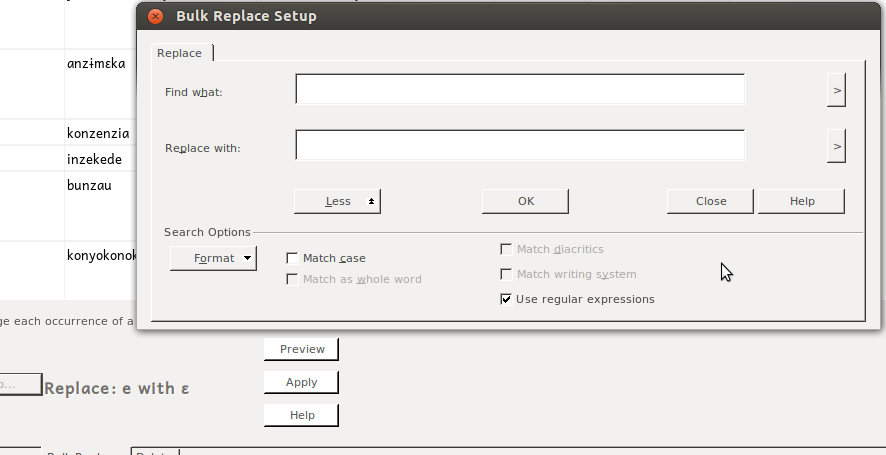
This will give you Bulk Replace Setup dialog:
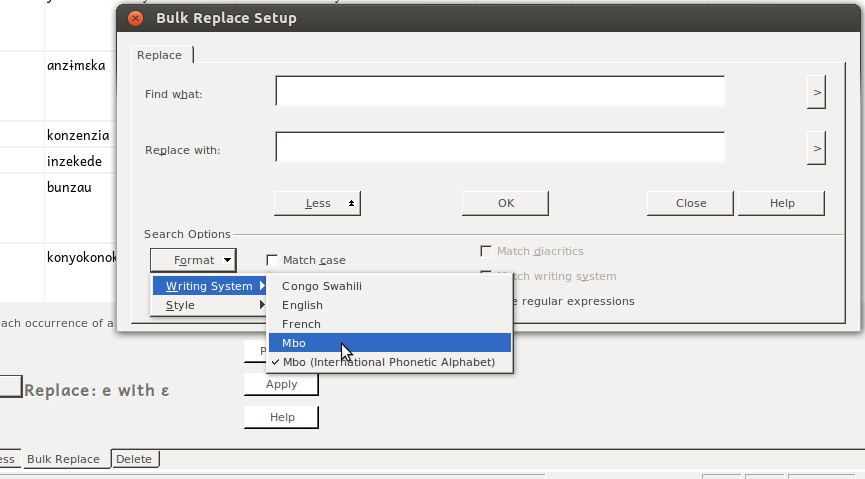
Where you can select in the “Find what:” box, then (click “more” if you have to, and) select Format/Writing System/xyz –whatever writing system you copied your data from:
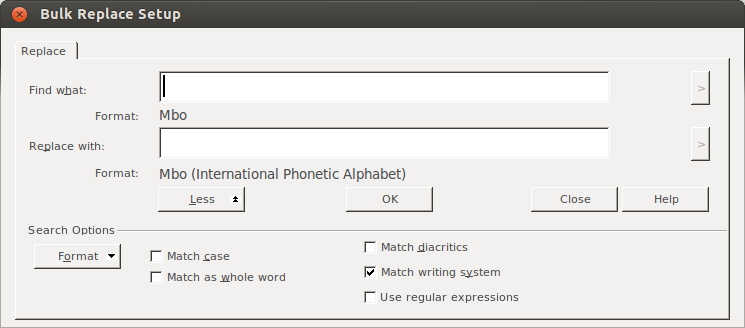
My experience is that at this point, FLEx will figure out what you’re trying to do, and set the other field for you. You can verify this by seeing “Format: <Writing system name>” under each field:
You don’t need to add anything to the empty fields in this box; you want to find everything. So you can just click OK. Unfortunately, I don’t see anything when I click “Preview” here, so we just trust that we’ve set it up correctly (you backed up your data before starting this, right? If not, stop and do it now.), and hit Apply.
Back in the bulk replace field, we can verify that the data in the IPA field is now indicated as IPA:
While the orthographic field is still in the orthographic writing system:
At this point, you can go through your IPA field and convert orthographic letters to IPA equivalents, either systematically through bulk replace (if appropriate) or manually. Then you can enjoy your dictionary database with both orthography and IPA in your entries!
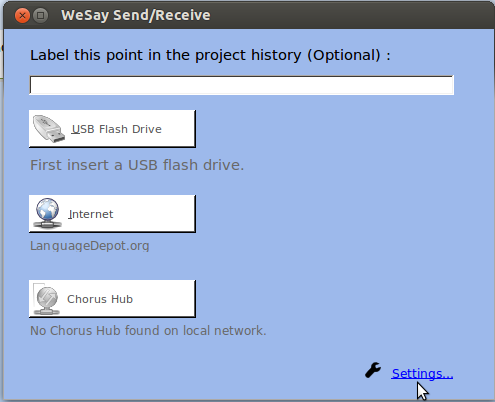
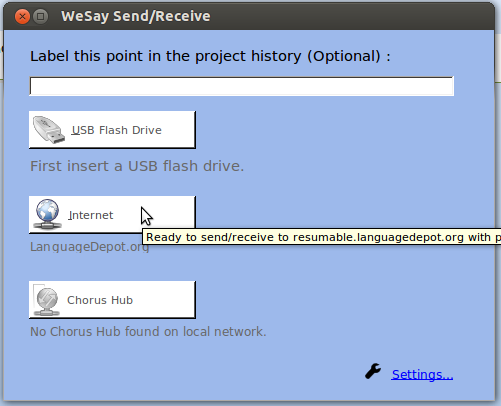
I’ve been very happy lately, being able to use WeSay on my Ubuntu Linux (Precise) computer for the first time in about two years. Among many other improvements (not the least are speed and stability, at least since 1.1) are the improvement of the way languagedepot.org synchronization is set up. If you aren’t using languagedepot.org to store your mercurial repositories of language data, you should check it out; especially in our potentially unstable environment, more copies (and some at a distance) is better for data survivability. You can get an account here. Once you have your account and the language data account set up (instructions on the site), you click on the lower right corner of the send/receive dialog box in WeSay (this is 1.5.x):
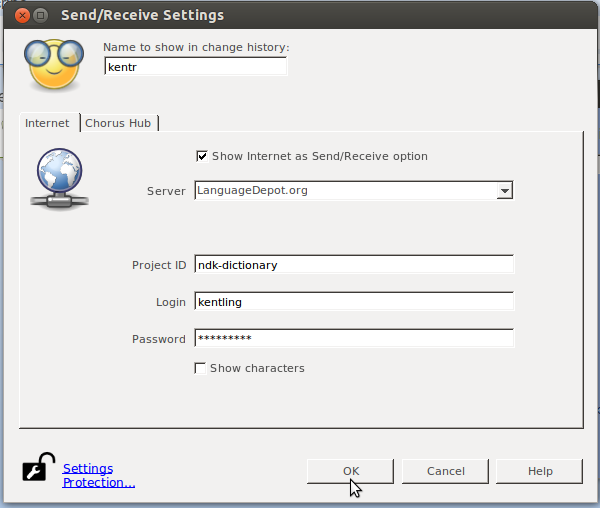
And you’ll get this dialog, where you can input the project name, your name and your password (leave languagedepot.org there, but there are other options, too):
That’s it. Once that’s set up, you can send/receive with this button, which should no longer be gray:
One note: the errors didn’t seem to be particularly informative to me, when I had my wrong username. So if you get an error, check your username and password to ld.org.
I just finished a trip to Bunia and Nia-Nia, DRC, where I helped the Ndaka [ndk] and Mbo [zmw] communities develop draft alphabet charts and transition primers, the material for each language including all nine vowels (with ATR harmony) and the egressive/implosive stops. The Mbo version also includes the [p]/[ɸ] contrast, as /p/ is normally [ɸ] there. Each booklet includes a short story in the new draft orthography.
I’ve written before about using WeSay to collect language data in highly illiterate language communities, which was a major part of this work. And since I don’t want to do IT work full time (or rather I have other things to do with my time), I’m using WeSay in BALSA. So since much of this work would not have been possible without the work of many people, especially those working on BALSA and WeSay, I wanted to take a minute to thank them. Without a budget to do so materially, I’ll do that through describing the work here, and explicitly saying that if you work on WeSay and/or BALSA, please feel free to take and use this story and/or pictures in your own publications; this is your story, too.
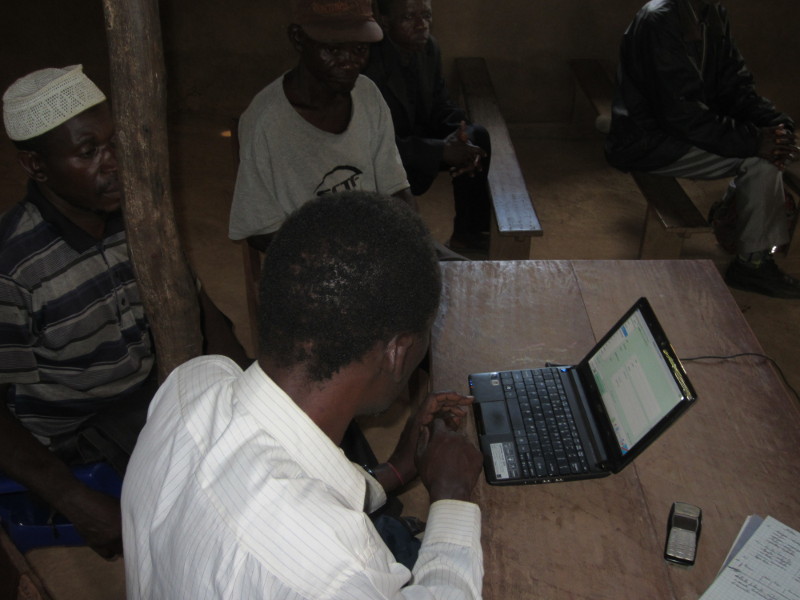
We met for this workshop in Nia-Nia, DRC, about an hour into the rainforest (by MAF) from Bunia, which is about an hour (again by MAF) from Entebbe, Uganda. We met in a church, with the Ndaka covering most of the workshop logistics, since this is their home turf. The Mbo are also a bit on the run these days from a militia conflict that hasn’t seemed to end yet. And they’re a smaller and more illiterate people group. So much so that one of the guys on the Mbo team didn’t participate in a dictation exercise, as we were practicing new letters. And yet, here they are, around a BALSA machine, using WeSay:
Admittedly, the guy touching the computer isn’t Mbo, but he’s helping them deal with the interface, and they’re choosing pictures through the Art of Reading interface in WeSay, which would seem to be even more popular with less literate communities.
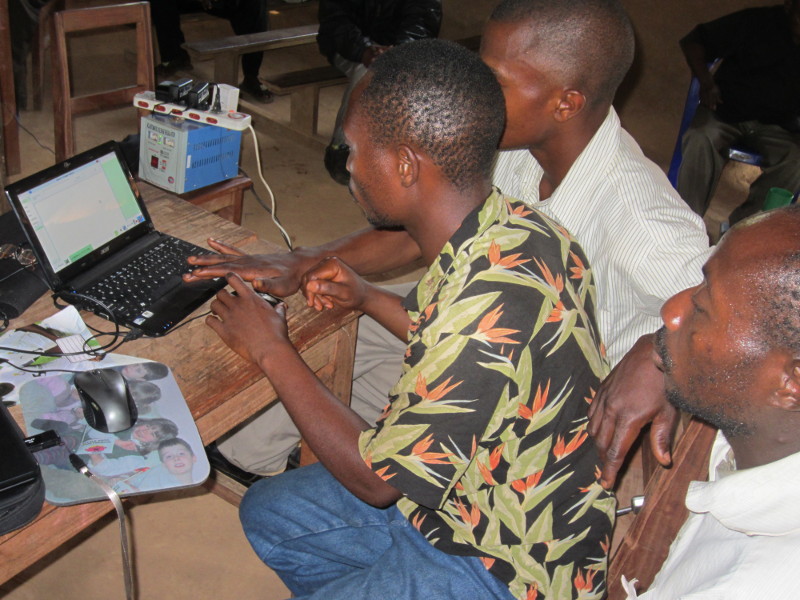
This one is of the Ndaka team, using WeSay in BALSA independently:
They’re also picking images to go with dictionary entries we put there earlier, though some people started modifying entries by the end of the workshop. Lest this seem trite, let me point out that this was the first time that ANY of them had used a computer of any kind. For some, it was the first time they had seen one. You can see in the background the current stabilizer, which is plugged into the generator we used to have electricity. Without the stabilizer, I wouldn’t plug in a computer, because of the risk of unstable current. After the stabilizer, we put a fridge guard. when I can, I put a second stabilizer in series, to even out what current irregularities the first one doesn’t catch. Which is all to say that this is not the most computer friendly place, even after the alternating dust and humidity, and the heat. But these guys took to the tasks, and were able to work somewhat independently on computers for the first time. Having tried this in similar contexts with other software, I attribute this success entirely to WeSay and BALSA. Thanks, guys, for making that possible.
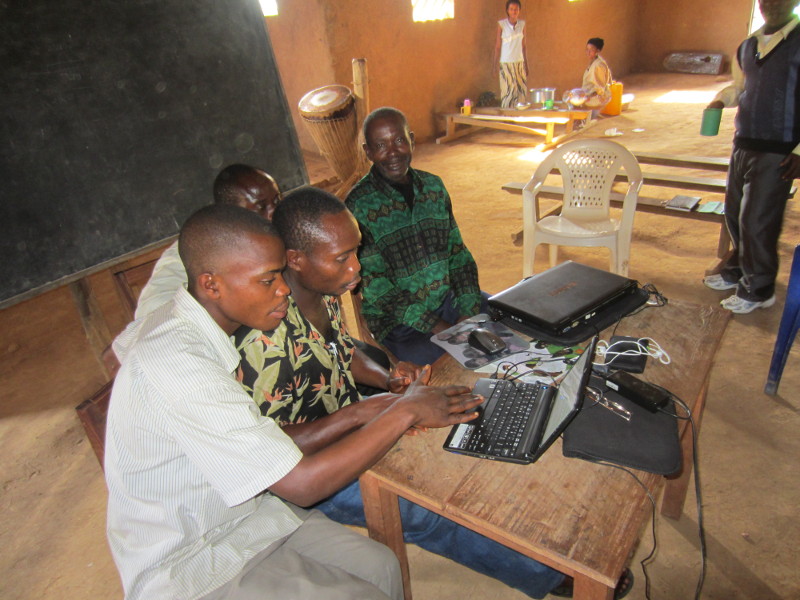
Here is the same team from another angle:
And here is one with other people hanging around, showing that this is truly a community affair:
So this workshop was a success in part because people who had never used computers before (including the elementary school principal, shown in the background of this last pic), were able to get up and running in very little time, with very few frustrations. They even enjoyed the work so much, I had to kick them out several evenings, after it was already too dark to walk home. So thanks to everyone involved, for your part in making this happen.
Here is the stylesheet that is used throughout the report generator. It takes LIFT entries (already filtered and sorted), and makes them into XLingpaper examples. There is a lot of information stored in an externalID attribute, so that they LIFT entries can be rebuilt again later. ampamp