I recently finished a series of presentations, each of which required me to prepare notes and a handout and/or slides. I figured out a workflow that made things a bit more streamlined than I’d been doing it, so I thought it worth documenting here.
Why do it
First of all, I’m sold on the use of XML standards, like XLingPaper, an XML standard for writing linguistic documents. One of the main reasons is because it just makes sense, if you’re re-purposing a document, to not start it from scratch each time (Simons and Black 2009 and Black 2009). For instance, the three presentations I gave last month were all on the same language, and a bit of the content was common to all, even if the focus (and audience) was radically different for each. So rather than starting each from scratch, I modified one presentation to make the next, and used copy and paste liberally. I think most of us would do this, because it just makes economical sense. But what about applying the same principle across notes, slides, and a handout, for the same presentation?
Each of my presentations required me to have notes to speak from, which were related to the slides I used, and the handout (for the academic talks). Why should I make three different documents in three different programs, when I can accomplish all three in one? Especially if I can use the same source document for all three, so I don’t have to update three separate documents when I need to make a change?
How to do it: Content Types
I accomplished this by writing my presentation in XLingPaper, through the XMLMind XML Editor (XXE), the recommended editor for XLingPaper. The basic mechanism to organize the different outputs was Content Control, which is described here in the XLingPaper documentation. Rather than repeat that information here, I’ll just describe how I used the system.
The circled section of this screenshot shows my content types (under content control, after the back matter):
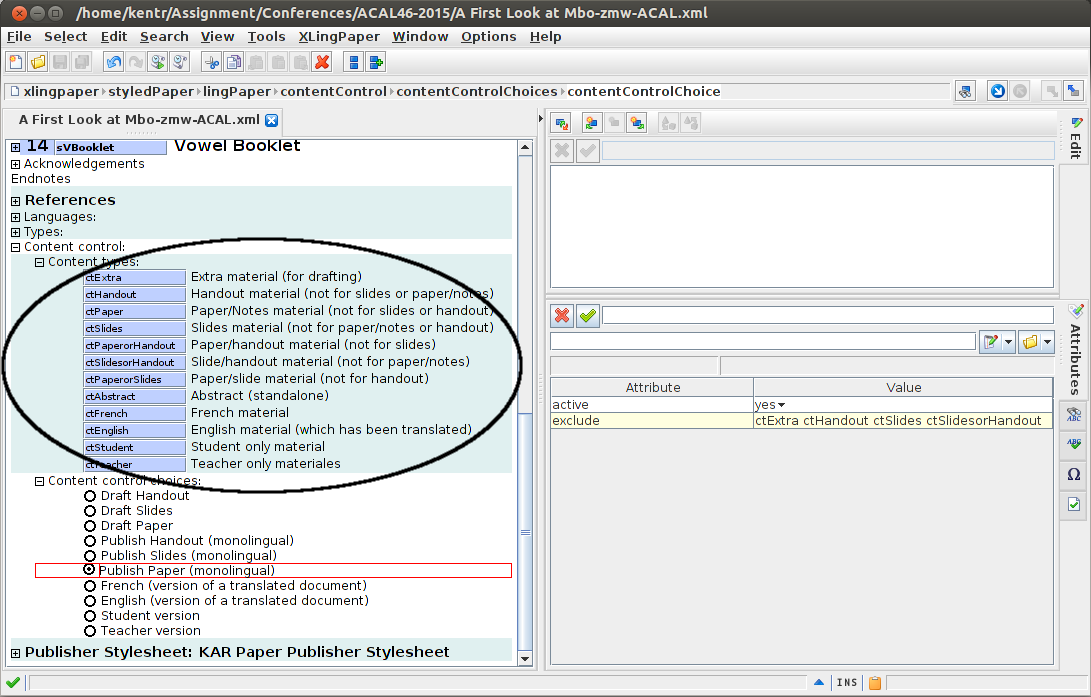
You can see that I have a content type for each of handouts, slides, and paper/notes, as well as one for each combination of the two (and a few others). This allows me to quickly mark a portion of the paper as belonging to just one of the three products, or else to two of them, but not the third (like if I want something in the handout and my notes, but not on a slide, or else in my notes and the slides, but not on a handout). Once this is set up, as I’m editing my paper, I can mark a paragraph, list, section, etc. as belonging to the appropriate output, and know it will only show there. So if I have a full table of data to put in the handout, but I don’t want all that data in a slide, I can make two different copies of that table, and label the one for the handout and paper, and the other for the slides. As I make any updates to the table, I can easily cut and paste between them, since they’re adjacent in the source document. I haven’t so far had much trouble keeping track of which copy goes for which product (this may be a bit of an issue, since it isn’t obvious in the UI), but one could easily put a comment (which would be highlighted in the UI, but not show in any output) in one or both copies to remind yourself which is which.
How to do it: Content Control Choices
Once I have my content (at least provisionally) set up as belonging to one output or another (or not marked, if I want it in all outputs), it makes sense to test it out by selecting an output, here:
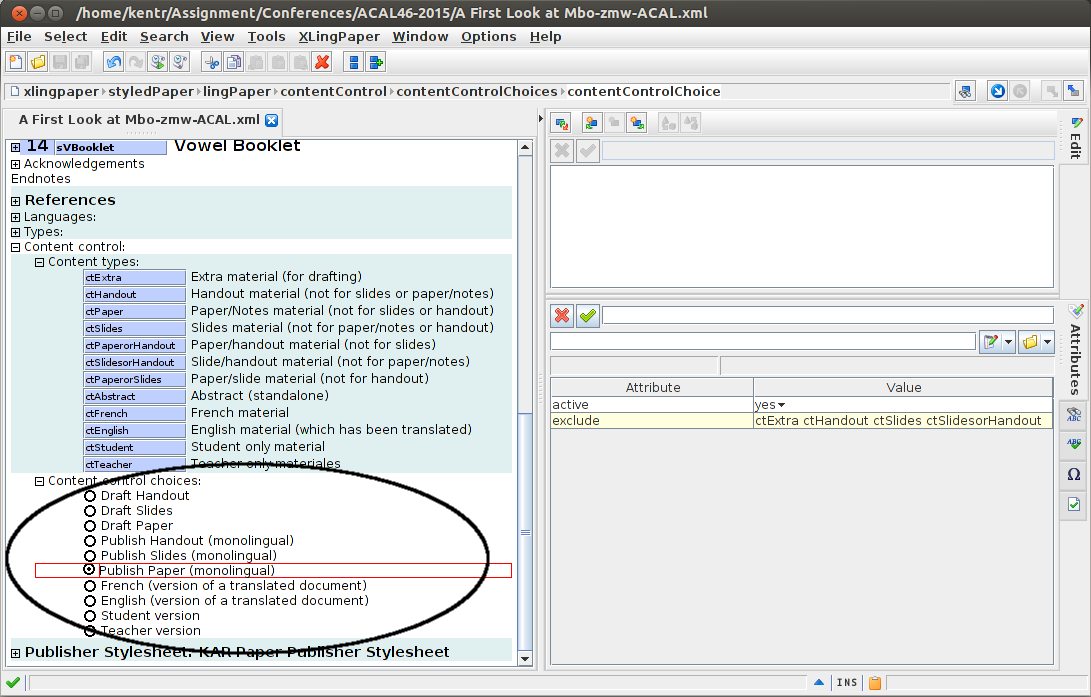
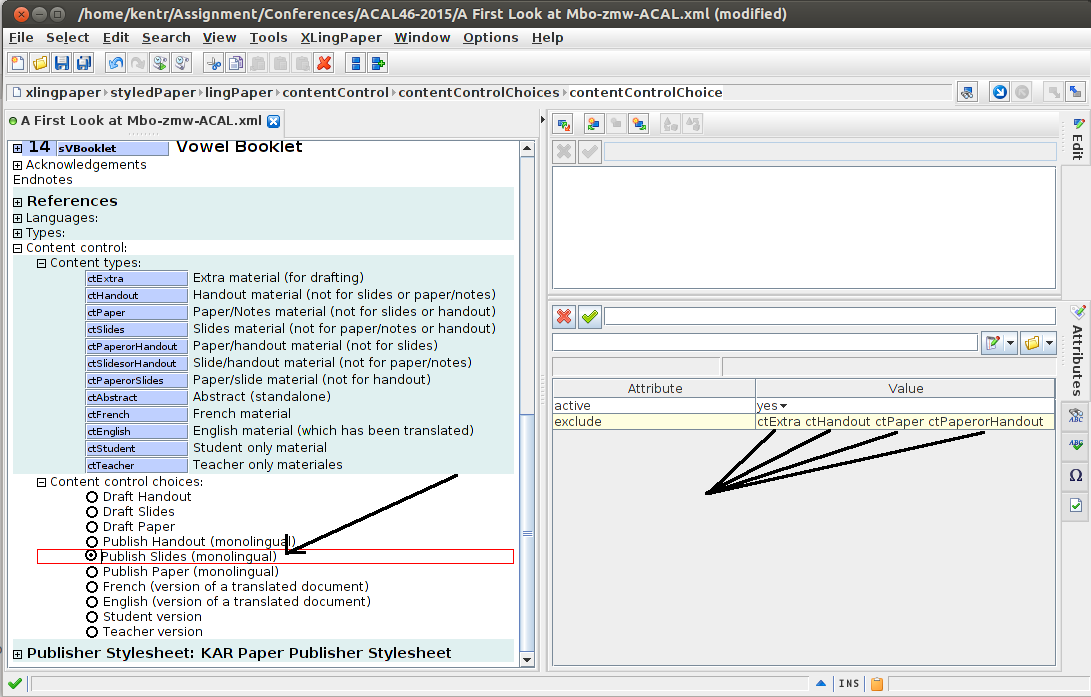
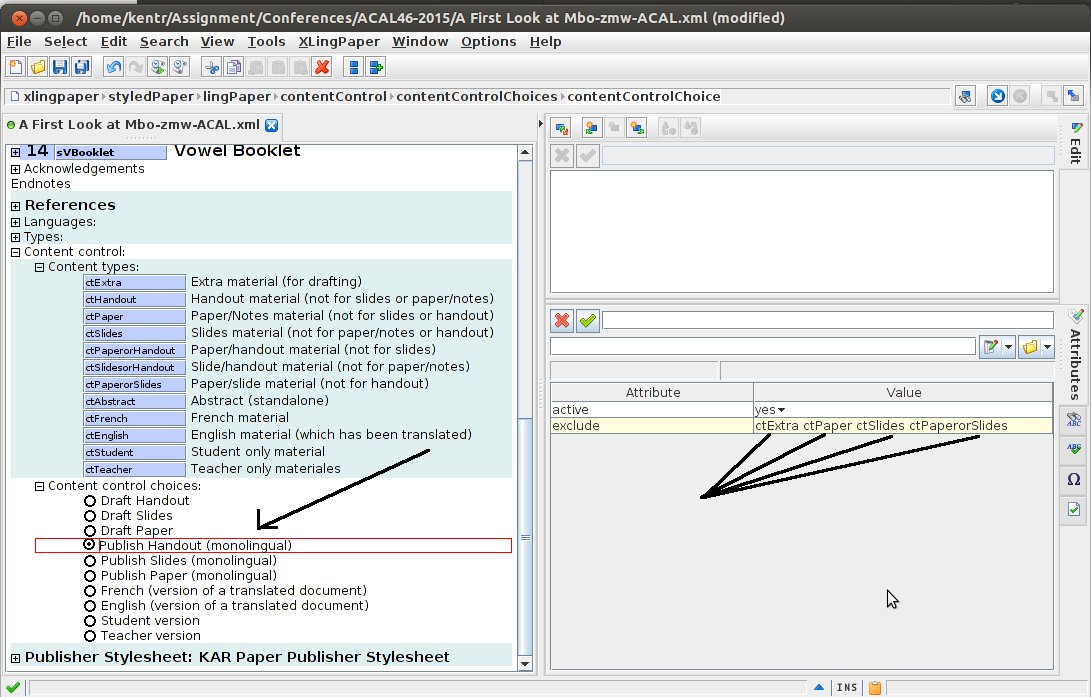
I’ve set up these content control choices to give me quick access to what I want showing in each of slides, handout, and paper, etc. For this selection, you see the following exclusions:
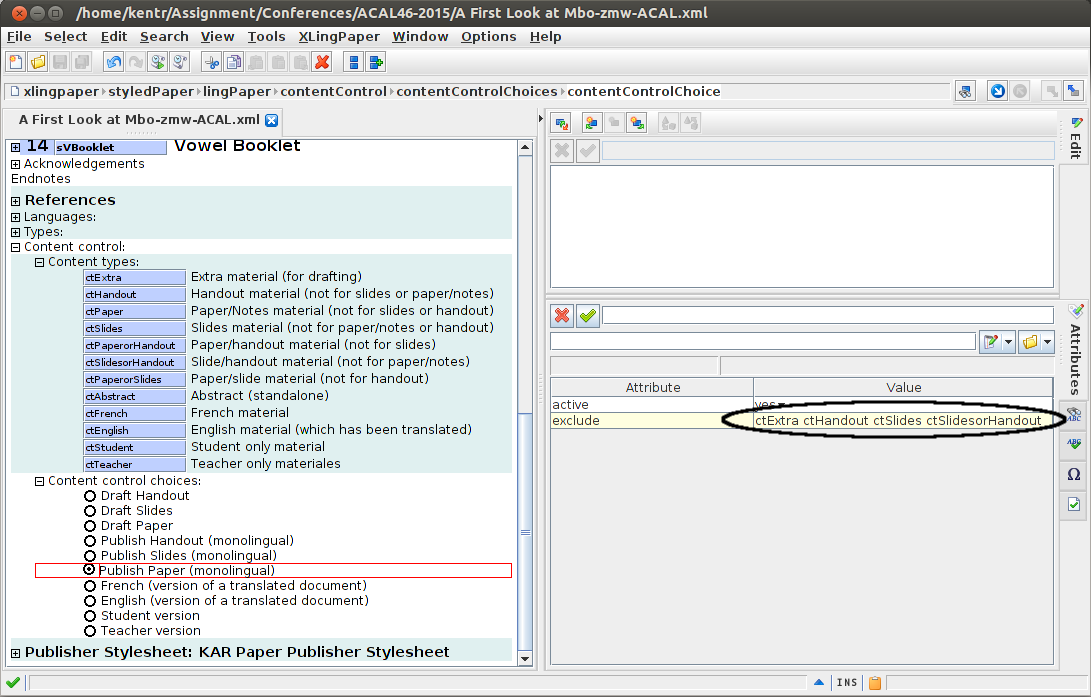
That is, when “publish paper (monolingual)” is selected, it excludes pieces of the document labeled as extra, handout, slides, or SlidesorHandout:
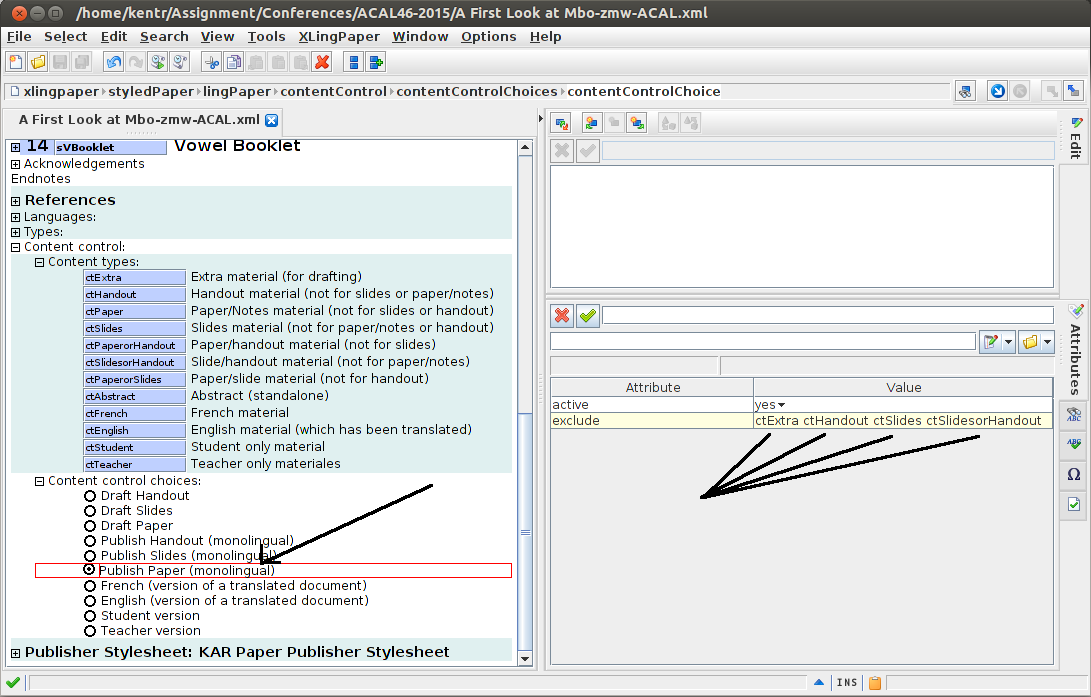
Alternatively, when Publish Slides (Monolingual) is selected, it excludes pieces of the document labeled as extra, handout, paper, or PaperorHandout:
And finally, when Publish Handout (Monolingual) is selected, it excludes pieces of the document labeled as extra, paper, slides, or PaperorSlides:
To be clear, this is just the way I’ve set up my documents, for my own convenience. I decided initially to have a ctExtra type, though I don’t really use it much. Additionally, I haven’t done many bilingual or student/teacher versioned documents since I started using content control (though there were some times when it would have been handy). Other categories may be relevant for you, both for tagging sections of your document, and for selecting them in content control choices.
Setting up a template
Regarding this setup, I wouldn’t want to organize all this for each paper I wrote, which is why I’ve made these options a part of my modular paper template. So just like I have the same (longer and longer) references section referenced in each paper, I now have the same content options available in each paper (which costs me nothing if I don’t use them…). But this was a bit tricky to set up, since we want the options to be universal across documents, but not the selection itself. So as you can see in the above screenshots, the Content Control section has a white background, since it is part of the document (since I want my content control choice to impact a particular document), but the content types node has a colored background, as it is in a referenced document (since I want a change to that section to impact all documents). This does mean that if I develop new content control choices, I would need to copy them into old documents where I wanted to use them, but I think that’s a worthwhile (and small) cost. You might see this as an unprincipled decision (and maybe it is); you’re more than welcome to organize your docs in a way that makes sense to you.
Outputting slides
One last point about this setup deals with the output formatting. My notes and the handout are both output to US letter, but you can set whatever you need in your stylesheet (e.g. A4), and assuming its the same, you can use the same stylesheet for both. But what about slides? I’ve tried showing letter-sized PDF’s in a slideshow before, and it is ugly. So what I did this time was set up a new stylesheet, that gives me 4″x6″ pages:
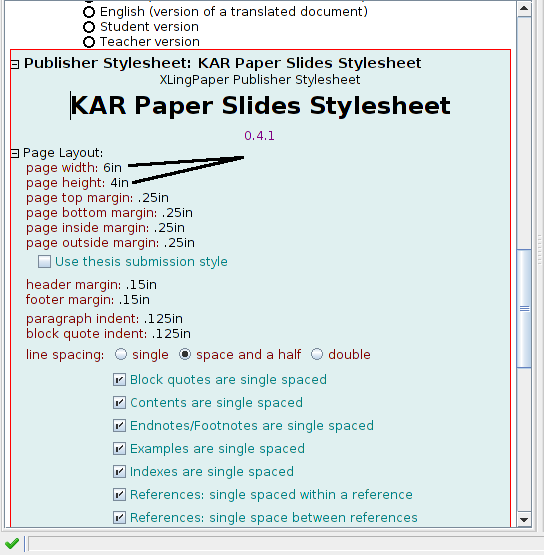
You may find a better solution for your material, but the important part is to get the aspect ratio right (assuming you know what your projector’s aspect ratio is). Additionally, I found this size to work nicely in terms of getting only so much information on a slide. If you did 8×12, you’d have much more information on each page, which you probably don’t want for your slides — or maybe you do. In any case, there will probably be some fiddling to find the right mix of size and aspect to get the right content on your slides. I also found that if my images were smaller in my paper, they came out just right on the slides, but that if I had full page width images, they would spill over the edge of the slides — again figure out what works for you; I could see using two different images with different sizes and content types, but I just made them smaller and used the same images for each.
Setting Stylesheets
One final bit of trouble is the fact that there is no method (currently) for associating a stylesheet with a content type. That is, if you set XXE to output a handout, but you have the slides stylesheet applied, you’ll get really big words on weirdly shaped paper for your handout PDF. Alternatively, if you set it to output to slides, but don’t have the slides stylesheet attached, you’ll get your slides material in a letter sized PDF. So that’s just something to watch out for. But the good thing is that once you set up your source document, making changes like which output to make, and which stylesheet to apply, are rather simple.
Conclusion
Over all, I was very happy with this application of the XLingPaper XML specification, in that it reduced duplication of my work, kept multiple versions of a single document in one place, and reduced my overhead in terms of the number of files I was managing, while producing each of the three files I needed to do each of my presentations. Just another reminder of why I’m editing my documents in XML (Black 2009).
One thought on “Writing Presentations in XLingPaper”